How to change an Ost File Name in any version of outlook?
Are you trying to figure out how to rename an OST file? Or would you like to know why renaming an OST file could be required? In this article, we will address a number of variables and situations. You will also gain additional knowledge about the OST file and its applications.
What is an Outlook OST file?
Users of Outlook are aware that an OST file, which is produced when Cached Exchange Mode is enabled, is a local copy of their Outlook mailbox. Offline Storage Table, or OST, enables users to read, write, and open emails even when they are not connected to the internet. The OST file immediately synchronises with the Exchange Server, Microsoft 365, or IMAP account when the user reconnects.
While OST files provide constant mailbox data synchronisation with the server, Outlook also uses PST files to store data locally without server synchronisation.
When is it necessary to rename an OST file?
There are other reasons to rename an OST file beyond re-syncing data. Renaming the OST file can also be useful in a number of other circumstances, including:
- The Outlook profile won’t load.
- Even when you are online, the OST file is not synchronising with the server.
- The OST file is damaged or corrupted.
- Outlook displays the “Disconnected” state.
- Outlook operates slowly.
- One Outlook profile is associated with several OST files.
You can rename the OST file and let Outlook download a fresh copy from the server if you run into any of these problems. This procedure frequently aids in fixing synchronisation issues and local faults.
Is it safe to rename the OST file?
Yes, unless your mailbox is accessible on the server (Exchange, Microsoft 365, or IMAP), it is completely protected. Outlook will just build a new OST file the next time you access it since all of your mailbox data is stored on the server.
Note: Because it doesn’t resync with the server, this doesn’t work with POP accounts.
Step1: shut down Outlook.
First, shut off Microsoft Outlook entirely, even if it’s operating in the background.
Step 2: Locate the OST file
Location of the OST file (by default)
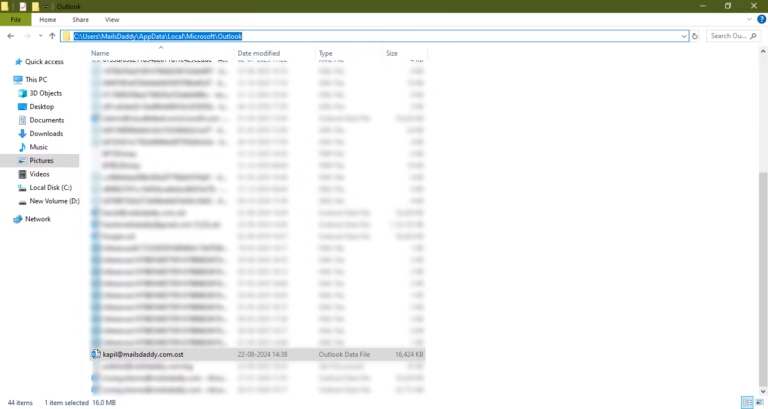
Additionally, you can open “appdata” directly by using the “Run” command.
Note: Enable hidden items if you are manually browsing and the AppData folder is not visible.
Step 3: Select the appropriate OST file
This is the most common step in selecting the right OST file. Select the appropriate account or profile if you have several. You can use account settings to examine the location of Outlook data files for that.
Step 4: Rename the OST file
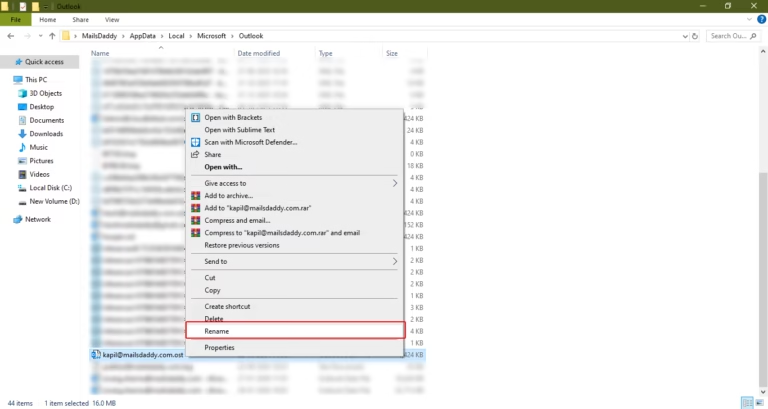
After locating the file, right-click on it and choose Rename.
Example : user_address.ost, to user_address_backup.ost
Step 5: Give Outlook a restart
Now open Outlook to resync all of your inbox items and build a new OST file.
Conclusion
Unless there is a problem, renaming the OST file is not necessary. Users can create a new OST file from the server by following this step-by-step instructions. Use caution while following these instructions with a POP3 account, as this could lead to data loss. Before starting the renaming process, it is also advised to make a backup or export the OST file to a PST file.
FAQs
Q: Before renaming the OST file, is it necessary to close Outlook?
Ans: Outlook locks the OST file while it is operating, thus it is necessary to close it before proceeding.
Q: Does the OST file need to be backed up?
Ans: The content mentioned above is derived from Microsoft guidelines. But at GoldyTools, we suggest that users backup their OST files by converting them to a PST file, particularly if they contain really valuable data.
Q: What is the anticipated time frame for rebuilding the OST file?
Ans: Technically speaking, this is incorrect because the procedure is heavily influenced by the size of the mailbox and the speed of the internet.
Q: What distinguishes removing an OST file from renaming it?
Ans: While deleting the file permanently erases the data, renaming the OST file keeps it safe as a backup.

