All posts by admin

What to do if Exchange EDB file too Big?

Microsoft Exchange Server employs Exchange Database (EDB) files to store information in a user’s mailbox. At some point, these files grow big enough to slow down and even corrupt the system. It is important to get acquainted with the reasons why EDB files can become oversized and to know the corresponding measures to address this issue, as server efficiency depends on it.

Why Does the Exchange EDB File Become Too Large?

Several factors can contribute to the excessive growth of EDB files:

  • Accumulation of Deleted Items: Whenever users try to delete emails or other items in their mailbox, they are automatically relocated to the “Deleted Items” folder. If not purged from time to time, this folder can become very large, thus increasing the size of the EDB file.
  • Mailbox Bloat: Attachments, big picture, and extended records of emails without archiving are some other causes that can lead to the fast growth of mailboxes.
  • Public Folder Growth: This is because folders that are available to multiple users for data storage can fill up very fast, especially when not supervised.
  • Lack of Maintenance: Other routine activities include system defragmentation, database clearing, etc. Overlooking these leads to more data that is not required to be stored in the EDB file.

How to Fix an Oversized Exchange EDB File

Here are the methods to repair the Exchange mailbox:

Method 1: Reduce the Size Using ESEUTIL

ESEUTIL is one of the Exchange Server utilities developed by Microsoft to work with the Exchange Server database. You can also utilize this tool for offline defragmentation to determine the amount of free space in EDB files.

Steps to Perform:

  • Get-MailboxDatabase -status | Select Name, AvailableNewMailboxSpace
  • MailboxDatabase

    Dismount the Exchange database to make it accessible for defragmentation:

  • Dismount-Database .
  • Dismount-Database

    Run the defragmentation command:

  • Eseutil /d “” /t “.”
  • Defragmentation

    Remount the database after the process completes:

  • Mount-Database .
  • Mount-Database

    Check the outcomes and make sure the database size has been cut down.

Method 2:Reduce File Size via Exchange Management Console

The Exchange Management Console allows the EMB files to be relocated from their default location, minimizing their size.

Steps to Perform:

  • Open Exchange Management Console.
  • Right-click the mailbox database that you want to reduce, and select the move database path option.
  • Database Management Console

  • You can type a new path for the database and log files in the dialog box.
  • Move database path

  • Do click on “Move” and when the secondary database operation returns the message that the database must be temporarily dismounted, confirm the same.
  • After a move operation is performed, check the results and, if necessary, remount the database.
  • Move database path

    Tip: This method can be very useful when the server is low on disk space and files need to be moved quickly.

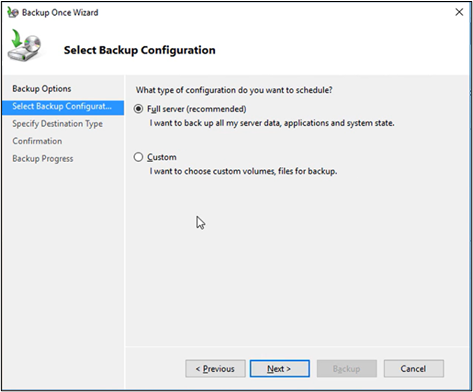
    Method 3: Archive Mailbox Data

    Archiving is a process of reducing the main EDB file size by copying older or less frequently accessed mailbox items to an archive database.
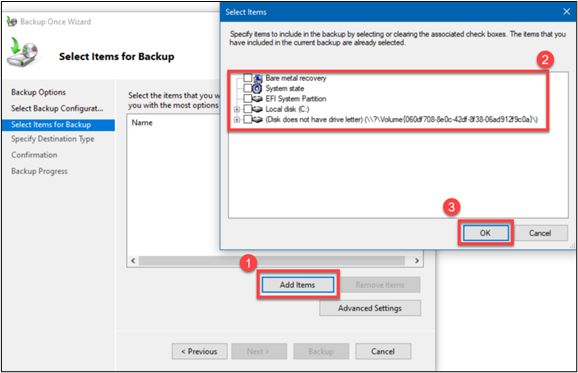
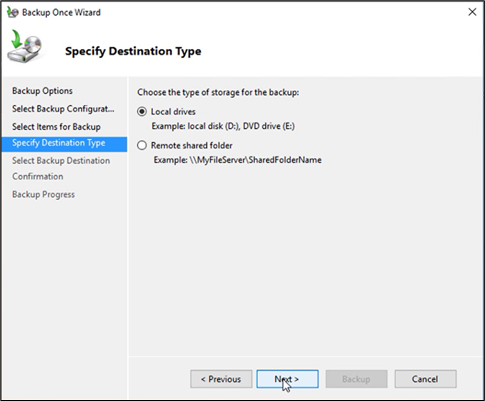
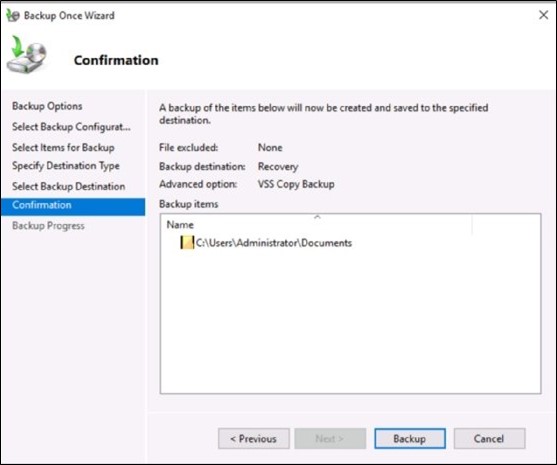
    Steps to Perform:

    • Users can create archive mailboxes through the Exchange Admin Center or by command prompt in PowerShell.
    • This means that only settings should be made regarding the movement of old data to the archive through retention policies.
    • Check the performance of the archive database from time to time to prevent it from becoming clustered and, hence, slow.

    Benefits: This method has the advantage of not only decreasing the size of the EDB file but also optimizing user’s access time by reducing their dependence on the primary database

    Method 4: Implement Mailbox Quotas

    Limiting mailbox sizes assists users in dealing with their data properly and avoids the outgrowth of EDB files. You can recover corrupted EDB files by using the following method:

    Steps to Perform:

    • Start the Exchange Management Shell.
    • Use the Set-MailboxDatabase cmdlet to configure default mailbox quotas:
    • Use the following commands to adjust the warning limit and sending limit of the selected mailbox database:
      • Set-MailboxDatabase -IssueWarningQuota -ProhibitSendQuota .
    • Inform users of these limits and offer them directions on how to manage data.
    • Ensure quotas are reviewed often and more especially when the organization requires it.

    5. Use Goldytools EDB to PST Converter Software

    Nonetheless, the manual approaches are also possible, but they require much time, are rather complicated, and involve certain dangers connected with data loss. There is an effective solution available in the market, which is none other than Goldytools EDB to PST Converter. It makes the process of EDB file size optimization easier and includes such options as direct EDB to PST conversion, the capability to work with large databases and selective migration. It helps maintain the efficacy and accuracy of the data and also proves to be a great time saver, making it the best tool for handling oversized Exchange EDB files in the most optimized way possible

    Conclusion

    The Exchange server’s performance deteriorates when EDB files are enormously huge, and this is very dangerous for data loss and server unavailability. The management of file size involves the use of preventive measures like cleaning the deleted items, putting in place quotas, and archiving data. At times when manual solutions cannot be implemented or are time-consuming, third-party tools like Goldytools EDB to PST Converter make it easier to handle large EDB files with ease.

How to Fix Error 0x800ccc0e in Outlook

If you are getting error 0X800CCC0E in Microsoft Outlook and looking for a solution to resolve it, then this blog will be of great help. In this blog, we will learn about various reasons for error 0X800CCC0E in MS Outlook and the manual methods to fix this error. There are situations when an individual configures an email account in MS Outlook and may encounter error 0X800CCC0E while attempting to send an email.

Outlook send/receive progress

Outlook send/receive progress

  • When sending an email, Outlook does not authenticate your Account on the server, and the Outlook mail server rejects the email message.
  • Duplicate accounts.
  • Conflict between SMTP servers while using an email program or when users try to send emails during account configuration.
  • Antivirus Settings restrictions
  • Features blocked due to Firewall.
  • Faulty and corrupted add-ins or files
  • Unwanted or suspicious emails

Manual methods to fix error 0X800CCC0E in Outlook

Configuring your Email account in MS Outlook

  1. Launch the Microsoft Outlook application.
  2. Navigate to Accounts -> Properties -> Servers.
  3. Check the option “My server requires authentication”.
  4. Enter the email ID and password for your email account.
  5. Click Apply and Accept.
  6. Try sending an email.

Check Server Requirement from Settings

  1. Now, start the Microsoft Outlook application.
  2. Navigate to File-> Tools -> Account Settings.
  3. After this, select the Email and choose your Email account from the list.
  4. Click More Setting.
  5. Click the Outgoing Server tab.
  6. Enabling the “My outgoing server (SMTP) requires authentication” option.
  7. Click OK to apply the changes.
  8. Restart the MS Outlook application.

Delete Duplicate Accounts

  1. On the Outlook menu, select Tools.
  2. Navigate to the Accounts -> Mail tab.
  3. Select duplicate mail account.
  4. ClickRemove to remove the duplicate Account.
  5. Restart the MS Outlook application

Change Server Port Number

  1. Launch the MS Outlook application on the system.
  2. Navigate to File -> Tools -> Account Settings.
  3. Click the Email tab -> select your Email account from the list.
  4. Click More Settings and open the Advanced tab.
  5. Change the Outgoing Server (SMTP) port number to 587.
  6. Click OK to apply the changes.
  7. Restart the MS Outlook application

Repair Outlook

  1. Press Windows + X->select Apps and Features.
  2. Locate MS Outlook ->, click on it ->from the available options, and click Modify.
  3. Select the Quick Repair option -> click Repair.
  4. In a few minutes, the software can detect and resolve the issue.
  5. On completion of the repair process, launch MS Outlook.

Reinstall Outlook

  1. Open Control Panel->navigate to Programs and Features.
  2. Select MS Office application.
  3. Now, ensure you tap Uninstall at the top of the Programs and Features window.
  4. An uninstallation wizard opens. Follow the on-screen instructions to uninstall MS Office.

  5. After the uninstallation of the MS Office procedure is completed, you need to install MS Office again.
  6. After installing MS Office, create your email account.
  7. Try sending an email.

Remove and again add the email account

Remove Email Account

  1. Launch MS Outlook -> navigate to the File menu.
  2. Click Account Settings and then select Account Settings.
  3. Select the email account that you want to remove->click Remove.
  4. From the Account Settings popup, click Yes to confirm.

Add Email Account

  1. Launch MS Outlook. ->navigate to the File menu and ->click Add Account.
  2. Enter your name, Email, and password, and retype the password.
  3. Click Next to proceed.
  4. Once the Account is configured correctly, click Finish

Perform a Clean Boot

  1. Open your system as an administrator.
  2. In the search bar, type msconfig->select System Configuration.
  3. In the System Configuration window, select the Services tab.
  4. Select Hide all Microsoft services checkbox->click Disable all.
  5. Select the Startup tab and ->select Open Task Manager in the System Configuration window.
  6. Select every item in the Task Manager and ->click Disable.
  7. Close Task Manager and restart your system.
  8. Install MS Outlook and add the email account again

Check Internet Connection

  1. Click the internet icon in the taskbar-> select the network with “No Internet, secured” displayed.
  2. If the Forget button is visible, click it.
  3. Connect to your network again.

Professional OST to PST Converter Software

If you are still getting error 0X800CCC0E in Outlook, we recommend using third-party OST to PST converter software. This software effectively resolves error code 0X800CCC0E in Outlook without any data loss and supports all versions of Microsoft Outlook. The OST to PST Converter software is also available as a free trial version.

Conclusion

This blog highlights all the possible reasons for error 0X800CCC0E in Outlook and the manual methods to fix it. In case you are still unable to resolve the error code, we recommend using professional third-party OST to PST converter software. The tool allows saving recovered emails in PST, MSG, EML, and MBOX file formats.

Reasons for Exchange Database Corruption & How to Get Rid of It

This blog discusses the various reasons for the corruption, damage, or inaccessibility of the Microsoft Exchange Server database and the methods for overcoming this situation.

Reasons for Exchange Database Corruption

Let’s first discuss the possible reasons for the corruption of Exchange Server database EDB files. At a very high level, the reasons for damaging Exchange EDB files can be categorized into two categories: corruption due to physical errors and logical errors.

Physical Corruption

  • Hardware failures include hard drives, raid controllers, motherboards, and other components.
  • Disk failure
  • Loss of power/power outage
  • VM / Physical Server rebooted

Logical Corruption

  • Invalid index entries
  • Cross-object chain linkage
  • Corruption in the file header
  • Corruption in access control levels
  • A mismatch between the Exchange log file generation number and signature
  • Incorrect data restoration in the Exchange database

Common Exchange Server EDB file Errors

  • JET Engine Errors
  1. 344 – JET_errDbTimeCorrupted (Time Mismatch Error)
    This error appears when there is a time mismatch between the DB and the directory.
  2. 501 – JET_errLogFileCorrupt
    This error appears when the hardware corrupts the I/O when writing or when the hardware loses a flush, making the log unusable.
  3. 510 – JET_errLogWriteFail
  4. 528 – JET_errMissingLogFile
  5. 543 – JET_errRequiredLogFilesMissing
  6. 550 – JET_errDatabaseDirtyShutdown
    This error appears when the Administrator modifies logs or loses the I/O flush on shutdown.
  7. 551 – JET_errConsistentTimeMismatch
  8. 567 – JET_errDbTimeTooNew
  9. This error appears because the disk subsystem lost an I/O, most probably during a hang or unscheduled shutdown.

  10. 1018 -JET_errReadVerifyFailure
    One encounters such an error during page-level corruption in Exchange EDB files that cannot be repaired with the inbuilt Exchange Server utility. It also occurs during the creation of an online backup, i.e., a cloud backup.
  11. 1019 – JET_errPageNotInitialized
    This error appears when the requested page is empty or uninitialized in the Exchange Database.
  12. 1021 – JET_errDiskReadVerificationFailure
    This error appears due to bad blocks on the hard disk.
  13. 1022 – JET_errDiskIO
    This error appears when the disk Input/Output process restricts the Exchange Server’s access to the targeted page in the Exchange database.
  14. 1032 (JET_errFileAccessDenied, cannot access file, the file is locked or in use)
  15. JET_errFileAccessDenied

  16. 1206 – JET_errDatabaseCorrupted
  17. 1216 – JET_errAttachedDatabaseMismatch
  18. JET_errAttachedDatabaseMismatch

  19. 1601 – JET_errRecordNotFound
    This error appears when the STM and EDB files have different structures or when the Exchange Database EDB file has severe corruption.
  20. 1605 – JET_errKeyDuplicate
    This error appears due to index corruption.
  21. 1811
    This error appears when the Administrator modifies logs or loses the I/O flush on shutdown.
  22. 0xfffffdfd – JET_errInvalidLogSequence
    This error appears due to missing log files or log file mismatch.
  23. JET_errFileAccessDenied (Anti-Virus)
    • Dirty Shutdown State
    • Unable to mount database
    • mount database

    • 1056749110 error
    • Unable to initialize Exchange Information Store Service –Error 0x8004010F
    • This error appears when the Information Store fails to initialize. This error disfunctions the smooth functionality of the Exchange Server.
      Error 0x8004010F appears when a synchronization issue occurs between the clocks on the Server system and the client system.

      Outlook send/Receive progress

    • Inconsistent or missing log files
    • Low or no disk space
    • Licensing
    • Database mount error: (hr=0x80004005, ec=-501)
    • Failed to mount database "Mailbox Database"

    • Time mismatch in the DB compared to the directory. (Unable to mount database. (hr=0x80004005, ec=-344))
      This error occurs when there is a time mismatch between the DB and the directory.
    • Exchange Error 1056749110
      This error appears when corrupt items are present in the mailbox.
    • Machine :xptest

    • Permission Issue
    • Anti-Virus
    • The exchange database won’t mount (Cannot see Active Directory)
    • SMTP Virtual Server and Connector Configuration
    • Dirty Shutdown issue
    • The Exchange Server reached its Limit (16 GB)
    • Minor Corruption

    Manual Methods to Resolve the Exchange Server Database Errors

    Exchange Server Database Utility (ESEUTIL)

    It is an inbuilt utility that supports repairing Exchange Server 2007, 2010, and 2013 versions. It is an executable utility that repairs all the errors in Exchange mailboxes, public folders and transport server queue databases.

    ESEUTIL/p mode auto corrects the damaged Exchange EDB files at page or table level, not in application level.
    Syntax – ESEUTIL/P databasefilename. edb

    Limitations with ESEUTIL

    • Time-consuming process
    • Incorrect execution of commands
    • Permanently deleted data gets recovered
    • Requires much space
    • Demands technical skills and expertise to execute the commands

    Professional third-party EDB to PST Converter

    Since the manual method to repair corrupted EDB files has some limitations, we recommend that our users use a third-party EDB to PST Converter software to repair corrupted EDB files and restore the Exchange mailboxes on the server. The EDB to PST Converter restores mailboxes on the Live Exchange Server and resumes mailbox connectivity lost due to the dismounted Exchange mailbox database. Use EDB to PST Converter to backup Exchange Server data to Office365 account.

    Conclusion

    Let us try to determine the reasons that cause the Exchange database to be corrupted, damaged, or inaccessible. To resolve this, users can try the manual method explained, but it has some limitations. We suggest our users use third-party EDB to PST Converter software to restore mailboxes on the Exchange Server.

What do you do when emails get stuck in your Outbox?

If you have ever had your emails remain in the Outbox folder, then you can attest that it is a very annoying situation, especially if you have an urgent message to send. This is a familiar problem with Outlook and may be due to several factors. It is essential to know these reasons and how to sort them out to have efficient communication. So, let us get into the details

Reasons for emails to get stuck in your Outbox

Of course, before we proceed to the solutions, it is crucial to understand why your emails are stuck in the Outbox. Several factors can contribute to this problem:

  • Large Attachments: Outlook’s sending process can be bogged down when you send emails with big attachments.
  • Poor Internet Connection: Sometimes, the internet connection is poor, which may hamper the sending or sharing process, and emails remain in the Outbox.
  • Outlook Add-Ins: Certain third-party add-ins may clash with Outlook, leading to problems sending emails.
  • Corrupted Outlook Profile: Outlook profiles can be corrupted, and this can cause many issues, such as emails not being sent properly and staying in the Outbox.
  • Server Issues: On some occasions, the issues arising from the server on the side of your email provider may lead to a delay in sending emails

In other words, when you attempt to send an email, it is not delivered to the recipient; instead, it arrives in your mailbox. However, it ends up in a folder named “Outbox. ” It can be irritating because your email must reach the intended recipient. On top of that, Outlook may display some error messages to you.

Methods to Resolve Stuck Emails in Outbox issue

Here are some reliable methods to fix the stuck emails in the Outbox issue. Follow each method carefully to get desired outcomes.

Method 1: Check Your Email Settings

At some point, emails may remain in the Outbox because you have scheduled them to be sent later. It is as if one wants to send a message at a particular time, which will be sent automatically. To fix this:

  1. Open your Outbox.
  2. Click on File.
  3. Click Account Settings.
  4. Choose the account you want to change the settings of.
  5. Click Change.
  6. Type in your new password if required.
  7. Then click Next, and then on the final window, click on the Finish button.

If you have a password for your Outlook data file, here is how you can change it:

  1. First, you need to launch the Outlook application on your local computer.
  2. Next, click the right mouse button on the email account you want to configure.
  3. Then select Data File Properties.
  4. Select Advanced, then go to Change Password.
  5. You have to type in your old password and then the new one. Confirm it.
  6. Press OK and then exit all the opened windows.

The above solution is useful in finding the solution to Emails Get Stuck in Outbox error. If not, then go for the other ones

Method 2: Change the Outlook connection status

Before diving into the solution methods, one needs to ensure Outlook’s connection status. If Outlook is offline, your email messages will be kept in the Outbox folder until the status changes to online.

To modify the mail server state, follow these steps:

  1. Open Outlook and go down to the bottom right corner of the screen. You will see Connected or Connected to Microsoft Exchange. If it is “Connected,” then the issue is not the server’s status in any way.
  2. Microsoft Exchange. If it is “Connected

  3. If the state is Working Offline, the user should go to the Send/Receive tab and click Work Offline to disable it. Now, resend the mail.
  4. the Send/Receive tab

  5. .However, if the status is still Disconnected, look at the Internet connection and correct it if necessary
  6. Method 3: Resend the email

    If you encounter the problem despite following the first method, you have no option but to resend the emails, but this time, make sure you are logged into the server, not to mention checking the internet connection.

    Also, restart your system once. Outlook will resynchronize with the mail server upon Outlook’s launch after a reboot, and as such, the email may leave Outbox. Also, do not open the mail immediately after sending it because it will lock the sending process.

    Another measure to be taken is the reduction of the number of attachments in the mail. If doing so successfully takes the mail out of the Outbox folder, you are done with your problem.

    Outbox folder

    Method 4: Automated OST to PST Converter

    While the manual methods above can be helpful, they may not always be effective, especially in severe Outlook data file corruption. Moreover, these methods can potentially lead to data loss if not executed correctly. For a more dedicated and comprehensive solution, consider using GoldyTools OST to PST Converter.
    GoldyTools OST to PST Converter is a professional tool that addresses various Outlook issues, including emails stuck in the Outbox. This powerful software offers several advantages:

    1. Free conversion of the first twenty emails in every folder
    2. Conversion of several OST files at a time
    3. It incorporates all Outlook items (mails, calendar, contacts, etc. ).
    4. It is compatible with IMAP, Office 365, Exchange, Hotmail, and Outlook.com
    5. Easy to use, no Exchange profile or server connection required
    6. Fixes and migrates damaged OST files
    7. Saves in PST, MSG, EML, HTML, MHT and PDF formats
    8. Divides and combines large PST files
    9. Allows for the search of OST items using the field names.
    10. Works with Outlook in versions 2000 up to 2019

    Conclusion

    Stuck emails in the Outbox can cause problems in your working process and communication with business partners. Although there are various manual solutions to fix this problem, employing a professional tool such as Goldytools OST to PST Converter guarantees a better approach.

How to resolve the “SQLite database file is locked” error

If you encounter the SQL error message: “SQLite database file is locked”, it needs immediate attention. This blog highlights the genuine reasons for the occurrence of this error message and how to resolve it manually. It also suggests that its users give a third-party SQLite Database Recovery tool a chance to perform SQLite Database recovery with an advanced and professional solution for complete data recovery without any data loss.

SQLite database
A Brief Introduction – SQLite Database

SQLite is a server-less, self-contained, zero-configuration database management system (DBMS) that organizations use to manage their data.

A Brief Introduction – SQLite Database

The error message appears when two users execute transactions on the same tables and modify the content simultaneously. The SQLite engine finds this abnormal, and the database gets locked. As a result, users cannot execute further transactions.

SQLite database
SQLite databaseSQLite database

Various scenarios for SQLite database getting locked

Scenario 1: When a SELECT transaction is activated on a table, the user tries a CREATE query.
Scenario 2:When the SELECT statement is pending, the user puts a new CREATE or DROP statement.
Scenario 3:When multiple threads access the same table, two or more SELECT queries try to access the same table.
Scenario 4: Multiple applications acc the database at the same time.
Scenario 5: Long-running transactions that do not commit or rollback promptly.
Scenario 6: Improper handling of database connections and cursors.

Manual method to resolve “SQLite Database is locked” error

To resolve the “SQLite Database is locked” error, use the backup copy of the same database. With the backup file of the SQLite database handy, you can restore it at the database engine and remove the locked SQLite database file. This approach is recommended to restore and recover locked SQLite database files. To perform this, follow the steps as:

Step 1: Take the Backup of SQLite file

Use the below commands to take the backup of the SQLite file (let us assume your SQLite database file name is Administrator.sqlite):
$SqliteAdministrator.SQLite
Sqlite> .backup main BackupAdmin.SQLite
Sqlite> .exit

By executing the above commands, you can get the same backup file in the same directory named BackupAdmin.Sqlite.

Step 2: Replace the backup database with the primary database

Use the below commands to replace the backup database with the primary database:
$mv Administrator old.SQLite
$mv BackupAdmin.SqliteAdministrator.SQLite

After the above queries are successfully executed, the backup file replaces the locked database. Users can execute new transactions and queries
since the backup file is not locked.
If you don’t have a database backup file with you, the above-suggested manual approach will not work, and you need to look for a third-party SQLite Database recovery solution.

Other solutions to resolve the “SQLite Database is locked” error

Solution 1: Ensure Proper Transaction Management
Ensure that transactions are completed promptly by committing or rolling back as appropriate.
Solution 2: Use Database Connection Properly
Always select the database connection properly after operations are completed.
Solution 3: Configure Timeout
Configuring a timeout duration helps where multiple accesses are possible.
Solution 4: Avoid long-running transactions
Keep the transactions as short as possible.

Professional Third-party SQLite Database Recovery Tool

SQLite Database Recovery Tool is a third-party professional solution that scans and recovers the locked SQLite database file. This tool locks SQLite database files and efficiently recovers corrupt, damaged, and deleted SQLite files. The tool recovers all database objects, including tables, views, indexes, rules, triggers, functions, deleted records, primary keys, unique keys, procedures, etc.
The SQLite Database Recovery tool recovers the corrupt, damaged SQLite database files that might get corrupt due to one of the following reasons:

  • Application or operating system crash
  • Power Failure
  • Disk drive failure
  • Flash memory failure
  • SQLite file gets overwritten by a rogue thread or process
  • Using a file descriptor continuously even after closing it.
  • Swapping journal files between two different databases
  • Overwriting a journal file
  • Moving a journal file without copying the journal
  • Broken or missing lock implementations in SQLite files
  • Using different locking protocols

Prominent Features of SQLite Database Recovery Tool

  • Recovers even a large-sized SQLite database file.
  • Recovers and restores corrupt or damaged .dB, .dB3, .SQLite,SQLite2, and .SQLite3 files.
  • Recover deleted records from SQLite database files.
  • Maintains the integrity of data of SQLite database files.
  • Displays preview of repaired SQLite database files.
  • It supports all versions of SQLite Engine, including the latest version, 3.27.2.
  • Ideally, it is compatible with all Windows operating systems, which include Windows 10, 8,and7.
  • Also, a trial version can repair and display a preview of SQLite database file contents.

Conclusion

This article discusses the common reason the SQLite database file is locked and how we can resolve this error manually. If the user does not have any backup copy and the database file gets locked, we suggest our users give the third-party SQLite Database Recovery tool a chance to recover the SQLite database file.

How to find location of OST Files in Outlook 2013, 2016, and 2019 on Windows?

Emails are crucial for communication, especially at work. Microsoft Outlook simplifies email management. A key feature is the OST file, or Offline Storage File. These files allow you to work offline. Later, you can sync any changes with the Exchange server. If you’ve wondered where OST files are stored, you’re not alone. In this blog, we’ll guide you in finding your Outlook Data File (.OST). This helps you manage your emails more effectively.

Where are OST Files Located?

Most of the OST files are stored under the ‘AppData’ directory of your Windows user account. This location can be different based on the versions of Windows and Microsoft Outlook which are installed. There are ways by which the OST file can be located and we are going to describe them below. All the methods will help you to follow a step by step procedure.

Step 1: Check the Default OST File Location

Refer to the table mentioned below to find the default location of OST files according to the versions of MS Outlook and Windows

MS Outlook Version Windows OS Version Path Location of the OST file
Outlook 2000
Outlook 2003
Outlook 2007
Windows XP C:\Documents and Settings\User Name\ Local
Settings\Application Data\Microsoft Outlook
Outlook 2007 Windows Vista
Windows 7
Windows 8
Windows 10
C:\Users\ User Name\AppData\Local\Microsoft\Outlook
Outlook 2010 Windows XP My Documents\Outlook Files
Outlook 2010 Windows Vista
Windows 7
Windows 8
Windows 10
Documents\Outlook File\
Outlook 2013
Outlook 2016
Outlook 2019
Windows Vista
Windows 7
Windows 8
Windows 10
C:\Users\admin\AppData\Local\Microsoft\Outlook

To find the OST file on your Windows PC, you can manually go through the route in File Explorer or use the path URL provided in the table above.

Step 2: Search for the OST File Using Outlook Options

In case you are unable to search for files at default locations or manually, you can take a look at below steps to find the OST files quickly on Windows XP, 7, 8, 8.1, 10, or 11 PC.

MS Outlook 2013, 2016, 2019, or 2021

  • Open the Microsoft Outlook application.
  • Go to File > Info > Account Settings > Account Settings.
  • Click on the Data Files tab and select the OST file associated with your account.
  • Click on the “Open File Location…” button.

MS Outlook 2010

  • Open Microsoft Outlook and go to File > Info > Account Settings > Account Settings.
  • Choose Microsoft Exchange Server from the list, then click on “Change.”
  • Click on “More Settings.”
  • In the Advanced tab, click on “Offline Folder File Settings.”
  • This will display the path where the OST file is located.
  • To visit the OST file location, copy the folder path and paste it into File Explorer.
  • This will open the File Explorer window and show you where the OST file is stored on your PC.

Step 3: Directly Open the OST File Location via Outlook

  • Here’s an easy way to find the OST file in any version of Outlook:
  • Open Outlook and right-click on your email profile name or email ID in the left sidebar.
  • Click on “Open File Location.”
  • A File Explorer window will pop up, showing where the OST file is stored.

Step 4: Professional Solution to Find and Convert OST File

The methods mentioned above can be time-counsuming, especially when dealing with multiple OST files. Also, these methods may not help you recover corrupted OST files. Therefore, it’s advisable to use a more advanced and powerful solution like the one offered by Goldytool’s OST to PST Converter.

This tool allows you to quickly find all your OST files in seconds. It also lets you convert OST files to PST, including emails, journals, notes, and more. Additionally, you can repair corrupted OST files and save them in formats like PST, PDF, and HTML. The software is user-friendly and easy to navigate.

Conclusion

Manual methods work well if you are technically sound and issues are minor. But in case of dealing with multiple OST files, you may require a professional solution like the Goldytool’s OST to PST converter. It will help you find the files without any hassle. You can also repair the corrupted files and convert in any format you like. Also, all your data like email, contacts, and notes are saved.

How to increase the maximum size for PST and OST files in Outlook

Microsoft Outlook is one of the most popular email clients today, and millions of people and companies use it. Over time, when users increase the number of emails, attachments, and other data, Outlook’s data files – PST for POP3/IMAP accounts and OST for Exchange accounts – may become too large. When this occurs, it can cause poor performance, inability to send/receive new emails, and, in some cases, data corruption. In this article, you will learn how PST and OST files grow large and how to raise the size limits in Outlook.

Reasons for Reaching Size Limits

If PST and OST files grow to their maximum size or become even closer to it, they can become an issue. Several factors contribute to this:

  • Accumulation of emails: In the long run, users have numerous emails, including those they receive and are not usually deleted after some time.
  • Large attachments: Large file attachments in emails also tend to fill up PST/OST files more quickly than other activities.
  • Calendar entries and contacts: Outlook’s calendar and contacts also contribute to the size of the overall package.
  • Journal entries: To the users who use the journaling feature of Outlook, these entries add to the size of the files.
  • Default size limits: Outlook versions before Outlook 2010 are found to have lower default size limits for PST/OST files.

Methods to Increase the Maximum Size for PST-files and OST-files in Outlook

Method 1: Modifying the Windows Registry

This method involves using the Windows Registry to change the PST/OST file size limit in size. Although it is quite effective, it should be used appropriately since wrong changes to the Registry may lead to system instability. Before you proceed with the next steps, it is advisable to backup the Registry.

  1. Close Outlook completely.
  2. Press the Windows key on your keyboard and hold it while pressing the ‘R’ key.
  3. One must enter the “regedit” command in the command line and press “Enter” to launch the Registry Editor.
  4. Go to the following key, which depends on the version of Outlook you have installed.
      ● Outlook 2019/2016: HKEY_CURRENT_USER\Software\Microsoft\Office\16.0\Outlook\PST
      ● Outlook 2013: HKEY_CURRENT_USER\Software\Microsoft\Office\15.0\Outlook\PST
      ● Outlook 2010: HKEY_CURRENT_USER\Software\Microsoft\Office\14.0\Outlook\PST

  5. Again, right-click on the right pane, click on New, and then click on DWORD (32-bit) Value.
  6. Give the new value the name “MaxLargeFileSize” (quotes included).
  7. Double-click the new value and set the Value data to the numeric value of the maximum size in MBs for instance, 51200 for 50 GB.
  8. Make another DWORD value called “WarnLargeFileSize” and set it to another figure, a bit lower than the previous one.
  9. Click ‘OK’ to close the Registry Editor and start the Outlook application again.

Method 2:Using Group Policy (for organizations)

The Group Policy method is suitable for organizations that have many Outlook users in their facilities. It enables the administrators to manage the PST file size policy in the organization from the central point. However, this method involves administrative access and cannot be used for a single user or home use.

  • Right-click on the Group Policy Management Console.
  • Create or modify a GPO.
  • They can visit the User Configuration > Administrative Templates > Microsoft Outlook > Miscellaneous > PST Setting.
  • Large PST Absolute Maximum Size and Large PST Warn About Maximum Size should be set up.
  • This is done by clicking on the Group Policy and selecting the option ‘apply’.
  • Method 3: Compact PST files

    The PST file compacting is the function integrated into Outlook that can help manage the size of the PST file, and this will not be possible if no changes are made to the PST file. It is a safe method that helps reduce the unneeded space between PST files. Nevertheless, it may not be good enough for users already at the maximum file size limit or even beyond it.

    Although it does not directly contribute to the increase of the size limit, it can help to reduce the size of the PST files:

    1. In Outlook, please click File, then Account Settings, then Account Settings.
    2. Go to the Data Files tab.
    3. Find the PST file you want to compact, right-click, and click on settings.
    4. In the new window, click the Compact Now button.

    Method 4: Automated Goldy Outlook PST Repair Tool

    There is no better way to increase the maximum size for PST and OST than by using the above-described method. But if your focus concern is over-sized files, which can inversely impact working or cause corruption, you can split or compress PST.

    With the professional way, users can split PST files according to their requirements, compress PST files and decrease their size without any problem to overcome the problem of large PST.

    Goldy Outlook PST Repair Tool is designed to manage large PST files easily, so you do not have to spend time fixing Outlook problems. This is especially useful when the other recovery methods do not work or when working with highly damaged PST files. Download it and use its trial version to know whether the tool is functioning.

    Conclusion

    It is necessary to raise the maximum PST and OST size in Outlook for effective email functioning, particularly for users with numerous emails and attachments. There are, however, manual approaches to it, but they are tedious and may involve a lot of steps. The Goldy Outlook PST Repair Tool is a single package that can handle large PST files, fix corruptions and restore lost data. This way, the user can save time and avoid data loss, and Outlook will remain convenient and fast.

How to repair SQL Database DBCC CHECKDB command for MDF & NDF Files

If you are experiencing the below symptoms in your SQL Server database files, then it is obvious that they have become corrupted or damaged and need immediate attention.

  • Frequent database crash
  • Constant downtime
  • Performance issues with the database
  • Noticeable lags
  • Major data loss or inconsistencies
  • Failure in the data backup task
  • Software errors and glitches
  • Random errors while opening or accessing the database
  • The database moves to the suspect mode

If you are looking for a solution to repair the corrupt or damaged SQL database DBCC CHECKDB command for MDF and NDF files, then this blog will really prove helpful.

What is an MDF and NDF File?

MDF stands for Master Database File, and NDF stands for Secondary Database File. Both MDF and NDF files store data and objects of the SQL Server database.
The MDF file is nothing but a primary data file containing the database’s schema and data, including tables, views, stored procedures, triggers, and other objects. It also contains metadata that describes the database’s structure.
NDF files are secondary data files that can be added to the SQL Server database to store additional data. They are used when the MDF file is not sufficient to hold all the data.NDF files help improve performance and storage management.
An SQL Server database has only one MDF file but can have multiple NDF files. SQL Server can operate with just an MDF file, but NDF files help manage larger databases and thus optimize performance.

Few SQL Server Error Messages

  • Msg 823 error in SQL Server
  • Msg 824 (I/O error) in SQL Server.
  • Msg 825 (read retry) in SQL Server.
  • SQL Server Page-Level Corruption
  • SQL Server Table Corruption Error.
  • Corruption on non-clustered indexes.
  • Database consistency errors reported by DBCC CHECKDB.
  • Corruption on data pages.
  • Metadata Corruption Error.
  • Error 9004 in SQL Server
  • Msg 7105 in SQL Server

Common reasons that lead to corruption or damage of SQL database

  • Human errors like accidental deletion
  • Sudden shutdown
  • Improper system termination
  • Abrupt power cuts or power outages
  • Virus or malware attacks
  • Hardware issues like bad sectors in the storage device, physical damage to the disks, etc.
  • Software bugs or glitches
  • Network issues
  • Changes in SQL account
  • Incompatible software or outdated installed software
  • Inappropriate isolation level
  • Insufficient storage space on the hard disk

DBCC CHECKDB Command

Using the DBCC CHECKDB command is a manual method for repairing corrupt or damaged Microsoft SQL Server database MDF and NDF files.

Syntax:

DBCC CHECKDB (Database_Name)

Pre-requisites of DBCC CHECKDB command

  • With an active license, users must have SQL Server Management Studio (SSMS) installed on their system.
  • Users must have Admin rights and privileges to perform this manual command.

Three Repair Modes with DBCC CHECKDB Command

REPAIR_FAST

Use this repair mode to resolve the backward compatibility issue, which means you can run SQL Server 2005 database files in SQL Server 2008.
While using this repair mode, ensure the database is in SINGLE_USER mode.

Syntax:

DBCC CHECKDB (N ‘Database_Name’, REPAIR_FAST) WITH ALL_ERRORMSGS, NO_INFOMSGS;
GO

REPAIR_REBUILD

This repair mode is preferred as it has a very low risk of data loss. It performs similarly to REPAIR_FAST, except that it rebuilds the indexes, which is a time-consuming repair process.
While using this repair mode, ensure the database is in SINGLE_USER mode.

Syntax:

DBCC CHECKDB (N ‘database name’, REPAIR_REBUILD) WITH ALL_ERRORMSGS, NO_INFOMSGS;
GO

REPAIR_ALLOW_DATA_LOSS

This repair mode, along with repairing the SQL Server, performs the following:

  • Allocates and deallocates the pages
  • Deletes the corrupt objects
  • Fixes page errors, structural errors in the database

Syntax:

DBCC CHECKDB (N ‘Database_Name’, REPAIR_ALLOW_DATA_LOSS) WITH ALL_ERRORMSGS, NO_INFOMSGS;
GO

Limitations of DBCC CHECKDB command

  • Unreliable
  • Complex
  • Requires experienced professionals to perform this manual method.
  • It doesn’t repair deleted objects from the database.
  • Users often skip pre-requisites of the DBCC CHECKDB command.

3rd-party SQL Database Recovery Tool

SQL Database Recovery Tool is a third-party professional tool that efficiently recovers corrupt or damaged SQL Servers. The SQL Database recovery tool repairs minor and significant levels of corruption in SQL Server database files. It recovers all SQL database components, including Rules, Functions, Tables, Triggers, Views, Stored Procedures, Indexes, etc.SQL. The Database recovery tool supports recovering database files of all SQL Server versions, including 2019, 2017, 2016, 2014, 2012, 2008, 2208 R2, 2005, 2000. The tool displays a preview of recovered data.

Conclusion

The moment the SQL Server database gets corrupted or damaged, users look for solutions to restore database files with complete accuracy. Initially, they try the manual method DBCC CHECKDB command, but it has its own limitations. To overcome those limitations, we suggest our users use an automated SQL Database recovery tool to efficiently repair and recover Microsoft SQL Server database files. The advanced solution repairs and recovers all SQL Server components without fail.

How to backup Microsoft Exchange Server Mailboxes?

Exchange Server backup and restore remain critical for organizations that are still using on-premises Microsoft Exchange servers. This article discusses the methods for backing up and restoring your Microsoft Exchange Server mailboxes.

Factors leading to damage or corruption of Exchange Server mailboxes

  • Logical and Physical errors
  • Hard disk failure
  • Corruption in database
  • Virus/malware attacks
  • System crash
  • Accidental file deletions
  • Software malfunctions

Two methods to create a backup of Exchange Server mailboxes

  • Using Windows Server Backup
  • Using PowerShell cmdlets

Method 1: Using Windows Server Backup

Windows Server Backup is an integrated backup feature in the supported versions of Windows Server. It includes basic backup functionalities and helps users manually backup files and folders, system data, and applications. Use the Windows Server Backup method to backup and restore Exchange databases.

Pre-requisite for Windows Server Backup

  • The Windows Server Backup feature must be installed on the local computer.

Step-by-step instructions for Windows Server Backup

To convert Exchange EDB to PST files, perform the steps:

  1. OpenServer Manager, selectTools and select Windows Server Backup.
  2. Select Local Backup.
  3. In the right pane, under Actions, clickbackup Once.
  4. In the Backup Options wizard, select Different Options and click Next.
  5. On the Select Backup Configuration page, select Full Server (recommended), and click Next.
  6. On Select Items for Backup. window, click Add Items. to select the volume(s) you want to backup, and click OK.
  7. Select Advanced Settings.
  8. On the Exclusions tab, click Add Exclusion to exclude any files or file types from the backup.
  9. Under the VSS Settings tab, select VSS full Backup and click OK. Click Next.
  10. Specify the Destination Type page, select a location where you want to save the backup, and click Next.

  11. a. When selecting local drives, the Select Backup Destination page will appear.
    i. Select an option from the Backup destination dropdown, and click Next.
    b. The Specify remote folder page will appear when selecting the remote shared folder.
    i. Specify a UNC path for the backup files and configure access control settings.
    ii. Select Do not inherit if you want the backup accessible only through a specific account.
    iii. Please provide the username and password for an account with write permissions on the computer hosting the remote folder, then click OK.
    iv. Click Next. Select Inherit if you want the backup to be accessible to everyone who has access to the remote

  12. Review the backup settings on the Confirmation page and click backup. The backup will start for the selected volumes (those you selected in Step 6 to backup).
  13. The Backup Progress page displays the status and progress of the backup operation.
  14. Click Close to exit the Backup Progress page. Any backup in progress continues to run in the background.
  15. Limitations of Windows Server Backup

    • You can only back up data on local hard drives.
    • Offers only a limited storage capacity of 2TB.
    • Only one copy of the backup is available.
    • No central management for managing backups and recovery across multiple servers.
    • No granular application support.
    • No control over the automatic deletion of older files and folders.
    • There is no support for encryption.
    • Limited options for restoration.
    • No support for virtualized Windows servers.
    • Limited backup options.
    • No support for Windows Server backups on a network location.

    Method 2: Using PowerShell cmdlets

    New-MailboxExportRequest

    Use New-MailboxExportRequestPowerShell cmdlet in Exchange Management Shell (EMS) to backup individual or selected mailboxes.
    New-MailboxExportRequest -Mailbox “MailboxName” -FilePath \\Servername\SharedFolderPathName\FileName.pst


    Pre-requisite for PowerShell cmdlet

    • The Mailbox Import/Export permission must be assigned to the user account.
    • Create a shared location and folder to save the exported Outlook PST files.

    Various Parameters with the New-MailboxExportRequest command

    Limitations of Windows Server Backup

    • This command is available in Exchange Server 2013 and later versions.
    • The process is lengthy and time-consuming.
    • It doesn’t display the status of mailboxes that are being exported.
    • Requires a large amount of space on server storage media.
    • Multiple mailbox exports may impact the server’s performance

    Third-party EDB to PST Converter

    We also suggest our users try a third-party professional EDB to PST Converter tool to efficiently convert Exchange EDB to PST files.
    The EDB to PST Converter tool allows you to back up complete Exchange Server data or select mailboxes. The EDB to PST Converter tool extracts mailboxes from Exchange EDB files and exports them to Outlook PST files. The tool scans and displays the extracted mailboxes and other items before converting them to PST files. The tool allows selective migration from Exchange EDB to PST. While performing EDB to PST conversion, the tool displays the progress of the EDB to PST export process. The EDB to PST Converter tool allows the export of Exchange EDB files directly to Microsoft Office 365 or a live Exchange Server.
    The free-to-download trial version has a few limitations and allows you to check the software’s capabilities. If you are satisfied with the demo version, you can purchase the licensed version with full capabilities.

    Conclusion

    You can backup Exchange Server mailboxes using Windows Server Backup or the New-MailboxExportRequest PowerShell cmdlet in Exchange Management Shell (EMS). You can also use a professional EDB to PST Converter to convert Exchange EDB to PST files. In addition to saving Exchange EDB to PST, the tool allows saving to other supported file formats, such as EML, MSG, HTML, RTF, and PDF.

How do you troubleshoot a slow migration issue in the Exchange Server?

If you are facing slow migration issues while migrating from an on-premises Exchange Server to another Server or Exchange Online (live Exchange Server or Office 365), this article will help you resolve the issue.

Error messages that appear while Exchange migration are:

  • StalledDueToTarget_MdbAvailability

The move monitors the replay queue of transaction logs into remote copies of databases. Migration stalls when the queue is long, and it generally lasts until it drains.

  • StalledDueToTarget_MdBReplication

The move monitors the copy queue of transaction logs to other DAG member servers.

Common reasons for the occurrence of the above error message are:

  • Network issues or blocked ports
  • Storage limitations or issues
  • Incorrect network configuration
  • Third-party software blocks the traffic or processes
  • Insufficient server resources, such as CPU and RAM
  • Services failed to start due to failed updates or other issues
  • StalledDuetoSource_DiskLatency or StalledDueToTarget_DiskLatency

This error message appears when the disk latency is at a level where adding additional I/O might impact user experience on the disk. It is located in the target mailbox database (MDB).

Common reasons for the occurrence of the above error message are:

  • Disk performance issues on the source disk or target disk
  • Insufficient system resources
  • Existing export requests in the queue
  • High response time from source or target disk.
  • StalledDueToTarget_Processor

This error message appears when the utilization of the CPU is too high on target MRS servers involved in the move.


  • StalledDueToTarget_BigFunnel

This error message appears when content indexing operations suddenly face an unexpected interruption and are actively recovering.


Common reasons for the occurrence of the above error message are:

  • High CPU or disk utilization on the target server
  • Network latency or bandwidth issues
  • Database availability or replication issues
  • Antivirus or firewall interference
  • Corrupted or missing index files
  • StalledDueToSource_MdbCapacityExceeded
  • StalledDueToSource_UnknownReason


The most common reasons for the above error message are:

  • Content Indexing health
  • CPU
  • High Availability Replication Health
  • StalledDueToTarget_MailboxLock
  • StalledDueToMRS_Quarantined
  • StalledDueToCI (Stalled due to content indexing)


The above error message appears when content indexing is done on the database copies.

Factors responsible for the performance of Exchange Migration

  • Exchange Server
  • Ensure that the Exchange Server is up to speed with the latest updates, hardware resources, and storage performance. Ensure that the Operating System and Exchange Server are working perfectly without any issues. Ensure that no background tasks are affecting the performance of the Exchange Server.

  • Migration Server
  • Ensure that the Exchange Server has good specifications.

  • Migration Engine
  • Ensure you choose the appropriate migration method—cutover migration, staged migration, hybrid migration, or a third-party application like an EDB to PST converter tool.

  • Network

    Ensure your network, including local infrastructure, perimeter network, and internet connectivity, is set up to perform Exchange Server migration services without delay.

  • Office 365 Service

    Ensure proper policies, subscriptions and settings are configured for the optimized hybrid deployment.

Powershell commands to help diagnose slow migrations

  • Get-MoveRequestStatistics
  • This command provides information about where the stall is and how much time is being consumed by the stall.
    Also, this command provides the count of total stalls, which further elaborates on where the migration is stuck and where time is being consumed.

  • Get-MailboxDatabaseCopyStatus
  • Use this command to check your database’s health and state whether they are mounted or not.

Limitations of Manual Method

  • Manual methods are challenging for new or non-technical users.
  • Need good technical knowledge to execute the steps.
  • The manual steps are complex and time-consuming.
  • There is a high risk of data loss.
  • The Exchange Server mailbox files may get corrupted or damaged during the manual steps if not performed correctly.

Third-party Application for Exchange Server Migration

The EDB to PST converter is the best tool for performing seamless data migration to a live Exchange Server. Using the EDB to PST Converter tool, you can access any Exchange Server EDB file of any Exchange Server version without having Exchange Server installed.
The EDB to PST Converter tool converts Exchange Server EDB files to Outlook PST files and is also capable of converting to other file formats, such as EML, EMLX, MBOX, PDF, VCF, MSG, and HTML.
EDB to PST Converter tool facilitates migrating Exchange Server Mailbox to a Microsoft Office 365 account.

Who should use the EDB to PST Converter tool?

  • Administrators are performing upgrades to the Exchange Server.
  • Users facing Exchange Server EDB file corruption issue.
  • Users are migrating from Exchange Server to other email clients like Office 365, Gmail, and Yahoo.
  • To convert Exchange Server EDB files to other file formats and cloud servers.
  • To export mailbox from EDB to PST.
  • A backup is needed to avoid the risk of data loss.
  • Export Exchange to PST for Archival, Compliance, and Legal Discovery purposes.

Key Features of EDB to PST Converter Tool

  • Supports exporting mailboxes from Exchange 2007, 2010, 2013, 2016, and 2019 to Outlook PST.
  • Efficiently converts complete Exchange mailbox items like contacts, emails, calendars, tasks, etc.
  • Allows exporting selective items from Exchange mailbox to Outlook PST.
  • Displays preview of emails before EDB to PST conversion.
  • It facilitates converting Exchange EDB files to EML, EMLX, PST, MBOX, PDF, VCF, MSG, and HTML files.
  • Allows exporting Exchange mailbox to Gmail, Yahoo Mail, Hotmail, GoDaddy, and Amazon Workmail.
  • Allows migrating Exchange Server mailbox to Microsoft Office 365 account.
  • Repairs corrupt, damaged Exchange Server database.
  • Recovers permanently deleted emails.
  • Generates detailed progress reports in CSV format.
  • Maintains original hierarchy and integrity of emails and folders.
  • There is no file size limitation for EDB to PST conversion

How does the EDB to PST Converter tool work?

    Step1:Launch EDB to PST Converter tool.
    Step 2:Select ‘EDB file’ for scanning.
    Step 3: The tool displays a preview of mailboxes before saving.
    Step 4: Select the Saving format as a ‘PST’ file.
    Step 5: Click Next to convert Exchange Mailbox to PST file

Conclusion

While migrating from one Exchange Server to another, numerous factors may affect your Exchange mailbox migration process. It would be best if you handled all those factors that may impact the Exchange Server mailbox migration process. You can opt for the professional EDB to PST Converter tool to ease your accurate Exchange mailbox migration without delays.