All posts by harshit

How do I Fix Outlook 2016 Search not Working?

Summary

Microsoft Outlook stores a huge number of emails and if you are not able to search your specific email, then it will be a mess. Facing issues like the search feature is not working in Outlook” can occur due to PST file corruption or several other reasons. In this blog, we will learn about the reasons behind search failure in Outlook and how to fix it. However, we suggest using the automated Goldytools Outlook PST Repair Tool that will help you with PST repair, which is causing issues in Outlook.

Introduction

Microsoft Outlook is a common web email client widely known to help organizations work globally with streamlining communication. Businesses working over Outlook know about the daily flow of mail that stuffs the mailbox heavily if you’re not cleaning it up and backing up data.
There are many instances where a business administrator often wants to find any particular mail from long back. Outlook offers users one search feature that helps them to easily search any mail using mail body, recipient, or subject. But Outlook is also prone to attaining severe errors due to basic dysfunctionalities or overstuffing of mail as well, due to which search features may not work & throw errors.

So, this blog will outline the effective ways to fix Outlook search not working issues by using the prominent methods.

Understanding the main causes for Outlook 2016 Search not Working issue

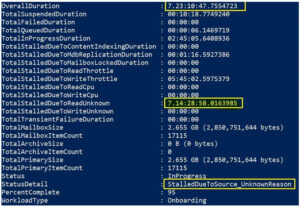
Analyzing the root causes behind search result failure in Outlook is very crucial because to manage collaboration & projects accessing specific data is necessary. But if you’re not able to find those data due to PST file corruption or Outlook errors can cause unwanted interruptions. Let’s find the possible reasons for Outlook 2016 search failure mentioned below:

  • Folder indexing excluded for folder: If the configuration is not appropriate for the folders in the Window Search Index, then search will show no results.
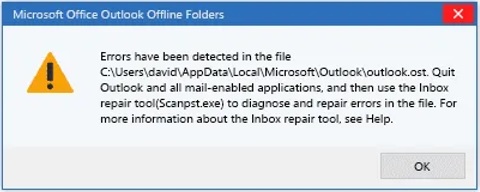
  • Corruption in Outlook: Outlook applications can get damaged including corruption due to improper shutdowns, virus in the system, antivirus expired or incompatible system updates.
  • Indexing failure: To fix Outlook search not working, you need to fix the indexing at first. If the search index fails then it fails to show results.
  • Oversized mailbox: Outlook mailbox being heavily loaded with mails is one of the common reasons for search feature failure.

Methods to fix Outlook Search not Working

Managing Microsoft Outlook is not a piece of cake as it requires multiple practices to create a healthy environment. Once you have analyzed all the common issues that can cause Outlook search features showing no result error, you have to apply suitable methods to fix them. Find some of them below:

  • Method 1. Verify the Check Windows Search Service:

You need to check whether the Windows Search Service is active or not in your system.

  • Hold the Windows key and press R to open the dialog box.
  • Now, type the Service.msc and click OK.
  • One the Service window, choose and right click on the Window Search Service.
  • Now click on Properties and check the running status of the service.
  • If it’s not started then click on restart and then click on Ok.
  • Method 2. Indexing status:

There are various instances where your Outlook may be missed on the indexing. Initially, you have to check if your Outlook application is indexed or not.

  • Launch your Outlook application and from the top pane, choose Search Tools>Indexing Status.
  • Now, you can see the indexing status and if Outlook is indexing mails then you can wait till its completion.
  • If Outlook is not indeed then you might need to rebuild Indexing.
  • Method 3. Re-create your Search Index:

It will be more beneficial if you create a new index rather than trying to fix an index Outlook item in the old index.

  • Open Outlook application and go to Files>options.
  • Click on Search and then choose Indexing options and click onAdvanced option.
  • Now, click on the Rebuild option and click Ok.
  • The recreating process of your Search Index will start and take some time to complete. Once it is completed then restart your system and verify indexing status.

Conclusion

Accessing Outlook mails is very important to use your valuable data and utilize it in the tasks & operations. The search feature in Outlook is very helpful for finding specific emails, but it can throw issues if the mailbox is oversized and stuffed,
In the above blog, we have discussed all the aspects along with reliable methods to fix Outlook Search not working. But, due to these small issues, your PST file can get severely corrupted, which will risk the entire data. PST repair is an easy practice as there are few manual methods, but they are only effective in small files and minor corruptions. So, we advise you to use the Goldytools Outlook PST Repair Tool, which is a smartly built software that fixes severely corrupted files easily.

Fix the Outlook error “Ost is not an Outlook Data File”

Summary

Microsoft Outlook OST files store your crucial business data but are prone to getting damaged or throwing errors. One such error is “OST is not an Outlook data file”, which leads to data inaccessibility. In this blog, we will learn about the root cause of this error, along with reliable methods to fix the OST file. However, you can fix the inaccessibility of your OST file by converting it into PST using the advanced Goldytools OST to PST Converter

.

Introduction

Microsoft Outlook is a reliable email that allows users to work in offline mode by creating a synchronized copy of their entire Exchange Server data. It lets you work freely on the offline OST file when disconnected from the server and automatically updates the data after the connection is restored. The issue arises when Outlook is not able to read or access the OST file & its data due to “OST is not an Outlook data file” error. These issues can occur after procuring corruption & bringing downtime, and also risk on your sensitive data, so you need to repair the OST file to proceed required operations.

There can be some common reasons behind the occurrence of errors where you will see a popup message on the screen showing:

““Cannot start Microsoft Outlook. Cannot open the Outlook Window. The set of folders cannot be opened. The file c:\Users\USERNAME\Local\Microsoft\Outlook\abc@xyz.com.ost is not an Outlook data file (.ost).””

ost

What results in “OST is not an Outlook data file”

Microsoft Outlook is indeed a reliable collaborative platform for organizations that are managing their business. But, the occurrence of errors is very common while using an OST file, which can be derived from different reasons. By undertaking the respective measures you can avoid experiencing such errors. Let’s discuss some of the most common reasons behind such errors:

  • Corruption: OST files often get corrupted which is a very common phenomena, and it can happen at any time due to many issues.
  • Sudden shutdown: Instances where the software and system gets abruptly shutdown, so it can severely damage your OST file.
  • Outlook version: The compatibility issue in Outlook version can slowly damage your OST file, so you should update your Outlook to the latest version.
  • Virus or malware: One of the most common yet dangerous causes of OST file related issues are virus attacks that highly affect the valuable data.
  • Synchronization failure: The connection failure between the OST file and Exchange Server can also throw OST is not an Outlook data file error.
  • Oversized OST file: Heavy flow of mails are received on the Exchange Server on a daily basis as it is synced with the OST file, that makes the OST file very large.

How to fix the “OST is not an Outlook data file” error?

Experiencing an OST file issue that prohibits your access to its data or not being able to open it and leaves the data at risk. This instigates the need to find prominent ways to repair OST file errors and secure business’s useful data. Find the effective manual methods to fix OST file errors:

Method -1 Create a new OST file

To fix the corruption in the OST file which stops you to open or makes it inaccessible.So, in such cases you must delete the old OST file and then create a new file. Below the

  • Locate the OST file from the system, and you can use the default location – C:\Users\AppData\Local\Microsoft\Outlook\.
  • Browse the corrupt OST file from the system and delete it.
  • After this, launch the Outlook application as it will automatically create a new OST file.

Method -2 Disable add-ins in Outlook

In Microsoft Outlook, users often include several add-ins to enhance the functionality but it sometimes invites errors due to bad configuration. So, we suggest you to remove add-ins by following the methods mentioned below:

  • Launch Outlook application.
  • Go to Files and click on Options.
  • Now, from the Add-ins de-select the add-ins you want to remove.

Method -3 Check for updates

It is very necessary to manage proper technical requirements to run both applications and files safe from unpredictable errors “OST is not an Outlook Data File”. So, you must check if your Outlook application & Windows is up-to-date or not. To update both Windows and Microsoft Outlook follow the steps below:

  • Launch Outlook application and go to Files.
  • Click on Office Account>Update Options where you can see if there is any update or not.
  • If there is an update available then click on theUpdate Now option.
  • After the update, then restart the applications.

Updating Window

  • In the Search bar type Settings and open it.
  • Now, go to Windows Update.
  • If it’s showing any new updates, then click on it and update the Windows to the latest version.

Conclusion

Microsoft Office 365 users often keep their data within the Offline OST file and forget to back it up to different locations. The possibility of experiencing errors like “OST is not an Outlook data file” is always high and, if the data is not backed up then you might lose it forever. In the above article, we have mentioned some useful methods that can help you to fix this error. But, there are some instances where your Outlook account gets damaged, and you can’t even configure the OST file to Outlook. So, we recommend you integrate a reliable Goldytools OST to PST Converter tool that easily exports and saves your corrupt or damaged OST file in PST file format.

How to Change OST File Name in Simplest Renaming Steps

As an Outlook user, you should change the OST file name to troubleshoot or fix a problem in the OST program. This will help you deal with some of the common issues with OST files, such as file corruption, OST not synchronizing with the local mailbox, etc.
The OST file is a local copy of the mailbox data in the Exchange Server. It allows users to work offline when a connection to the Exchange Server is not possible and synchronizes with the Exchange server when a connection is established. Here is a simple guide to changing the OST file name.

The need to rename the OST files:

Before proceeding with how to change the file name of the OST file, let us understand the need to change the OST file name. The main reason is to deal with the issues we encounter with the MS Outlook files. We can fix the issues encountered in MS Outlook by recreating and renaming the OST files. Some of the issues of MS Outlook that can be fixed by recreating the OST files are as follows.

  • When the OS Outlook gets disconnected
  • When the Outlook file freezes
  • When the email is not sent or received because of mailbox size
  • Outlook calendar is not displaying the information – such as Free or Busy.
  • Corruption in the OST files.

How to rename the OST file?

Following these steps allows you to change the name of the OST file and create a new copy at any time.

  • The first step is to exit the MS Outlook file.
  • Click on Start and then Click on the Control Panel.
  • Click on Mail and then Click on the Show Profiles link.
  • In the main window, select the profile name and then click on the properties.
  • Now, click on email accounts and choose exchange account
  • Click on change
  • Now, you must type the server IP address and the user’s profile ID.
  • The next step is to click on More Settings
  • Click on the Advance tab and then clear the Use Cached Exchange Mode.
  • Now click on the Outlook data file settings.
  • Show Profiles

  • Click on Disable Offline Use. After this step, a new dialogue box will appear. You have to click ‘Yes’ on the dialogue box. If the ‘Disable Offline Option Use’ is disabled, then it means that the Use Cached Exchange Mode Checkbox was not cleared in the previous step.
  • Click on Offline Folder File settings again.
  • Now click on OK.
  • Select the Use Cached Exchange Mode checkbox in the Cached Exchange Mode Settings.
  • Now click on OK, Click on Next, and then Click on Finish.
  • Click on Close in Account Settings and Mail Setup dialog box.
  • Disable Offline

    If the Outlook issues are not resolved after this step, you may have to try the method below to rebuild the OST file.

    Rebuilding OST file Outlook 2013 and 2010:

    In this method, it is important to first delete an OST file and then recreate and rename it in Outlook 2013 and 2010.

    Deleting an OST File:

    To delete the OST File, you have to follow the steps below.

    • The first step is to close MS Outlook.
    • Go to the default location where MS Outlook saves the OST file.
    • In MS Outlook 2013 or 2010, the default location is C:\Users\Computer Login ID\AppData\Local\Microsoft\Outlook.
    • After running this command, the list of Outlook files will appear.
    • Now, right-click on the OST file that needs to be deleted.
    • Now click on Delete.

    Recreate and rename the OST file Outlook 2013 and 2010:

    After deleting the OST files, you must recreate and rename them by following these steps. To complete this process and change the OST file name, follow the following steps.

    • Click on the Control Panel, and then Click on the Mail.
    • Click on the Show Profiles menu and then Click on the Add menu.
    • Try the new profile name and then click OK.
    • Click on the server settings ‘configure manually’ or click on the additional server types menu that pops up in a dialogue box and then click Next.
    • Select the MS Exchange or compatible service and then Click on Next.
    • Next

    • Type the IP address and user name of the Exchange Server. Make a check on the Use Cached Exchange Mode.
    • Click Finish.

    Opening the account in the MS Outlook file will now be possible. Thus, these are simple methods for changing the name of an OST file.

    If you think these step too much time cosuming the you use simple conversion method OST to PST Converter.

How to fix common problems with Outlook .pst and .ost data file

Summary

OST & PST in Outlook keep data secure but these files are prone to attain common errors such as corruption, inaccessibility, & file not found. Microsoft offers native tools to fix such errors but it’s necessary to use them properly. Let’s understand the types of OST & PST file errors along with their useful solutions. However, it is advisable to opt for the advanced Goldytools OST to PST Converter software that helps to export inaccessible OST files to PST as it is easier to transfer data in PST format

Introduction

The importance of data is very high for businesses operating on Outlook web or on-premises. Both store data in Offline Storage Table (OST) and Personal Storage Table (PST), but each file format serves different purposes. The crucial data of the business, including email, notes, contacts, calendars, etc, are stored within OST & PST files.
It is very important to protect an organization’s data as both OST & PST files can attain various errors, which can cause severe data loss, business downtime, inability to open Outlook, inaccessibility, slow performance, and more. There are numerous ways by which you can prevent experiencing such errors.
So, this blog below will help you with productive ways to repair Outlook PST files & OST files. Also, we guide you on how to convert OST to PST so you can protect Outlook data.

Types of errors occurred in OST & PST files

Microsoft Outlook hosts a heavy flow of mails on a daily basis that ignites the chances of error occurrence. These files carry mailbox data items due to which it cana throws several types of errors mentioned below:

  • Corruption: It is the most common issue experienced with OST & PST files as it can occur anytime, leaving the OST & PST files inaccessible. There are various reasons that can corrupt OST & PST files, such as sudden system shutdowns, antivirus updates, server crashes, large files, etc.
  • Virus attacks: The use of unauthorized software in your system can carry malicious viruses which can damage your system. As OST & PST files are stored offline in the system it also affects both the files.
  • Hard drive: Overload hard drives or infected sections in your hard drives are very prone to damage your PST & OST files if they are stored in those sections. So, checking the health of your hard drive by running a regular scan is necessary
  • .

  • Outlook getting slow : Usually, the data stored in OST & PST files becomes too large, which slows down Outlook or multiple application crashes. It is necessary to manage the large fOST & PST files for better performance.
  • Synchronization failures: OST files work offline but are synchronized with the Exchange Server, but sometimes failure in this sync will leave the OST file orphaned and inaccessible.
  • Errors detected: Some of the most basic PST file errors are “Outlook Data File Cannot Be Accessed” or “Errors have been detected in the file .pst” which are highly derived from corruption or configuration issues in Outlook.

Practices to avoid OST & PST files from attaining errors

Data in Outlook is always vulnerable to damages or errors; it doesn’t matter if it is a PST file or an OST file, as both carry crucial business data. Being different in operation, OST & PST attain errors that become a severe issue for you as it causes downtime. However, various precautionary measures can prevent your OST & PST files from throwing errors. Let’s find out some of these solutions below:

  • Manage updates: Keep your system, software, and Outlook application to its updated version, which prevents the occurrence of unwanted errors. Updates usually fix the loopholes & bugs that can bring corruption & damage to your system affecting the OST & PST files.
  • File size management: Large OST & PST files are the primary reasons for bringing issues, so it is advisable to maintain the size under 50 GB as recommended by Microsoft. Also, you must clean up the space by archiving the older emails, which are not required at the moment.
  • Use SCANPST tool: It is more beneficial to use the native tools provided by Microsoft, such as SCAN.PST and SCAN.OST to detect any issue within the OST & PST files.
  • Creating data backups: To protect your business from sudden interruptions due to the occurrence of any type of errors, it is necessary to create regular backups. This will allow you to restore the data during scenarios like corruption, server failures, and external attacks.

How to fix the OST & PST file issues manually?

The process to fix the issue with the OST & PST files is not easy as it depends upon the severity of the error. Still, the most feasible methods which are suggested are the use of Microsoft native tools, that scans and informs you about the issues behind the errors. Let’s discuss about the useful methods to fix the issue below:

Method 1- Using scanpst.exe

The two inbuilt tools offered by Microsoft to repair PST & OST files were scanost.exe and scanpst.exe, which are located in your system. Now, scanpst.exe is the ideal utility tool replacing scanost.exe, which is used to fix both OST & PST files. Here are the ways by which you can use the scanpst.exe tool in Microsoft Outlook 2010 and above versions:

  • Close your Outlook application.
  • Now, run the scanpst.exe utility tool.
  • Click on browse to select the PST file, the usual location for PST file is C:\Users\Documents\Outlook Files\.
  • Click on Start to run the scan.
  • After the scan completion, a summary will be seen on the screen and if there is any error detected, so you can click on Repair.

Method 2- Rebuild the OST file

The corruption in the OST file makes the file unable to open or inaccessible. It is more recommended to delete the damaged file and create a new file. But before deleting the OST file, you must backup the OST file data by converting into PST. Find the ways to rebuild the OST below:

  • Locate the OST file from the system, and you can use the default location – C:\Users\Anand\AppData\Local\Microsoft\Outlook\.
  • Browse the corrupt OST file from the system and delete it.
  • Now, Outlook will automatically create the new OST file which can check by relaunching the Outlook.

Method 3 – Manage the PST file size

It is evident the overstuffing the emails or storing large sized emails are the primary reasons behind the PST file errors. So, it is better to manage the size of the file and for that two main methods are archiving old emails and compacting the PST file.

Email archiving:

  • Launch Outlook and go to Files>Options.
  • Now, choose Advance from the side pane.
  • Under theOption for working with Outlook page’s >AutoArchive tab, click on the AutoArchive Setting… option.
  • Then, check theRun AutoArchive option and select the number of days for data archiving. After that, choose the location to save your archives and clickOK.

Conclusion

The issue in OST & PST files can damage your entire workflow and can also affect the valuable data. In the above blog, we have discussed the various types of issues that occur in the OST & PST files risking the data. Also, we have mentioned a few manual methods to fix the issue in the OST & PST file.

But, the manual methods are not as effective in the severely corrupted or damaged OST to PST files. So, we suggest you utilize the advanced Goldytools OST to PST Converter tool that easily exports OST file data to PST, which can be saved as a backup.

How to convert OST to PST – A complete guide for secure and safe conversion

Summary

Microsoft Outlook’s mailbox data items are stored in two main formats- OST & PST. But businesses often aim to convert OST to Outlook PST to secure data accessibility during a server crash, OST corruption, or rebuilding OST. In this blog, we will help you to convert the OST file into Outlook PST along with an automated solution. So, we highly recommend using Goldytools OST to PST Converter that easily converts entire mailbox data to PST.

Introduction

Organizations have shifted their businesses to Office 365 productive cloud platforms globally to enhance their workflow. It provides you with incredible features & applications such as Exchange Online, SharePoint, OneDrive, Outlook, etc. It has become easier for you to manage your collaboration and projects online.
Offline Storage Table (OST) and Personal Storage Table (PST) are the two main email file formats in Outlook that store the entire data of a mailbox. Even Though both fulfill different aspects for the user, you have to manage data within both formats. There are several practices that require you to convert your OST to a PST file, as both offer different capabilities.

So, this blog below will explain the process of exporting your OST file to Outlook PST and what are the circumstances that led to this action.

Understanding the difference between OST to PST files

Offline Storage Table (OST) file stores the synchronized copy of your mailbox data on the Exchange Server with the feasibility to access it offline. It allows you to edit your data while being disconnected from the Exchange Server and updates it automatically on the server after the connection gets restored.

Contrariwise, the Personal Storage Table (PST) file format is mainly used to backup your Office 365 data locally as it stores mailbox’s data items such as email, contacts, notes, calendar, etc. It is the most compatible email format which allows you to transfer data from one system and Outlook tenant to another.

Why do you need to convert an OST file to PST?

Businesses indulged with Office 365 tend to perform various tasks to manage their operation and collaborations. OST & PST both contain PST file data but they fulfill different responsibilities, so you often need to export OST data to a PST file. Let’s find out the key reasons behind converting OST to PST below:

  • Migration: When one business is shifting from one tenant to another then it is very crucial to migrate entire mailbox data to the destination tenant, which is not possible with OST. So, you need to export your OST file to Outlook PST so it can be configured to the destination easily.
  • Data backup & restore: The major advantage of converting OST file PST is to create data backup of your sensitive business data. PST files are portable in nature and can be easily configured again if the online server crashes. You can share the useful data in PST files during business collaborations, or migration as it is very compatible to restore the data at the desired tenant.
  • Data security: There are many instances where the OST files get damaged or orphaned if the Exchange Server crashes due to any technical reason. It is a very common thing in Office 365, so exporting your OST data to PST will keep your data intact & secure.
  • Storage management: Due to the excessive flow of emails on a daily basis, the storage space is overstuffed and throws different types of errors in Outlook or Exchange Server. So, it is better to archive your data in PST file format and save it locally

Manual methods to convert OST file to PST

Microsoft Outlook enables several features that allows you to export your OST file to PST using its in-house features. But to perform these transitions you need to understand the entire process properly otherwise it can fail miserably. There several ways that let you to export OST to PST mentioned below:

Method 1 – Utilize Outlook’s Import/export feature

  • Launch the Outlook application.
  • Now, go to theFiles and from the side pane chooseOpen & Export option and then click on Import/Export.
  • Import/Export

  • In the Import and Export Wizard, select the Export to a file and click Next.
  • Next

  • Now, on the Export to a file page, choose Outlook Data FIle (.pst) and click Next.
  • Outlook Data FIle (.pst)

  • In the Export Outlook Data File page, choose the folder you want to export. Also, you can check the Include subfolders box, to add all the subfolders inside the main folder. Then, click on Next.
  • Next

  • At the end, choose the location where you want to save your PST file in the system and click on Finish.
  • Finish

Method 2 – Setup auto archive in Outlook

  • Open Outlook and go to Files>Options.
  • From the side pane, choose the Advanced option.
  • Now, under the Option for working with Outlook page’s >AutoArchive tab, click on the AutoArchive Setting… option.
  • Advanced

  • On the AutoArchive page, check the box of Run AutoArchive every and choose the number of days you want. Then, click on Browse to select the location where you want to save these archives and click OK.
  • Run AutoArchive every

Method 3- Use drag & drop option

  • Launch the Outlook application.
  • Now, click on New Email>More items>Outlook Data File.
  • On the New Outlook Data File page, choose Outlook data file (.pst) and click OK.
  • Name your new PST file and select the location you want to save in your system.
  • After that, open the old OST file and new PST file simultaneously, then drag the file from the OST file & drop it in the PST file.

Automated solution to convert OST to PST

Executing the manual methods to export OST to PST is useful but is not reliable enough for businesses. If the OST file is damaged with corruption or is inaccessible, then the above methods might fail and can become very time-consuming. The organization often looks to convert multiple files in quick time with no failures & data loss, which is not possible through manual ways. So, businesses actively aim to indulge with an ultimate third-party solution that enables smooth and easy OST to PST conversion.

Goldytools OST to PST Converter is advanced and feature-loaded software that allows you to export OST files to PST without any data loss. It is capable enough to convert multiple OST files along with the entire data items of the mailbox, such as emails, contacts, notes, calendars, etc. So, this tool is the perfect solution for your OST to PST conversion process with high accuracy & easy-to-use interface.

Conclusion

Enabling a successful transfer of an OST file to a PST file is a common practice for businesses but not as easy to execute. In the above blog, we have discussed various aspects of the OST to PST export and what are the effective ways to perform it manually. However, we have highlighted the fact that manual methods are not trustworthy & viable options, as the automated solution is far more convenient and result-oriented.

Solutions for Outlook PST file Errors have been Detected Issue

You can encounter error messages when you use Microsoft Outlook versions 2003, 2007, 2013, 2016, 2019, and 2021. These error messages might be, ‘Outlook PST file errors have been detected?’. Errors in Outlook could be of many different types. There are many solutions to these error messages.
One significant solution for these issues with Microsoft Outlook is Scanpst.exe, an efficient inbox repair tool. Let us discuss some of the most common errors that might erupt in Outlook and the probability of them being detected on most users’ accounts. Exploring the manual solutions and steps to resolve the Outlook PST file errors the users have detected is also beneficial.

Some of the most common Outlook PST file errors:

Some common errors in the Outlook PST files are as follows.

  • Outlook crashes due to corruption in the Outlook data file, whether PST or OST.
  • The file username PST is not a personal folder file.
  • The PST file could not be found or could not open the folder.
  • The file PST could not be accessed, or access was denied.
  • MS Outlook cannot open the data file.
  • The PST file errors have been detected.

Apart from some errors mentioned here, the user might also detect other Microsoft Outlook errors in the PST file. Experts usually suggest downloading the free demo version of the Outlook PST Repair Tool, which helps to resolve all of the PST file errors.

Reasons for finding the Microsoft Outlook errors in the PST file:

Some reasons why we find the PST file errors are as follows.

  • One of the main reasons is unwanted corruption of PST file. Corruption might occur due to the oversized PST file. Other reasons are multiple files saved on the system, a malicious attack on the system that can make them inaccessible, etc.
  • MS Outlook gets installed in the bad sectors of the hard drive.
  • Virus and Malware attacks can result in Outlook PST file errors.
  • Microsoft Outlook will stop while receiving and sending emails.
  • Outlook can also stop while synchronizing or for other reasons.

Solutions for Outlook PST file errors:

There are two solutions to the Outlook PST file errors. One of the solutions is the manual method of using the inbox repair tool. This is indeed an inbuilt utility that Microsoft and the second method have offered by using reliable Goldytools Outlook PST repair software.

Method 1: Using Goldytools Outlook PST repair Software to fix Outlook PST File Error:

This automated solution helps repair corrupted PST files with a single click. Irrespective of the level of corruption, this software is quick enough to scan and fix the error. The procedures for performing Outlook PST repair using this application are as follows.

  • As a first step, run and install the software on the computer.
  • The second step is to select the file using the tool. Then, browse the destination.
  • After the PST file is added, the next step is to have a proper view of the data items so that you can verify the data.
  • After this, ensure you choose the specific folder to repair as PST file format.
  • Select the filter you want to apply in the Filter options and click the “Convert” button.

Method 2: Using the Inbox Repair Tool:

Follow these steps to fix Outlook PST file errors using the manual method.

Step 1: Exit Outlook and Start:

  • Close Outlook and then run the Scanpst.exe. This will remove the damages from the PST
  • Automatically start the inbuilt tool.
    1. The Eay Fix Wizard can be used automatically if users use Outlook 2013 or a later version.
    2. Click on Easy Fix Wizard. Run the downloaded file and go through the required steps within Wizard.
  • To start the Microsoft tool manually, locate the ScanPST.exe. Then, double-click on the file.

Step 2: Select Outlook Data File:

In the inbox repair tool, always ensure you first browse the location and select the PST file, and at last tap the Start button.

Step 3: Initiate the repair process:

Once you click the repair button, complete the eight phases of fixing the PST file. The next step is to open MS Outlook to access the PST file.

Bottom Line:

The scanpst.exe tool usually runs multiple times to completely fix Outlook PST file errors. Users should wait until the process is fully completed.Goldytools Outlook PST repair are valuable tools for fixing Outlook errors.

How to recover deleted emails and mail items from OST files

Generally, an Offline Outlook Data File (OST file) is used to store the synchronized copy of the information in the mailbox. It generally stores this information on the local computer. However, in certain instances, such as data corruption and network outages, it might be required to recover the emails from the OST files. Let us discuss in detail how to recover deleted OST files here.

Recovering or rebuilding the OST files:

In past versions of Outlook, Microsoft has recommended using the scanost.exe tool to reduce the errors that might occur with the offline OST File. Microsoft actually recommends users delete their offline Outlook Data File and allow the OST to redownload the information from the server. We can rebuild the OST files in these situations.

  • Before beginning the process, you must connect with Outlook to complete the action.
  • Outlook should be kept in Online mode.
  • Errors should have been detected in the OST file in Outlook.
  • Outlook is not able to open the data file or is not able to open the set of folders.
  • There are issues with synchronization between Outlook and the Outlook Web app.

These errors and problems in synchronization might be caused by corruption in the OST files, and in some cases, emails may not be synchronized from the server. When you have an OST file and cannot access your email account through Outlook, extracting the data is the best alternative forOST recovery.

Extracting data from the OST files:

If you are facing any connection issues with Outlook and cannot rebuild your OST files, several tools are available to help recover deleted OST files. The tools we list here help extract emails from the OST files without needing a server account connection or the MS Outlook tool. These tools help recover important emails, tasks, contacts, and other data from the OST file. These files can also be saved in different file formats for future use. The tools used for OST recovery are,

Exporting emails with the help of OST and PST Viewers:

The OST PST Viewer tool can help recover encrypted, orphaned, corrupted, and password-protected OST files. This tool also makes it possible to export emails from a single OST file to different formats, such as PST and HTML, PDF, DOC, MHT, EML, MSG. The following is the step-by-step process for exporting emails from the OST file.

  • Close MS Outlook and all other mail-enabled applications that might use the Outlook mailbox.
  • Download the Goldytools OST Viewer and run it on the PC.
  • Browse the OST file the user wants to recover and click Open.
  • Select the mailbox folder in the ‘All Folders’ pane and preview all the items, such as messages, contacts, tasks, appointments, notes, and other journal entries.
  • Go to File and click on Export.
  • Choose the file format to export, and click OK.
  • Choose the current mailbox option and choose the destination folder as well.
  • Customize the additional settings as an option.
  • Click Run and wait for the export process to be completed.

Limits on recovering data from OST files:

The number of OST recoveries that can be performed is unlimited. However, specific license plans might impose severe recovering restrictions on the maximum file size. These soft limits will not be activated during infrequent use. They are designed to prevent the recovery of large volumes of data.
Recovering the emails from an OST file with the help of PowerShell:

PstScan Pro is an expert OST to PST converter tool that helps in bulk email recovery from OST files using batch scripts using Power Shell and other automation tools. To perform this, we can use the product’s command-line options. The following are two major scenarios we might encounter in the process of OST recovery.

  • Example 1: Search for the OST mailboxes and export the items to the PST files. In this example, we can search for the OST mailboxes for items in which the email address is equal to the sender. The search results will be exported to the D: PSTQueries folder.
  • Example 2: This focuses on converting all the users’ OST files to the PST files in the directory.

Now, there is no need to worry about recovering deleted emails. With the help of Goldytools OST to PST Converter tools, it is possible to convert inaccessible OST files into PST files in Outlook. These tools can also help an individual extract entire mailbox items from the OST files and save them in the PST format with a 100% precision rate. The tools also allow users to save the data in different formats as required.

How do I reduce the size of the Exchange EDB file?

Microsoft introduced the Exchange server in 1993, and it was with this introduction that the EDB files came into existence. However, the most common issue that users reported with the Exchange EDB files was their size, as they were too big. So, let us try to know the most effective way to reduce the Exchange EDB file size here.

What is an EDB File?

EDB stands for the Exchange Database File. It serves as the principal repository of the Exchange Server database to store all mailbox data. It also encompasses data components such as messages, attachments, emails, folders, etc. Each EDB file will have a corresponding STM file comprising the actual messages from SMTP.
These files will automatically grow as data gets added within the EDB files. Even if the data is removed, the EDB files will never compress. Therefore, there is a need to reduce the exchange EDB file size . Here is the step-by-step guide on reducing the EDB file size.

How to fix the exchange EDB file size:

With increasing EDB file size, the server might get out of space. The following methods can be used to reclaim the server space.

  • Create a new database and move the data from the old mailbox to the new one.
  • Offline defrag can be performed to shrink the Database.
  • The location of the mailbox database can be moved.

Reduce exchange EDB mailbox database by using Eseutil:

  • It is possible to reduce the exchange EDB file size by using Eseutil, but the Database should be dismounted at the time of file reduction.
  • A new file created in the process by Eseutil will exist along with the old one. Thus, there should be enough disk space available for such files to perform defragmentation.
  • If there is no free disk space, a temporary location should be specified while running the Eseutil.

The procedure of performing the defragmentation

  • Temporarily dismount the mailbox database before defragging the Database.
  • Dismounting can be performed with the help of the exchange management console.
  • Select the mailbox you wish to move, click on it, and then click on the dismount database.
  • Run the Eseutil to defrag the Exchange EDB file.
  • Mount the Database by running the suitable command.
  • Check the database size and the available white space of the selected mailbox database.
  • Run the full backup of the Database.

Move the Database by using the exchange management console:

We can reduce the exchange EDB file sizeby following this procedure.

  • Open the exchange management console.
  • Select the mailbox of Exchange 2010 in the organization configuration.
  • Select the mailbox you wish to move, right-click on it, and then click the Move database path.
  • Click on the move database path to see where you can enter the new path for the data and the log files.
  • After changing the path of the EDB files, click move.
  • This will help you reduce the exchange EDB file size.
  • This Move operation will take some time, depending on the mailbox size.
  • After the move operation is complete and we get the completion information, we can click the Finish button, and the wizard will close.

Manual methods are also available as an alternative to EDB to PST converters . However, they are not reliable and don’t offer a complete solution. They can come in handy if the EDB file is corrupted. In such instances, we might require third-party tools to handle the corruption in the EDB files.

Making use of third-party software:

There are many EDB to PST converter software programs that help recover corrupted EDB files. They also help repair the Exchange mailbox from corruption without data loss. These software tools render quick and advanced options to recover and fix the corruption in the Exchange database and repair the file.
These software tools can load any EDB file of any size and help users with numerous export options, enabling users to export many mailboxes and EDB files seamlessly. They also support different Exchange mailboxes such as shard, archive, legacy, emails, journals, tasks, contacts, calendars, etc. The EDB to PST converter software can support both public and private STM and EDB files. The users will be able to export these files to the selected export option simultaneously in a simplified manner.

Conclusion:

It is recommended that advanced EDB to PST converter software be used to reduce Exchange EDB file size and recover corrupted EDB files. These tools serve as complete solutions to resolve any issues with database corruption and Exchange and render complete data security. It is possible to download the free version of the EDB to PST converter tool to check before purchasing the complete software version.

How to Move Emails from Thunderbird to Outlook 2019, 2016

Email is the most widely and commonly used method of communication on the professional front. Thunderbird is one of the most commonly used email clients for official correspondence. It has impressive features such as junk filtering, message management, and open source.
However, many professionals wish to move emails from Thunderbird to Outlook owing to Thunderbird’s configuration issues. Also, users prefer MS Outlook for its user-oriented features and ease of installation in different browsers. Here are some prominent and working ways to move Emails from Thunderbird to Outlook 209, 2016.

The need to export emails from Thunderbird to Outlook:

  • Outlook is a Microsoft product and thus comes with a complete suite that is easily accessible and compatible.
  • Outlook has a better spam filter and goes miles in mitigating phishing attacks.
  • Thunderbird lacks a task and calendar list.
  • Outlook supports complex automation rules to allow seamless workflow and to manage email messages.
  • Though Thunderbird supports email clients with POP3, SMTP, and IMAP protocols, it can be configured only with an add-on.

Free Way to import Thunderbird to Outlook:

  • Run Thunderbird.
  • Choose File > New, and pick the existing Email account
  • Enter the login credentials
  • Click Done
  • Install and Run Outlook.
  • Click File> Add Account
  • Enter the Login credentials and complete the configuration
  • Now your Import from Thunderbird to Outlook is successful.

However, the manual method is not suitable for performing the export from Thunderbird to Outlook in batches, and there is a risk of data loss or corruption. Also, the manual method is time-consuming and has little to do with deleted emails. Thus, the best Way to do this is to adopt the software-based MBOX to PST conversion option.

Exporting Thunderbird to Outlook with the help of Drag and Drop Method:

With the help of the drag-and-drop option, it is important to export the Thunderbird emails in the EML files. Then, the next step is to drag and drop the EML files to a freshly opened Outlook folder.

  • Export the MBOX emails in Thunderbird into an EML file.
  • ➢ Open the messages folder from 2019 or 2016 that you wish to export
    ➢ Choose a single email or entire message list as per the requirement.
    ➢ Right-click on the selected message and choose the ‘Save As’ option
    ➢ To export the EML file, we can create a new folder.

  • Drag and drop the exported EML file into the Outlook folder.
  • ➢ Open the folder where you wish to export the EML files in Windows
    ➢ Drag and drop the exported EML files into the Outlook folder.

  • Export the emails into PST format.
  • ➢ Open Outlook
    ➢ Select the Open and Export option from the file menu and click on export or import.
    ➢ Choose the export option and press Next
    ➢ Choose the Outlook Data File in the .pst format and click on Next.
    ➢ Select the folders where the exported EML files are saved
    ➢ Choose a path for the PST file to save and click Finish.

Professional Way to Convert Thunderbird Emails to Outlook:

MBOX to PST Converter is a very easy-to-use and well-known tool that helps export Thunderbird to Outlook. It has a number of user-friendly options for exporting Thunderbird to Outlook 2019, 2016, and other versions, which are as follows.

  • It is a very secure approach that prioritizes data privacy.
  • The software exports Thunderbird emails and their properties without any changes.
  • It is easy to export large MBOX to PST files, and it works with multiple email clients and exchange servers.
  • A filter option allows you to exclude all unwanted items in the MBOX files and export only the required items.

Quick steps to export Thunderbird Mail to Outlook:

  • Run the MBOX to PST converter software in the system.
  • Ensure you tap on the add files and select Thunderbird MBOX.
  • Pick the PST format and also choose the destination folder path.
  • Start the conversion process by clicking on the export icon.
  • Click on the File and choose the Import/Export option to import PST in Outlook.

Importing the converted PST files to Outlook:

  • As a first step, open Outlook and click on the File option.
  • Then, click on the open and export option. Then, choose to import or export.
  • A wizard will open; now, choose ‘Import from another program or file’, then click Next.
  • Select the Outlook data file and click on Next.
  • Choose the PST file with the help of the browser button, choose the duplicate options, and click the Next button.
  • Choose the folder from where you wish to export the items and click on Finish.

Conclusion

It is better to adopt software to perform the Thunderbird to Outlook transition rather than the other manual methods. The manual methods have limitations, whereas the MBOX to PST converter software offers an easy and accurate way of conversion.

How to Convert NSF to PST File for Outlook in Easy Steps?

Have you been having trouble migrating your Lotus Notes data to Microsoft Outlook? The process may look cumbersome, but if the right procedures are followed, you can easily convert NSF from Notes Storage Facility to PST from Personal Storage Table for integration into Outlook. This guide will explain both the traditional and easier ways to make the conversion so that you do not have to struggle.

Why is it Necessary to Migrate NSF to PST File for Outlook?

Switching from Lotus Notes to Outlook requires the NSF files of IBM Notes and convert them to the PST files recognized by Microsoft Outlook. Here are the key reasons:

  • IBM Notes and Microsoft Outlook do not work well together by design.
  • Easy transfer of emails, contacts, and calendars.
  • Improved accessibility of options in Outlook within a clear and intuitive interface.
  • Preventing loss of data during an organization’s migration.
  • It allows for additional features of Outlook, such as searching for mail and scheduling.
  • This will helpreduce this organisation’s dependencyn’s dependency on Lotus Notes software.
  • Makes it easier for the employees to access old archives.
  • Helps reduce organizational email clutter.
  • Allows for cross-platform working.
  • A must-have for any business that decides to use Outlook as their main email client.

Methods to Convert NSF to PST File for Outlook

1.Export NSF Files to CSV

The first process of the NSF to PST conversion is the exportation of your NSF data into a CSV format using IBM Notes. Here’s how you can do it:

  • Open IBM Notes: Open the desktop application that is IBM Notes.
  • Locate the NSF File: To open Lotus Notes Application, go to File > Open > Lotus Notes Application, then select the desired NSF file.
  • Export to CSV: Go to File > Export. Type in a file name, specify the location, and finally select the CSV file format.
  • Set Export Options: Export settings include data details, the character set to use, and the scope of the export.
  • Save the File: Press OK to export the data in CSV format in the present window.

2.Using Microsoft Transporter Suite

Microsoft has the Transporter Suite, a tool for moving mailboxes from Lotus Notes to Exchange or Office 365. This process involves a direct importation of the data from NSF to Exchange, where it can be viewed using Outlook.

  • Install Microsoft Transporter Suite: The suite can be obtained and installed from the official Microsoft website.
  • Launch the Tool: Click the Transporter Suite Management Console link.
  • Configure Domino Server Connection: Supply all the account authentication information and connection information to access your Lotus Notes.
  • Migrate Data: If you have an Exchange or Office 365 account, you can follow the on-screen steps to move the NSF mailbox to that account.
  • Access Data in Outlook: After that, you must open Outlook to view the information that was transferred to it.

3.Import CSV File into Outlook

Once you’ve exported the NSF file data to a CSV format, you can import it into Outlook to complete the process:

  • Launch Outlook: Open Microsoft Outlook.
  • To access the Import Wizard: Open the software, click on File at the top of the screen, choose Open & Export, and then Import/Export.
  • Select Import Option: Select Import from another program or file and press the Next button.
  • Choose CSV Format: Choose the Comma Separated Values option and click on Next button.
  • Browse for CSV File: Find and choose the CSV file which you exported from IBM Notes.
  • Select Destination Folder: Select the Outlook folder where you want to save the imported data, then click on Next.
  • Map Custom Fields: Make sure that e-mail, date and subject fields are properly mapped.
  • Complete the Import: To complete the import process to Outlook, click on Finish.
    While these manual steps work well, they also take time and are likely to be inaccurate. For an easier and faster conversion, opt for an automated NSF to PST Converter.

4. Use Goldytools NSF to PST Converter for Faster Results

To make the Lotus Notes to Outlook conversion fast and smooth, the only way out is to use an automatic NSF to PST Converter. One reliable tool for this purpose is the Goldytools NSF to PST Converter, which offers the following features:

  • Effortless Conversion: The tool easily migrates NSF files into PST format within just a few clicks.
  • Faster Processing: Copes well with large NSF files and, if required, splits the NSF file into many PST files.
  • Custom Options: Offers filtering capabilities and preserves the folder structure during the transition.
  • Flexible Formats: The user can store the data in PST, HTML, TXT, and RTF formats.
  • Compatibility: Works with all kinds of Lotus Notes and Outlook versions.
  • Trial Version: Allows you to convert up to 10 files per folder without any charges

By using the Goldytools NSF to PST Converter, you can avoid the hassles of a manual process and successfully migrate data without risk of data loss. It is best if you are from Lotus Notes and are in the process of migrating to Outlook.

Conclusion

Conversion of the NSF files to PST files is the key requirement of migrating from Lotus Notes to Outlook. Though simple techniques such as copying data from NSF to CSV and then importing to Outlook can be done, they take a lot of time. To get a faster and more reliable solution to this problem, the reader is encouraged to download the professional NSF to PST Converter known as Goldytools.

The various methods above can help you make your migration smooth and rapid. Pick the option most convenient for you and use all Outlook’s advantages without facing various difficulties. Get started today!

How to Fix the ‘Exchange server is in inconsistent state’ Error?

Microsoft Exchange Server is an essential server solution for many organizations as it helps with email. Nonetheless, administrators may experience an Exchange Server error stating it is in an Inconsistent State while upgrading or reinstalling the server. This particular error can affect email services most of the time and cause a lot of downtime.

In this article, there are different reasons why you get such an error message and how to solve it.

Reasons for ‘Exchange Server is in an Inconsistent State’ Error

The “Exchange Server is in an Inconsistent State” is normally caused by issues related to existing server objects and new installations or updates. It is easier to find a cure if one understands the causes of the problem, so it will be easier for administrators to diagnose and handle this problem. Here are the primary reasons for this error:

  • Active Directory objects currently utilized in the Exchange Server
  • Previous version of Exchange was not uninstalled fully or inadequately uninstalled
  • Thieves usually penetrate Exchange database files through corrupt channels.
  • Domain renaming issues of old and new Exchange servers
  • Installation failures, upgrading issues, and intermittent system crashes
  • Every now and then, replication of Active Directory becomes inconsistent.
  • Lack of sufficient permission for the account doing the installation
  • Clutter left behind from prior installations of Exchange
  • Exchange versions and the underlying Windows Server incompatibility
  • Complex or incomplete Updates of the Exchange Server components

Methods to Fix ‘Exchange Server is in Inconsistent State’ Error

Here are three easy solutions for the ‘Exchange Server is in an inconsistent state’ issue. Both methods address the problem differently. If you follow these steps, you will be able to reinstall or upgrade the Exchange Server without coming across this usual error.

Error

Method 1: Rename New Exchange Server Domain Name

The first and the easiest way is to give the Exchange server a new name. Change the name of at least two servers to the same name in the domain and then add the server to the domain controller.

  • Change the current Exchange Server to another name.
  • To do that, you should rename the server and then re-join it into the domain.
  • You should install a new copy of the Exchange Server or upgrade the existing server in your system.

Method 2: Remove the Exchange Server Object and Relaunch the Exchange Setup

Another procedure is to delete the Exchange server object from the Active Directory prior to the reinstallation or upgrade.

  1. Click on Start and then click Run, then type in ADSIEDIT.mSC and hit the enter button.
  2. Go to CN=Configuration, CN=Services, CN=Microsoft Exchange, CN=, CN=Administrative Groups, CN=, CN=Servers, CN=.
  3. Locate the server object and get rid of it.
  4. Wait for some time until Active Directory has replicated the changes.
  5. To upgrade or reinstall, simply restart the exchange setup.

Method 3: Delete the Exchange Server Object from the Active Directory

Another way to solve this error is to remove all the unnecessary objects of the Exchange server from the Active Directory.

  • On the keyboard, press the Win+R key and then type ADSIEDIT.msc.
  • Follow this path:
  • ○ CN=Configuration, CN=Services, CN=Microsoft Exchange, CN=Your Organization Name, CN=Administrative Groups, CN=Exchange 2010 Administrative Group, CN=Servers, CN=Server Name.

  • Locate and erase the server object.
  • Wait for the active directory to update.
  • Restart the setup of the Exchange Server.

Method 4: Use Goldytools EDB to PST Converter

If the above-mentioned manual methods do not work or the OST file is heavily damaged, then using the Goldytools EDB to PST Converter is very efficient. This tool can easily convert OST files, which are hard to access, into PST format and can easily recover emails, contacts, calendars and other mailbox data without any technical hassle.

Choose Source Exchange Database

Choose Source Exchange Database

  • Lauch the Goldytools EDB to PST Converter and click on the “Select EDB” button.
  • In this window that appears, navigate and choose the.EDB file from your computer.
  • If required, also search for and choose the.STM file (if the EDB file is of Exchange 2000 or 2003).
  • Choose a temporary folder for storing temp files; this is a temporary path.
  • Click “Next” to proceed.
  • Select Mailboxes
    Select Mailboxes

  • The software will now list and show the mailboxes that are present in the selected EDB file.
  • You can choose to convert all mailboxes or the specific ones that you would wish to be converted to PST.
  • Click “Next” to proceed.

Start Conversion
Saving process

  • The selected mailboxes will begin the process of conversion to PST.
  • The software will show the status of each mailbox being converted with status such as Complete or In progress.
  • After that the conversion process is complete, a message “Saving process completed successfully” will appear.

Open Target Folder
“Open Target Folder

  • Once the conversion is done, click on the “Open Target Folder” to get the list of the newly created PST files.
  • It is now possible to import all these PST files into Outlook for easy retrieval of your data.

Conclusion

Fixing the ‘Exchange Server is in Inconsistent State’ Error can be a tricky affair if you are not so sure about some of the procedures outlined above. Still, they may be time-consuming and not wholly effective, particularly when the file is extremely corrupted.

For easier and faster conversion of EDB to PST files, we suggest that you download Goldytools EDB to PST Converter. This tool is built to particularly work with corrupted OST files, which enables you to get your data back within no time.

Best 6 SQLite database recovery tools

An SQL database is a system that organizes and manages data in a structured way. SQL or structured query language is the language used to interact with and query this database. Note that an SQLite database is a specific type of SQL database known for being lightweight, serverless, and self-contained. This makes it an ideal choice for applications that need a local storage solution without the complexity of a full server-based system.
While SQLite databases are great for storing data, they are susceptible to damage or corruption. This can put your important information at risk. If you discover that your SQLite database is corrupted, you can either attempt a manual fix or use an automated tool like the SQLite Database Recovery tool to restore it.

Top 6 SQLite database recovery tools

Here are the top six tools that can help you fix or recover corrupted files easily.

1.Goldytools SQLite Recovery

Best For: Users looking for an affordable, simple, and reliable SQLite database recovery solution.

Goldytool SQLite Recovery is a powerful tool designed to repair corrupt or damaged SQLite databases. SQLite administrators and tech communities highly recommend it for its ease of use and efficiency. Goldytools can repair tables, indexes, triggers, and views, and even recover deleted records. With a user-friendly interface and preview options, it allows users to fix and restore corrupted SQLite databases without losing data integrity.

Key Features:

  1. Goldytools can repair corrupt SQLite files caused by improper shutdowns, malware, or system errors. It scans the entire database and restores objects with minimal data loss.
  2. The tool can trace and recover deleted records during the repair process, organizing them in the repaired database.
  3. The tool offers an intuitive two-pane view, with a left pane for navigating database objects and a right pane for viewing the data in each object.
  4. It supports DB, DB3, SQLite, and SQLite3 files, including versions up to 3.27.2.
  5. After recovery, you can save the data in .db format or rebuild a new database with only the repaired components

Pros:

  • Simple interface, suitable for non-technical users.
  • Recovers deleted data during the repair process.
  • Allows users to verify the repaired data before finalizing.
  • Provides good value for the price.
  • Works with various SQLite file formats.

Cons:

  • The free version allows only a preview and saving of up to 20 items

2. SysTools

Best For:Users who need a quick and straightforward SQLite recovery tool.

SysTools SQLite Database Recovery tool is an intuitive software designed for fast and efficient recovery of corrupted SQLite databases. It supports the recovery of lost SQLite database files and offers a smooth process to extract tables, records, indexes, and other vital data structures.

Key Features:

  • Recovers damaged SQLite files (.db, .sqlite).
  • Extracts tables, indexes, and stored procedures.
  • Supports password-protected SQLite files.
  • Offers a preview of data before recovery.
  • Simple and user-friendly interface.

Pros:

  • Fast recovery process with minimal system resources required.
  • Provides a free preview of recoverable items before purchase

Cons:

  • Limited advanced recovery options compared to other tools.
  • 3.EaseUS

    Best For: Users who want a broader data recovery tool with SQLite support.

    EaseUS Data Recovery Wizard is a versatile data recovery software that supports a wide range of file systems and database formats, including SQLite. It’s known for its simple interface and the ability to recover lost or deleted files from a variety of devices, such as PCs, laptops, and external storage devices.

    Key Features:

    • Recovers SQLite files lost due to accidental deletion, system crashes, or corruption.
    • Supports multiple file formats and devices.
    • Works on both Windows and macOS systems.
    • Includes a preview feature for files before recovery.
    • Can restore files from formatted or damaged partitions.

    Pros:

    • All-in-one data recovery tool with broad file format support.
    • Simple interface that is perfect for beginners.

    Cons:

    • The free version has a limited recovery size (up to 2 GB).

    4. DiskInternals

    Best For: Advanced users who need deeper repair and recovery options.

    DiskInternals is another powerful SQLite Database Recovery tool that specializes in repairing and recovering SQLite databases. It’s designed for more advanced users and offers additional options to restore SQLite databases from corrupted or damaged files.

    Key Features:

    • Supports recovery of SQLite databases (.sqlite) on Windows.
    • Recovers lost data from corrupted or formatted SQLite databases.
    • Can restore entire database structures, including tables, records, and indexes.
    • Allows you to preview recoverable data before performing the recovery.
    • Works with a variety of file systems, including NTFS, FAT, and EXT.

    Pros:

    • Advanced options for experienced users.
    • Excellent for recovering large and complex SQLite databases

    Cons:

    • The user interface may seem complex for beginners.

    5.Recoverit

    Best For: Users looking for an affordable and user-friendly recovery solution.

    Recoverit by Wondershare is another popular data recovery tool that offers a dedicated solution for SQLite database recovery. It’s well-suited for users looking for a cost-effective solution that doesn’t compromise on performance. Whether your SQLite database file is deleted, corrupted, or damaged, Recoverit can help you get your data back.

    Key Features:

    • Simple and easy-to-use recovery process for SQLite database files.
    • Recovers lost files from corrupted or inaccessible SQLite databases.
    • Compatible with both Windows and macOS.
    • Offers both basic and advanced scanning modes.
    • Supports a wide range of file types and database formats.

    Pros:

    • Intuitive user interface that makes the recovery process easy.
    • Affordable pricing for individual users.

    Cons:

    • Limited advanced repair options compared to more specialized tools

    6. Kernel

    Best For:Users looking for a specialized SQLite repair tool with deep functionality.

    Kernel for SQLite Database Repair is a dedicated SQLite database repair tool that helps recover and repair corrupted or damaged SQLite database files. It is particularly useful for users dealing with large databases and offers advanced features to fix and recover data.

    Key Features:

    • Repairs corrupt SQLite databases and restores lost data.
    • Recovers SQLite database objects like tables, indexes, triggers, and views.
    • Supports both local and network-based recovery.
    • Allows you to preview recoverable data before saving it.
    • Provides detailed reports on recovery progress and file statistics.

    Pros:

    • Highly specialized for SQLite database repair.
    • Comprehensive recovery options for both basic and advanced scenarios.

    Cons:

    • A bit more complex than other tools, making it less beginner-friendly.

    Conclusion

    SQLite databases are great for managing data, but they can sometimes get corrupted. Thankfully, tools like Goldytools make it easy to fix and recover lost data. Whether you’re a beginner or an expert, there’s a solution to fit your needs. You can quickly restore your database and keep your data safe with the right tool.

    Lost Partition Recovery from Windows Machine Hard Disk

    If you are looking for a solution to recover lost, corrupt, or damaged partitions from a Windows machine’s hard disk, then this article is a good read and will really prove helpful for recovering lost or deleted partitions.
    For a machine to boot correctly, the two pre-requisites are
    – Master Boot Record (MBR) exists and is safe
    – A partition Table exists and contains at least one active partition.

    What is Partitioning, and What Purposes Does it solve?

    Partitioning is the process of dividing a hard drive into separate sections. It serves many purposes as:

    • It helps organise files by separating them into different sections.
    • Allows multiple operating systems to be installed on the hard drive.
    • Improves system performance.
    • Separates user data from system data
    • Helps backing up your data easier
    • Improves scalability and availability.
    • Reduces contention
    • Divides data by usage patterns
    • Protects system files from accidental deletion and corruption.

    What causes the loss of Partitions?

    Partition loss is just like a havoc for any user or organisation. Whatever may be the reason for the inaccessibility of your stored data, it is just like a bad dream for anyone.Some of the common reasons leading to the loss or damage of partitions are –

    • Virus or malware attacks
    • System crash
    • Hard drive failure
    • Power Outages
    • User Error
    • Corrupted Master Boot Record (MBR)
    • Damaged BPB
    • Damaged Globally Unique Identifiers Partition Table (GPT)
    • Damaged Partition table
    • Issues in the Boot sector
    • Bad sectors
    • Changes in Hard drive due to upgrades
    • Repartitioning hard drives
    • OS update

    Error Messages on Loss Partitions

    On partition loss or damage, you may encounter several error messages. Some of them are as follows:

      • Diskpart has referenced an object which is not up-to-date
      • Check and repair disk errors
      • A disk partition that was created immediately before power failure or system crash can’t be formatted or used
      • The drive is not formatted
      • Drive or Device Not Found
      • “An operating system wasn’t found. Try disconnecting drives that don’t contain an operating system.”
      • The location is not available

    location is not available

    Manual Solution for Partition Recovery

    Method 1: Use Command Prompt (CMD)

    Step 1:In the Windows search box, type CMD.
    Step 2: Right-click the Command Prompt app, then select Run as administrator.
    Step 3: Type chkdsk X:/f/r/x (replace X with the drive letter of the corrupted partition), and press Enter.

    Method 2: Use Command Prompt (CMD)

    Step 1: In first step, type CMD in Window Search Box.
    Step 2: Right-click the Command Prompt app, then select Run as administrator.
    Step 3: Enter the below commands in sequence and press Enter after each command:

    • diskpart
    • List disk [displays all drives on the system]
    • Select disk X [replace “X” with the hard drive number that contains lost partition]
    • List volume
    • Select volume X [replace “X” with lost partition number]
    • Assign letter=X [replace “X” with available drive letter]

    Step 4: Exit the CMD window and try accessing the lost partition.
    Method 3:Damaged MBR Recovery
    Step 1: Select “Repair your computer” on the Welcome screen.
    Step 2: Select Troubleshoot -> Advanced Option -> Command Prompt
    Step 3: Now as you see in the Command Prompt window, type the following commands:
    Bootrec.exe/fixmbr
    Bootrec.exe/fixboot
    Bootrec.exe/rebuildcd
    Press Enter after each of the above commands.
    Wait for the recovery process to complete, then restart the PC and see if the partition operates normally.

    Method 4:Windows System File Checker (SFC)

    Step 1:In the Windows search box, type CMD.
    Step 2: Right-click the Command Prompt app, then select Run as administrator.
    Step 3: Select Yes on the User Account Control UAS) option.
    Step 4: Type sfc /scannow, press Enter.
    The System File Checker (SFC) utility checks the integrity of the Windows file system and repairs issues if required.
    Step 5: After process completion, reboot your system.

    Factors to choose the 3rd party Windows Data Recovery Tool

    • Intuitive, easy-to-use and user-friendly GUI
    • The tool must result in complete data recovery without fail.
    • Must support multiple file systems and OS

    Third-party Windows Data Recovery Tool

    Windows Data Recovery is a third-party automated solution for automatically recovering permanently deleted, formatted, or corrupted files from the Windows operating system. The tool recovers data that has even been deleted from the recycle bin.

    Salient Features of Windows Data Recovery Tool:

    • Recovers permanently deleted data from Windows.
    • Fully compatible with all Windows operating systems
    • Supports both FAT and NTFS file formats
    • Displays a preview of the recovered data
    • Recovers deleted partitions of any size
    • Supports both Windows MBR and GPT partitions for lost data recovery

    Conclusion

    This article discusses the ways a user can recover a lost, deleted, corrupted, or damaged partition from a Windows machine. It initially discusses some manual methods, but they have some limitations. Then, we suggest our users use a professional third-party Windows Data Recoverytool for accurate and efficient data recovery from Windows partitions.

    How to Fix Errors Detected in the File Outlook OST?

    Microsoft Outlook is an essential tool in business communications, storing data in OST (Offline Storage Table) and PST (Personal Storage Table) files. OST files are particularly valuable as they allow Microsoft Exchange Server to synchronize a user’s offline activities with the server once an internet connection is established.

    Despite their utility, OST files are prone to errors that can disrupt data flow and access. This blog outlines practical methods to diagnose and resolve these errors.

    Common Causes of OST File Errors

    Errors Detected

    Several factors can lead to OST file errors, each affecting data integrity and Outlook performance:

    • File Corruption: This can make the file unreadable, often resulting from system crashes or software errors.
    • Virus Attacks: Malicious software can corrupt or compromise the security of OST files.
    • Improper Shutting of Outlook: Exiting Outlook abruptly might corrupt the current session’s data.
    • Excessive File Size: OST files that exceed size limits may become slow or unresponsive.
    • Sync Interruptions: Disruptions during synchronization with the Exchange server can corrupt the data.
    • Unexpected System Shutdowns: These can lead to unsaved data being corrupted or lost.

    Manual Repair Methods for OST Files

    Here are a few manual methods to address and fix OST file errors:

    Method 1: Restart and open Outlook in Safe Mode

    1. Exit Outlook if it is currently running.
    2. First, reboot your computer. This action eliminates temporary files. It also stops processes that may cause the error.
    3. Next, press and hold the ‘Ctrl’ key. While holding, click the Outlook icon. This will open Outlook.
    4. ‘Ctrl

    5. When prompted, select ‘Yes’ to launch Outlook in Safe Mode.
    6. Enter Safe Mode first. Then, access your emails. Check your contacts and calendar data. See if the error message persists.

    Method 2: Recreate the OST File

    1. Go to Control Panel > User Accounts > Mail.
    2. In the Mail Setup dialog, select Show Profiles.
    3. Next, click on ‘Remove’ and then confirm to delete the
      Show Profiles
      profile.
    4. Remove’

    5. Select the ‘Add’ option to create a new Outlook Profile.
    6. Add

    7. Enter a name for the profile and click on ‘OK’
    8. OK

    9. Proceed with entering your email account details to set up the profile.
    10. Once the profile is configured, launch Outlook to check if the error has been resolved.

    Method 2: Use the scanpst.exe Tool

    1. Execute scanpst.exe with administrative privileges.
    2. Use the Browse button to find and select the corrupted OST file.
    3. Initiate the repair by clicking Start, then Repair if errors are detected

    Limitations of Using Manual Methods

    While manual methods can often resolve common OST issues, they have limitations:

    • Time-Consuming: These processes can be slow, especially when dealing with large or multiple OST files.
    • Technical Knowledge Required: A certain level of expertise is necessary to effectively use these methods without risking further data loss.
    • Incomplete Recovery: Manual methods may not recover all lost or corrupted data, potentially leading to partial restoration.
    • Recurrent Errors: If the root cause of the corruption is not addressed, the same issues may recur, compromising long-term reliability.

    Advanced Professional Solution: Goldytool’s Outlook PST Repair

    For more severe or stubborn OST file issues, Goldytool’s Outlook PST Repair offers a powerful solution. This professional tool excels in repairing OST files with features designed for both efficiency and thoroughness:

    • Simplified Interface: User-friendly, facilitating easy navigation and operation.
    • Comprehensive File Repair: Capable of resolving a wide array of corruption issues.
    • Data Recovery: Efficiently recovers deleted or inaccessible items from damaged OST files.
    • Preview Capabilities: Allows users to view recoverable items before saving, ensuring selective restoration.
    • Flexible Data Saving Options: Recovered items can be saved in various formats such as MSG, EML, etc., accommodating different user preferences.
    • Broad Compatibility: Supports all major versions of Outlook and is compatible with every modern Windows operating system.

    Conclusion

    Manual solutions work for minor and some moderate issues. However, complex problems need a more sophisticated approach. Goldytool’s Outlook PST Repair offers a reliable and straightforward solution. It ensures your OST files are not only repaired but also restored to their optimal state.
    This is truly vital for supporting continuous business operations and data integrity. Whether you opt for manual fixes or a professional tool, timely action is crucial to prevent further data loss and restore functionality.

    Easy Fixes – Microsoft Outlook cannot Connect to Server Error.

    One of the most common issues that Outlook users experience is the “Microsoft Outlook Cannot Connect to Server.” This error can also prevent you from accessing your emails, which is irritating. Luckily, these problems with Outlook can be fixed pretty easily, and Outlook can be restored to online status. In this article, we will explain why this error occurs and provide practical solutions to fix it.

    Reasons for Microsoft Outlook Cannot Connect to Server Error

    The “Cannot Connect to Server” error in Microsoft Outlook is an error that occurs when the software cannot connect to your email server. This can be caused by a range of factors, including:

    • Network issues: There are chances you are using Outlook, poor internet connectivity, or a firewall that’s blocking Outlook from accessing the server.
    • Incorrect email account settings: Outlook outdated or wrong email configurations.
    • Corrupt OST files: Server connection can be interfered with damaged Outlook data files.
    • Outdated software: Compatibility issues may occur from running an out-of-date version of Outlook or Windows.
    • Add-in interference: Server connection problems can be caused by faulty or incompatible add-ins.

    Before we can tackle the error, we must understand the root causes. Let’s now see some of the ways you can solve this problem.

    Methods to Fix Microsoft Outlook Cannot Connect to Server Error

    Various methods to fix Outlook cannot connect to the exchange Error

    Method 1: Check Your Internet Connection

    Before we jump into more advanced solutions, make sure your internet connection is stable. This Outlook not connected to server error is caused by one of the most common reasons: a weak or intermittent connection. Try the following:

    • Open your web browser, and go to any website to check the Internet is working properly.
    • To reset the connection, restart your modem or router. Also, check whether Outlook is online or offline.
    • If you are using Wi-Fi, try to connect with an Ethernet cable for a faster connection.

    Method 2: Update Outlook

    You may also have connection problems with the server if you are using an outdated version of Outlook. Microsoft Exchange server constantly updates and fixes bugs and compatibility issues. This can easily be fixed by updating Outlook.

    • Open Outlook.
    • Head to File > Office Account (or Account in some versions).
    • Click Update Now under Product Information and select Update Options.
    • Update Options

    • If no Update Now option is available in your Outlook client, download and install the Windows OS updates.

    Method 3: Disable Faulty Add-ins

    Outlook add-ins can improve Outlook functionality, but at times, they conflict with the server connection. Faulty or outdated add-ins may be the reason Outlook can’t connect to the server error message.

    • Press the Windows + R keys to open the Run dialog box. Type Outlook /safe and hit the Enter key or OK. This will launch Outlook in safe mode.
    • Run dialog box

    • Click File > Options.
    • Options

    • Open Outlook in safe mode. Click ‘Add-Ins’ and then click the ‘Go‘ button beside Manage: COM Add-Ins.
    • Add-Ins’

    • Click OK and uncheck all Add-Ins.
    • Add-Ins

    • Reboot Outlook in normal mode.

    Method 4: Create a New Outlook Profile

    In some cases, a corrupt Outlook profile may prevent the program from connecting to the server. To resolve the Outlook issue, you can create a new profile without losing your email data.

    • In the Control Panel, search ‘Mail.’ Click on the ‘Mail’ option, then.
    • Control Panel

    • Under the mail setup window, click on ‘Show Profiles.’
    • Mail setup

    • Click on Add to add a new outlook profile.
    • Add

    • Type in the Profile Name and press ‘OK.’
    • Profile Name

    • Log into your new profile with your email account and Finish.
    • Finish

    • It will create a new Outlook profile.

    Method 5: Repair Outlook Account

    If all the above fails to fix the “Outlook trying to connect to server” error, you can go for repairing your Outlook account.
    When you enter the servers or email addresses in Outlook, the info associated with these servers or email addresses is known as an Outlook account. And these settings might be disrupted, which might cause problems like the one you are facing now. The problem could be fixed by repairing an Outlook account. So, try the following steps:

    • Open Outlook.
    • Now click on “File”>” Info”> Account and Social Network Settings”>” Account settings.”
    • Click on the “Repair” button and select your account
    • Repair

    • You will be prompted to enter your account details or to confirm simply. They suggest that you should remove the password and reenter it to get rid of the change you have entered the wrong password.
    • Hit the “Next” button. This allows Outlook to connect automatically to the server and diagnose any problems.

    Method 6: Verify that Outlook Is Online and Disable Offline Mode

    Outlook has an Offline Mode that prevents It from connecting to the server. If your Outlook is set to work offline, you will get a “Cannot Connect to Server” error. Make sure Outlook is online.

  • Open Outlook.
  • Go to the “Send/Receive” tab.
  • To reconnect, choose the “Work Offline” option.
  • Work Offline

    Method 7: Try Goldytools OST to PST Converter

    The above methods can solve most connection glitches, but things go south when file corruption is the culprit of connection failures. If you still can’t connect to the server after trying all manual fixes, your OST file may be corrupted. When it comes to this case, an OST to PST converter can be the easiest and the most effective solution.
    Goldytools OST to PST Converter is a powerful tool that lets you repair corrupt OST files and recover your data by converting them to the only used PST format. It allows you to recover your emails, contacts, and calendar entries even if manual methods fail; you don’t lose your data.

    Conclusion

    The “Microsoft Outlook Cannot Connect to Server” error is one of the most common errors, but by using the above-mentioned troubleshooting methods, you can fix it in no time. First, start simple, like updating Outlook, disabling faulty add-ins, or checking your connection settings. If that doesn’t work, try creating a new profile or repairing your Outlook account. But when manual methods don’t work and corrupted OST files are the cause, using an OST to PST converter like Goldytools OST to PST Converter is the easiest and the most effective way out.

    What to do if Exchange EDB file too Big?

    Microsoft Exchange Server employs Exchange Database (EDB) files to store information in a user’s mailbox. At some point, these files grow big enough to slow down and even corrupt the system. It is important to get acquainted with the reasons why EDB files can become oversized and to know the corresponding measures to address this issue, as server efficiency depends on it.

    Why Does the Exchange EDB File Become Too Large?

    Several factors can contribute to the excessive growth of EDB files:

    • Accumulation of Deleted Items: Whenever users try to delete emails or other items in their mailbox, they are automatically relocated to the “Deleted Items” folder. If not purged from time to time, this folder can become very large, thus increasing the size of the EDB file.
    • Mailbox Bloat: Attachments, big picture, and extended records of emails without archiving are some other causes that can lead to the fast growth of mailboxes.
    • Public Folder Growth: This is because folders that are available to multiple users for data storage can fill up very fast, especially when not supervised.
    • Lack of Maintenance: Other routine activities include system defragmentation, database clearing, etc. Overlooking these leads to more data that is not required to be stored in the EDB file.

    How to Fix an Oversized Exchange EDB File

    Here are the methods to repair the Exchange mailbox:

    Method 1: Reduce the Size Using ESEUTIL

    ESEUTIL is one of the Exchange Server utilities developed by Microsoft to work with the Exchange Server database. You can also utilize this tool for offline defragmentation to determine the amount of free space in EDB files.

    Steps to Perform:

    • Get-MailboxDatabase -status | Select Name, AvailableNewMailboxSpace
    • MailboxDatabase

      Dismount the Exchange database to make it accessible for defragmentation:

    • Dismount-Database .
    • Dismount-Database

      Run the defragmentation command:

    • Eseutil /d “” /t “.”
    • Defragmentation

      Remount the database after the process completes:

    • Mount-Database .
    • Mount-Database

      Check the outcomes and make sure the database size has been cut down.

    Method 2:Reduce File Size via Exchange Management Console

    The Exchange Management Console allows the EMB files to be relocated from their default location, minimizing their size.

    Steps to Perform:

    • Open Exchange Management Console.
    • Right-click the mailbox database that you want to reduce, and select the move database path option.
    • Database Management Console

    • You can type a new path for the database and log files in the dialog box.
    • Move database path

    • Do click on “Move” and when the secondary database operation returns the message that the database must be temporarily dismounted, confirm the same.
    • After a move operation is performed, check the results and, if necessary, remount the database.
    • Move database path

      Tip: This method can be very useful when the server is low on disk space and files need to be moved quickly.

      Method 3: Archive Mailbox Data

      Archiving is a process of reducing the main EDB file size by copying older or less frequently accessed mailbox items to an archive database.

      Steps to Perform:

      • Users can create archive mailboxes through the Exchange Admin Center or by command prompt in PowerShell.
      • This means that only settings should be made regarding the movement of old data to the archive through retention policies.
      • Check the performance of the archive database from time to time to prevent it from becoming clustered and, hence, slow.

      Benefits: This method has the advantage of not only decreasing the size of the EDB file but also optimizing user’s access time by reducing their dependence on the primary database

      Method 4: Implement Mailbox Quotas

      Limiting mailbox sizes assists users in dealing with their data properly and avoids the outgrowth of EDB files. You can recover corrupted EDB files by using the following method:

      Steps to Perform:

      • Start the Exchange Management Shell.
      • Use the Set-MailboxDatabase cmdlet to configure default mailbox quotas:
      • Use the following commands to adjust the warning limit and sending limit of the selected mailbox database:
        • Set-MailboxDatabase -IssueWarningQuota -ProhibitSendQuota .
      • Inform users of these limits and offer them directions on how to manage data.
      • Ensure quotas are reviewed often and more especially when the organization requires it.

      5. Use Goldytools EDB to PST Converter Software

      Nonetheless, the manual approaches are also possible, but they require much time, are rather complicated, and involve certain dangers connected with data loss. There is an effective solution available in the market, which is none other than Goldytools EDB to PST Converter. It makes the process of EDB file size optimization easier and includes such options as direct EDB to PST conversion, the capability to work with large databases and selective migration. It helps maintain the efficacy and accuracy of the data and also proves to be a great time saver, making it the best tool for handling oversized Exchange EDB files in the most optimized way possible

      Conclusion

      The Exchange server’s performance deteriorates when EDB files are enormously huge, and this is very dangerous for data loss and server unavailability. The management of file size involves the use of preventive measures like cleaning the deleted items, putting in place quotas, and archiving data. At times when manual solutions cannot be implemented or are time-consuming, third-party tools like Goldytools EDB to PST Converter make it easier to handle large EDB files with ease.

    How to Fix Error 0x800ccc0e in Outlook

    If you are getting error 0X800CCC0E in Microsoft Outlook and looking for a solution to resolve it, then this blog will be of great help. In this blog, we will learn about various reasons for error 0X800CCC0E in MS Outlook and the manual methods to fix this error. There are situations when an individual configures an email account in MS Outlook and may encounter error 0X800CCC0E while attempting to send an email.

    Outlook send/receive progress

    Outlook send/receive progress

    • When sending an email, Outlook does not authenticate your Account on the server, and the Outlook mail server rejects the email message.
    • Duplicate accounts.
    • Conflict between SMTP servers while using an email program or when users try to send emails during account configuration.
    • Antivirus Settings restrictions
    • Features blocked due to Firewall.
    • Faulty and corrupted add-ins or files
    • Unwanted or suspicious emails

    Manual methods to fix error 0X800CCC0E in Outlook

    Configuring your Email account in MS Outlook

    1. Launch the Microsoft Outlook application.
    2. Navigate to Accounts -> Properties -> Servers.
    3. Check the option “My server requires authentication”.
    4. Enter the email ID and password for your email account.
    5. Click Apply and Accept.
    6. Try sending an email.

    Check Server Requirement from Settings

    1. Now, start the Microsoft Outlook application.
    2. Navigate to File-> Tools -> Account Settings.
    3. After this, select the Email and choose your Email account from the list.
    4. Click More Setting.
    5. Click the Outgoing Server tab.
    6. Enabling the “My outgoing server (SMTP) requires authentication” option.
    7. Click OK to apply the changes.
    8. Restart the MS Outlook application.

    Delete Duplicate Accounts

    1. On the Outlook menu, select Tools.
    2. Navigate to the Accounts -> Mail tab.
    3. Select duplicate mail account.
    4. ClickRemove to remove the duplicate Account.
    5. Restart the MS Outlook application

    Change Server Port Number

    1. Launch the MS Outlook application on the system.
    2. Navigate to File -> Tools -> Account Settings.
    3. Click the Email tab -> select your Email account from the list.
    4. Click More Settings and open the Advanced tab.
    5. Change the Outgoing Server (SMTP) port number to 587.
    6. Click OK to apply the changes.
    7. Restart the MS Outlook application

    Repair Outlook

    1. Press Windows + X->select Apps and Features.
    2. Locate MS Outlook ->, click on it ->from the available options, and click Modify.
    3. Select the Quick Repair option -> click Repair.
    4. In a few minutes, the software can detect and resolve the issue.
    5. On completion of the repair process, launch MS Outlook.

    Reinstall Outlook

    1. Open Control Panel->navigate to Programs and Features.
    2. Select MS Office application.
    3. Now, ensure you tap Uninstall at the top of the Programs and Features window.
    4. An uninstallation wizard opens. Follow the on-screen instructions to uninstall MS Office.

    5. After the uninstallation of the MS Office procedure is completed, you need to install MS Office again.
    6. After installing MS Office, create your email account.
    7. Try sending an email.

    Remove and again add the email account

    Remove Email Account

    1. Launch MS Outlook -> navigate to the File menu.
    2. Click Account Settings and then select Account Settings.
    3. Select the email account that you want to remove->click Remove.
    4. From the Account Settings popup, click Yes to confirm.

    Add Email Account

    1. Launch MS Outlook. ->navigate to the File menu and ->click Add Account.
    2. Enter your name, Email, and password, and retype the password.
    3. Click Next to proceed.
    4. Once the Account is configured correctly, click Finish

    Perform a Clean Boot

    1. Open your system as an administrator.
    2. In the search bar, type msconfig->select System Configuration.
    3. In the System Configuration window, select the Services tab.
    4. Select Hide all Microsoft services checkbox->click Disable all.
    5. Select the Startup tab and ->select Open Task Manager in the System Configuration window.
    6. Select every item in the Task Manager and ->click Disable.
    7. Close Task Manager and restart your system.
    8. Install MS Outlook and add the email account again

    Check Internet Connection

    1. Click the internet icon in the taskbar-> select the network with “No Internet, secured” displayed.
    2. If the Forget button is visible, click it.
    3. Connect to your network again.

    Professional OST to PST Converter Software

    If you are still getting error 0X800CCC0E in Outlook, we recommend using third-party OST to PST converter software. This software effectively resolves error code 0X800CCC0E in Outlook without any data loss and supports all versions of Microsoft Outlook. The OST to PST Converter software is also available as a free trial version.

    Conclusion

    This blog highlights all the possible reasons for error 0X800CCC0E in Outlook and the manual methods to fix it. In case you are still unable to resolve the error code, we recommend using professional third-party OST to PST converter software. The tool allows saving recovered emails in PST, MSG, EML, and MBOX file formats.

    Reasons for Exchange Database Corruption & How to Get Rid of It

    This blog discusses the various reasons for the corruption, damage, or inaccessibility of the Microsoft Exchange Server database and the methods for overcoming this situation.

    Reasons for Exchange Database Corruption

    Let’s first discuss the possible reasons for the corruption of Exchange Server database EDB files. At a very high level, the reasons for damaging Exchange EDB files can be categorized into two categories: corruption due to physical errors and logical errors.

    Physical Corruption

    • Hardware failures include hard drives, raid controllers, motherboards, and other components.
    • Disk failure
    • Loss of power/power outage
    • VM / Physical Server rebooted

    Logical Corruption

    • Invalid index entries
    • Cross-object chain linkage
    • Corruption in the file header
    • Corruption in access control levels
    • A mismatch between the Exchange log file generation number and signature
    • Incorrect data restoration in the Exchange database

    Common Exchange Server EDB file Errors

    • JET Engine Errors
    1. 344 – JET_errDbTimeCorrupted (Time Mismatch Error)
      This error appears when there is a time mismatch between the DB and the directory.
    2. 501 – JET_errLogFileCorrupt
      This error appears when the hardware corrupts the I/O when writing or when the hardware loses a flush, making the log unusable.
    3. 510 – JET_errLogWriteFail
    4. 528 – JET_errMissingLogFile
    5. 543 – JET_errRequiredLogFilesMissing
    6. 550 – JET_errDatabaseDirtyShutdown
      This error appears when the Administrator modifies logs or loses the I/O flush on shutdown.
    7. 551 – JET_errConsistentTimeMismatch
    8. 567 – JET_errDbTimeTooNew
    9. This error appears because the disk subsystem lost an I/O, most probably during a hang or unscheduled shutdown.

    10. 1018 -JET_errReadVerifyFailure
      One encounters such an error during page-level corruption in Exchange EDB files that cannot be repaired with the inbuilt Exchange Server utility. It also occurs during the creation of an online backup, i.e., a cloud backup.
    11. 1019 – JET_errPageNotInitialized
      This error appears when the requested page is empty or uninitialized in the Exchange Database.
    12. 1021 – JET_errDiskReadVerificationFailure
      This error appears due to bad blocks on the hard disk.
    13. 1022 – JET_errDiskIO
      This error appears when the disk Input/Output process restricts the Exchange Server’s access to the targeted page in the Exchange database.
    14. 1032 (JET_errFileAccessDenied, cannot access file, the file is locked or in use)
    15. JET_errFileAccessDenied

    16. 1206 – JET_errDatabaseCorrupted
    17. 1216 – JET_errAttachedDatabaseMismatch
    18. JET_errAttachedDatabaseMismatch

    19. 1601 – JET_errRecordNotFound
      This error appears when the STM and EDB files have different structures or when the Exchange Database EDB file has severe corruption.
    20. 1605 – JET_errKeyDuplicate
      This error appears due to index corruption.
    21. 1811
      This error appears when the Administrator modifies logs or loses the I/O flush on shutdown.
    22. 0xfffffdfd – JET_errInvalidLogSequence
      This error appears due to missing log files or log file mismatch.
    23. JET_errFileAccessDenied (Anti-Virus)
      • Dirty Shutdown State
      • Unable to mount database
      • mount database

      • 1056749110 error
      • Unable to initialize Exchange Information Store Service –Error 0x8004010F
      • This error appears when the Information Store fails to initialize. This error disfunctions the smooth functionality of the Exchange Server.
        Error 0x8004010F appears when a synchronization issue occurs between the clocks on the Server system and the client system.

        Outlook send/Receive progress

      • Inconsistent or missing log files
      • Low or no disk space
      • Licensing
      • Database mount error: (hr=0x80004005, ec=-501)
      • Failed to mount database "Mailbox Database"

      • Time mismatch in the DB compared to the directory. (Unable to mount database. (hr=0x80004005, ec=-344))
        This error occurs when there is a time mismatch between the DB and the directory.
      • Exchange Error 1056749110
        This error appears when corrupt items are present in the mailbox.
      • Machine :xptest

      • Permission Issue
      • Anti-Virus
      • The exchange database won’t mount (Cannot see Active Directory)
      • SMTP Virtual Server and Connector Configuration
      • Dirty Shutdown issue
      • The Exchange Server reached its Limit (16 GB)
      • Minor Corruption

      Manual Methods to Resolve the Exchange Server Database Errors

      Exchange Server Database Utility (ESEUTIL)

      It is an inbuilt utility that supports repairing Exchange Server 2007, 2010, and 2013 versions. It is an executable utility that repairs all the errors in Exchange mailboxes, public folders and transport server queue databases.

      ESEUTIL/p mode auto corrects the damaged Exchange EDB files at page or table level, not in application level.
      Syntax – ESEUTIL/P databasefilename. edb

      Limitations with ESEUTIL

      • Time-consuming process
      • Incorrect execution of commands
      • Permanently deleted data gets recovered
      • Requires much space
      • Demands technical skills and expertise to execute the commands

      Professional third-party EDB to PST Converter

      Since the manual method to repair corrupted EDB files has some limitations, we recommend that our users use a third-party EDB to PST Converter software to repair corrupted EDB files and restore the Exchange mailboxes on the server. The EDB to PST Converter restores mailboxes on the Live Exchange Server and resumes mailbox connectivity lost due to the dismounted Exchange mailbox database. Use EDB to PST Converter to backup Exchange Server data to Office365 account.

      Conclusion

      Let us try to determine the reasons that cause the Exchange database to be corrupted, damaged, or inaccessible. To resolve this, users can try the manual method explained, but it has some limitations. We suggest our users use third-party EDB to PST Converter software to restore mailboxes on the Exchange Server.

    What do you do when emails get stuck in your Outbox?

    If you have ever had your emails remain in the Outbox folder, then you can attest that it is a very annoying situation, especially if you have an urgent message to send. This is a familiar problem with Outlook and may be due to several factors. It is essential to know these reasons and how to sort them out to have efficient communication. So, let us get into the details

    Reasons for emails to get stuck in your Outbox

    Of course, before we proceed to the solutions, it is crucial to understand why your emails are stuck in the Outbox. Several factors can contribute to this problem:

    • Large Attachments: Outlook’s sending process can be bogged down when you send emails with big attachments.
    • Poor Internet Connection: Sometimes, the internet connection is poor, which may hamper the sending or sharing process, and emails remain in the Outbox.
    • Outlook Add-Ins: Certain third-party add-ins may clash with Outlook, leading to problems sending emails.
    • Corrupted Outlook Profile: Outlook profiles can be corrupted, and this can cause many issues, such as emails not being sent properly and staying in the Outbox.
    • Server Issues: On some occasions, the issues arising from the server on the side of your email provider may lead to a delay in sending emails

    In other words, when you attempt to send an email, it is not delivered to the recipient; instead, it arrives in your mailbox. However, it ends up in a folder named “Outbox. ” It can be irritating because your email must reach the intended recipient. On top of that, Outlook may display some error messages to you.

    Methods to Resolve Stuck Emails in Outbox issue

    Here are some reliable methods to fix the stuck emails in the Outbox issue. Follow each method carefully to get desired outcomes.

    Method 1: Check Your Email Settings

    At some point, emails may remain in the Outbox because you have scheduled them to be sent later. It is as if one wants to send a message at a particular time, which will be sent automatically. To fix this:

    1. Open your Outbox.
    2. Click on File.
    3. Click Account Settings.
    4. Choose the account you want to change the settings of.
    5. Click Change.
    6. Type in your new password if required.
    7. Then click Next, and then on the final window, click on the Finish button.

    If you have a password for your Outlook data file, here is how you can change it:

    1. First, you need to launch the Outlook application on your local computer.
    2. Next, click the right mouse button on the email account you want to configure.
    3. Then select Data File Properties.
    4. Select Advanced, then go to Change Password.
    5. You have to type in your old password and then the new one. Confirm it.
    6. Press OK and then exit all the opened windows.

    The above solution is useful in finding the solution to Emails Get Stuck in Outbox error. If not, then go for the other ones

    Method 2: Change the Outlook connection status

    Before diving into the solution methods, one needs to ensure Outlook’s connection status. If Outlook is offline, your email messages will be kept in the Outbox folder until the status changes to online.

    To modify the mail server state, follow these steps:

    1. Open Outlook and go down to the bottom right corner of the screen. You will see Connected or Connected to Microsoft Exchange. If it is “Connected,” then the issue is not the server’s status in any way.
    2. Microsoft Exchange. If it is “Connected

    3. If the state is Working Offline, the user should go to the Send/Receive tab and click Work Offline to disable it. Now, resend the mail.
    4. the Send/Receive tab

    5. .However, if the status is still Disconnected, look at the Internet connection and correct it if necessary
    6. Method 3: Resend the email

      If you encounter the problem despite following the first method, you have no option but to resend the emails, but this time, make sure you are logged into the server, not to mention checking the internet connection.

      Also, restart your system once. Outlook will resynchronize with the mail server upon Outlook’s launch after a reboot, and as such, the email may leave Outbox. Also, do not open the mail immediately after sending it because it will lock the sending process.

      Another measure to be taken is the reduction of the number of attachments in the mail. If doing so successfully takes the mail out of the Outbox folder, you are done with your problem.

      Outbox folder

      Method 4: Automated OST to PST Converter

      While the manual methods above can be helpful, they may not always be effective, especially in severe Outlook data file corruption. Moreover, these methods can potentially lead to data loss if not executed correctly. For a more dedicated and comprehensive solution, consider using GoldyTools OST to PST Converter.
      GoldyTools OST to PST Converter is a professional tool that addresses various Outlook issues, including emails stuck in the Outbox. This powerful software offers several advantages:

      1. Free conversion of the first twenty emails in every folder
      2. Conversion of several OST files at a time
      3. It incorporates all Outlook items (mails, calendar, contacts, etc. ).
      4. It is compatible with IMAP, Office 365, Exchange, Hotmail, and Outlook.com
      5. Easy to use, no Exchange profile or server connection required
      6. Fixes and migrates damaged OST files
      7. Saves in PST, MSG, EML, HTML, MHT and PDF formats
      8. Divides and combines large PST files
      9. Allows for the search of OST items using the field names.
      10. Works with Outlook in versions 2000 up to 2019

      Conclusion

      Stuck emails in the Outbox can cause problems in your working process and communication with business partners. Although there are various manual solutions to fix this problem, employing a professional tool such as Goldytools OST to PST Converter guarantees a better approach.

    How to resolve the “SQLite database file is locked” error

    If you encounter the SQL error message: “SQLite database file is locked”, it needs immediate attention. This blog highlights the genuine reasons for the occurrence of this error message and how to resolve it manually. It also suggests that its users give a third-party SQLite Database Recovery tool a chance to perform SQLite Database recovery with an advanced and professional solution for complete data recovery without any data loss.

    SQLite database
    A Brief Introduction – SQLite Database

    SQLite is a server-less, self-contained, zero-configuration database management system (DBMS) that organizations use to manage their data.

    A Brief Introduction – SQLite Database

    The error message appears when two users execute transactions on the same tables and modify the content simultaneously. The SQLite engine finds this abnormal, and the database gets locked. As a result, users cannot execute further transactions.

    SQLite database
    SQLite databaseSQLite database

    Various scenarios for SQLite database getting locked

    Scenario 1: When a SELECT transaction is activated on a table, the user tries a CREATE query.
    Scenario 2:When the SELECT statement is pending, the user puts a new CREATE or DROP statement.
    Scenario 3:When multiple threads access the same table, two or more SELECT queries try to access the same table.
    Scenario 4: Multiple applications acc the database at the same time.
    Scenario 5: Long-running transactions that do not commit or rollback promptly.
    Scenario 6: Improper handling of database connections and cursors.

    Manual method to resolve “SQLite Database is locked” error

    To resolve the “SQLite Database is locked” error, use the backup copy of the same database. With the backup file of the SQLite database handy, you can restore it at the database engine and remove the locked SQLite database file. This approach is recommended to restore and recover locked SQLite database files. To perform this, follow the steps as:

    Step 1: Take the Backup of SQLite file

    Use the below commands to take the backup of the SQLite file (let us assume your SQLite database file name is Administrator.sqlite):
    $SqliteAdministrator.SQLite
    Sqlite> .backup main BackupAdmin.SQLite
    Sqlite> .exit

    By executing the above commands, you can get the same backup file in the same directory named BackupAdmin.Sqlite.

    Step 2: Replace the backup database with the primary database

    Use the below commands to replace the backup database with the primary database:
    $mv Administrator old.SQLite
    $mv BackupAdmin.SqliteAdministrator.SQLite

    After the above queries are successfully executed, the backup file replaces the locked database. Users can execute new transactions and queries
    since the backup file is not locked.
    If you don’t have a database backup file with you, the above-suggested manual approach will not work, and you need to look for a third-party SQLite Database recovery solution.

    Other solutions to resolve the “SQLite Database is locked” error

    Solution 1: Ensure Proper Transaction Management
    Ensure that transactions are completed promptly by committing or rolling back as appropriate.
    Solution 2: Use Database Connection Properly
    Always select the database connection properly after operations are completed.
    Solution 3: Configure Timeout
    Configuring a timeout duration helps where multiple accesses are possible.
    Solution 4: Avoid long-running transactions
    Keep the transactions as short as possible.

    Professional Third-party SQLite Database Recovery Tool

    SQLite Database Recovery Tool is a third-party professional solution that scans and recovers the locked SQLite database file. This tool locks SQLite database files and efficiently recovers corrupt, damaged, and deleted SQLite files. The tool recovers all database objects, including tables, views, indexes, rules, triggers, functions, deleted records, primary keys, unique keys, procedures, etc.
    The SQLite Database Recovery tool recovers the corrupt, damaged SQLite database files that might get corrupt due to one of the following reasons:

    • Application or operating system crash
    • Power Failure
    • Disk drive failure
    • Flash memory failure
    • SQLite file gets overwritten by a rogue thread or process
    • Using a file descriptor continuously even after closing it.
    • Swapping journal files between two different databases
    • Overwriting a journal file
    • Moving a journal file without copying the journal
    • Broken or missing lock implementations in SQLite files
    • Using different locking protocols

    Prominent Features of SQLite Database Recovery Tool

    • Recovers even a large-sized SQLite database file.
    • Recovers and restores corrupt or damaged .dB, .dB3, .SQLite,SQLite2, and .SQLite3 files.
    • Recover deleted records from SQLite database files.
    • Maintains the integrity of data of SQLite database files.
    • Displays preview of repaired SQLite database files.
    • It supports all versions of SQLite Engine, including the latest version, 3.27.2.
    • Ideally, it is compatible with all Windows operating systems, which include Windows 10, 8,and7.
    • Also, a trial version can repair and display a preview of SQLite database file contents.

    Conclusion

    This article discusses the common reason the SQLite database file is locked and how we can resolve this error manually. If the user does not have any backup copy and the database file gets locked, we suggest our users give the third-party SQLite Database Recovery tool a chance to recover the SQLite database file.

    How to find location of OST Files in Outlook 2013, 2016, and 2019 on Windows?

    Emails are crucial for communication, especially at work. Microsoft Outlook simplifies email management. A key feature is the OST file, or Offline Storage File. These files allow you to work offline. Later, you can sync any changes with the Exchange server. If you’ve wondered where OST files are stored, you’re not alone. In this blog, we’ll guide you in finding your Outlook Data File (.OST). This helps you manage your emails more effectively.

    Where are OST Files Located?

    Most of the OST files are stored under the ‘AppData’ directory of your Windows user account. This location can be different based on the versions of Windows and Microsoft Outlook which are installed. There are ways by which the OST file can be located and we are going to describe them below. All the methods will help you to follow a step by step procedure.

    Step 1: Check the Default OST File Location

    Refer to the table mentioned below to find the default location of OST files according to the versions of MS Outlook and Windows

    MS Outlook Version Windows OS Version Path Location of the OST file
    Outlook 2000
    Outlook 2003
    Outlook 2007
    Windows XP C:\Documents and Settings\User Name\ Local
    Settings\Application Data\Microsoft Outlook
    Outlook 2007 Windows Vista
    Windows 7
    Windows 8
    Windows 10
    C:\Users\ User Name\AppData\Local\Microsoft\Outlook
    Outlook 2010 Windows XP My Documents\Outlook Files
    Outlook 2010 Windows Vista
    Windows 7
    Windows 8
    Windows 10
    Documents\Outlook File\
    Outlook 2013
    Outlook 2016
    Outlook 2019
    Windows Vista
    Windows 7
    Windows 8
    Windows 10
    C:\Users\admin\AppData\Local\Microsoft\Outlook

    To find the OST file on your Windows PC, you can manually go through the route in File Explorer or use the path URL provided in the table above.

    Step 2: Search for the OST File Using Outlook Options

    In case you are unable to search for files at default locations or manually, you can take a look at below steps to find the OST files quickly on Windows XP, 7, 8, 8.1, 10, or 11 PC.

    MS Outlook 2013, 2016, 2019, or 2021

    • Open the Microsoft Outlook application.
    • Go to File > Info > Account Settings > Account Settings.
    • Click on the Data Files tab and select the OST file associated with your account.
    • Click on the “Open File Location…” button.

    MS Outlook 2010

    • Open Microsoft Outlook and go to File > Info > Account Settings > Account Settings.
    • Choose Microsoft Exchange Server from the list, then click on “Change.”
    • Click on “More Settings.”
    • In the Advanced tab, click on “Offline Folder File Settings.”
    • This will display the path where the OST file is located.
    • To visit the OST file location, copy the folder path and paste it into File Explorer.
    • This will open the File Explorer window and show you where the OST file is stored on your PC.

    Step 3: Directly Open the OST File Location via Outlook

    • Here’s an easy way to find the OST file in any version of Outlook:
    • Open Outlook and right-click on your email profile name or email ID in the left sidebar.
    • Click on “Open File Location.”
    • A File Explorer window will pop up, showing where the OST file is stored.

    Step 4: Professional Solution to Find and Convert OST File

    The methods mentioned above can be time-counsuming, especially when dealing with multiple OST files. Also, these methods may not help you recover corrupted OST files. Therefore, it’s advisable to use a more advanced and powerful solution like the one offered by Goldytool’s OST to PST Converter.

    This tool allows you to quickly find all your OST files in seconds. It also lets you convert OST files to PST, including emails, journals, notes, and more. Additionally, you can repair corrupted OST files and save them in formats like PST, PDF, and HTML. The software is user-friendly and easy to navigate.

    Conclusion

    Manual methods work well if you are technically sound and issues are minor. But in case of dealing with multiple OST files, you may require a professional solution like the Goldytool’s OST to PST converter. It will help you find the files without any hassle. You can also repair the corrupted files and convert in any format you like. Also, all your data like email, contacts, and notes are saved.

    How to increase the maximum size for PST and OST files in Outlook

    Microsoft Outlook is one of the most popular email clients today, and millions of people and companies use it. Over time, when users increase the number of emails, attachments, and other data, Outlook’s data files – PST for POP3/IMAP accounts and OST for Exchange accounts – may become too large. When this occurs, it can cause poor performance, inability to send/receive new emails, and, in some cases, data corruption. In this article, you will learn how PST and OST files grow large and how to raise the size limits in Outlook.

    Reasons for Reaching Size Limits

    If PST and OST files grow to their maximum size or become even closer to it, they can become an issue. Several factors contribute to this:

    • Accumulation of emails: In the long run, users have numerous emails, including those they receive and are not usually deleted after some time.
    • Large attachments: Large file attachments in emails also tend to fill up PST/OST files more quickly than other activities.
    • Calendar entries and contacts: Outlook’s calendar and contacts also contribute to the size of the overall package.
    • Journal entries: To the users who use the journaling feature of Outlook, these entries add to the size of the files.
    • Default size limits: Outlook versions before Outlook 2010 are found to have lower default size limits for PST/OST files.

    Methods to Increase the Maximum Size for PST-files and OST-files in Outlook

    Method 1: Modifying the Windows Registry

    This method involves using the Windows Registry to change the PST/OST file size limit in size. Although it is quite effective, it should be used appropriately since wrong changes to the Registry may lead to system instability. Before you proceed with the next steps, it is advisable to backup the Registry.

    1. Close Outlook completely.
    2. Press the Windows key on your keyboard and hold it while pressing the ‘R’ key.
    3. One must enter the “regedit” command in the command line and press “Enter” to launch the Registry Editor.
    4. Go to the following key, which depends on the version of Outlook you have installed.
        ● Outlook 2019/2016: HKEY_CURRENT_USER\Software\Microsoft\Office\16.0\Outlook\PST
        ● Outlook 2013: HKEY_CURRENT_USER\Software\Microsoft\Office\15.0\Outlook\PST
        ● Outlook 2010: HKEY_CURRENT_USER\Software\Microsoft\Office\14.0\Outlook\PST

    5. Again, right-click on the right pane, click on New, and then click on DWORD (32-bit) Value.
    6. Give the new value the name “MaxLargeFileSize” (quotes included).
    7. Double-click the new value and set the Value data to the numeric value of the maximum size in MBs for instance, 51200 for 50 GB.
    8. Make another DWORD value called “WarnLargeFileSize” and set it to another figure, a bit lower than the previous one.
    9. Click ‘OK’ to close the Registry Editor and start the Outlook application again.

    Method 2:Using Group Policy (for organizations)

    The Group Policy method is suitable for organizations that have many Outlook users in their facilities. It enables the administrators to manage the PST file size policy in the organization from the central point. However, this method involves administrative access and cannot be used for a single user or home use.

    • Right-click on the Group Policy Management Console.
    • Create or modify a GPO.
    • They can visit the User Configuration > Administrative Templates > Microsoft Outlook > Miscellaneous > PST Setting.
    • Large PST Absolute Maximum Size and Large PST Warn About Maximum Size should be set up.
    • This is done by clicking on the Group Policy and selecting the option ‘apply’.
    • Method 3: Compact PST files

      The PST file compacting is the function integrated into Outlook that can help manage the size of the PST file, and this will not be possible if no changes are made to the PST file. It is a safe method that helps reduce the unneeded space between PST files. Nevertheless, it may not be good enough for users already at the maximum file size limit or even beyond it.

      Although it does not directly contribute to the increase of the size limit, it can help to reduce the size of the PST files:

      1. In Outlook, please click File, then Account Settings, then Account Settings.
      2. Go to the Data Files tab.
      3. Find the PST file you want to compact, right-click, and click on settings.
      4. In the new window, click the Compact Now button.

      Method 4: Automated Goldy Outlook PST Repair Tool

      There is no better way to increase the maximum size for PST and OST than by using the above-described method. But if your focus concern is over-sized files, which can inversely impact working or cause corruption, you can split or compress PST.

      With the professional way, users can split PST files according to their requirements, compress PST files and decrease their size without any problem to overcome the problem of large PST.

      Goldy Outlook PST Repair Tool is designed to manage large PST files easily, so you do not have to spend time fixing Outlook problems. This is especially useful when the other recovery methods do not work or when working with highly damaged PST files. Download it and use its trial version to know whether the tool is functioning.

      Conclusion

      It is necessary to raise the maximum PST and OST size in Outlook for effective email functioning, particularly for users with numerous emails and attachments. There are, however, manual approaches to it, but they are tedious and may involve a lot of steps. The Goldy Outlook PST Repair Tool is a single package that can handle large PST files, fix corruptions and restore lost data. This way, the user can save time and avoid data loss, and Outlook will remain convenient and fast.

    How to repair SQL Database DBCC CHECKDB command for MDF & NDF Files

    If you are experiencing the below symptoms in your SQL Server database files, then it is obvious that they have become corrupted or damaged and need immediate attention.

    • Frequent database crash
    • Constant downtime
    • Performance issues with the database
    • Noticeable lags
    • Major data loss or inconsistencies
    • Failure in the data backup task
    • Software errors and glitches
    • Random errors while opening or accessing the database
    • The database moves to the suspect mode

    If you are looking for a solution to repair the corrupt or damaged SQL database DBCC CHECKDB command for MDF and NDF files, then this blog will really prove helpful.

    What is an MDF and NDF File?

    MDF stands for Master Database File, and NDF stands for Secondary Database File. Both MDF and NDF files store data and objects of the SQL Server database.
    The MDF file is nothing but a primary data file containing the database’s schema and data, including tables, views, stored procedures, triggers, and other objects. It also contains metadata that describes the database’s structure.
    NDF files are secondary data files that can be added to the SQL Server database to store additional data. They are used when the MDF file is not sufficient to hold all the data.NDF files help improve performance and storage management.
    An SQL Server database has only one MDF file but can have multiple NDF files. SQL Server can operate with just an MDF file, but NDF files help manage larger databases and thus optimize performance.

    Few SQL Server Error Messages

    • Msg 823 error in SQL Server
    • Msg 824 (I/O error) in SQL Server.
    • Msg 825 (read retry) in SQL Server.
    • SQL Server Page-Level Corruption
    • SQL Server Table Corruption Error.
    • Corruption on non-clustered indexes.
    • Database consistency errors reported by DBCC CHECKDB.
    • Corruption on data pages.
    • Metadata Corruption Error.
    • Error 9004 in SQL Server
    • Msg 7105 in SQL Server

    Common reasons that lead to corruption or damage of SQL database

    • Human errors like accidental deletion
    • Sudden shutdown
    • Improper system termination
    • Abrupt power cuts or power outages
    • Virus or malware attacks
    • Hardware issues like bad sectors in the storage device, physical damage to the disks, etc.
    • Software bugs or glitches
    • Network issues
    • Changes in SQL account
    • Incompatible software or outdated installed software
    • Inappropriate isolation level
    • Insufficient storage space on the hard disk

    DBCC CHECKDB Command

    Using the DBCC CHECKDB command is a manual method for repairing corrupt or damaged Microsoft SQL Server database MDF and NDF files.

    Syntax:

    DBCC CHECKDB (Database_Name)

    Pre-requisites of DBCC CHECKDB command

    • With an active license, users must have SQL Server Management Studio (SSMS) installed on their system.
    • Users must have Admin rights and privileges to perform this manual command.

    Three Repair Modes with DBCC CHECKDB Command

    REPAIR_FAST

    Use this repair mode to resolve the backward compatibility issue, which means you can run SQL Server 2005 database files in SQL Server 2008.
    While using this repair mode, ensure the database is in SINGLE_USER mode.

    Syntax:

    DBCC CHECKDB (N ‘Database_Name’, REPAIR_FAST) WITH ALL_ERRORMSGS, NO_INFOMSGS;
    GO

    REPAIR_REBUILD

    This repair mode is preferred as it has a very low risk of data loss. It performs similarly to REPAIR_FAST, except that it rebuilds the indexes, which is a time-consuming repair process.
    While using this repair mode, ensure the database is in SINGLE_USER mode.

    Syntax:

    DBCC CHECKDB (N ‘database name’, REPAIR_REBUILD) WITH ALL_ERRORMSGS, NO_INFOMSGS;
    GO

    REPAIR_ALLOW_DATA_LOSS

    This repair mode, along with repairing the SQL Server, performs the following:

    • Allocates and deallocates the pages
    • Deletes the corrupt objects
    • Fixes page errors, structural errors in the database

    Syntax:

    DBCC CHECKDB (N ‘Database_Name’, REPAIR_ALLOW_DATA_LOSS) WITH ALL_ERRORMSGS, NO_INFOMSGS;
    GO

    Limitations of DBCC CHECKDB command

    • Unreliable
    • Complex
    • Requires experienced professionals to perform this manual method.
    • It doesn’t repair deleted objects from the database.
    • Users often skip pre-requisites of the DBCC CHECKDB command.

    3rd-party SQL Database Recovery Tool

    SQL Database Recovery Tool is a third-party professional tool that efficiently recovers corrupt or damaged SQL Servers. The SQL Database recovery tool repairs minor and significant levels of corruption in SQL Server database files. It recovers all SQL database components, including Rules, Functions, Tables, Triggers, Views, Stored Procedures, Indexes, etc.SQL. The Database recovery tool supports recovering database files of all SQL Server versions, including 2019, 2017, 2016, 2014, 2012, 2008, 2208 R2, 2005, 2000. The tool displays a preview of recovered data.

    Conclusion

    The moment the SQL Server database gets corrupted or damaged, users look for solutions to restore database files with complete accuracy. Initially, they try the manual method DBCC CHECKDB command, but it has its own limitations. To overcome those limitations, we suggest our users use an automated SQL Database recovery tool to efficiently repair and recover Microsoft SQL Server database files. The advanced solution repairs and recovers all SQL Server components without fail.

    How to backup Microsoft Exchange Server Mailboxes?

    Exchange Server backup and restore remain critical for organizations that are still using on-premises Microsoft Exchange servers. This article discusses the methods for backing up and restoring your Microsoft Exchange Server mailboxes.

    Factors leading to damage or corruption of Exchange Server mailboxes

    • Logical and Physical errors
    • Hard disk failure
    • Corruption in database
    • Virus/malware attacks
    • System crash
    • Accidental file deletions
    • Software malfunctions

    Two methods to create a backup of Exchange Server mailboxes

    • Using Windows Server Backup
    • Using PowerShell cmdlets

    Method 1: Using Windows Server Backup

    Windows Server Backup is an integrated backup feature in the supported versions of Windows Server. It includes basic backup functionalities and helps users manually backup files and folders, system data, and applications. Use the Windows Server Backup method to backup and restore Exchange databases.

    Pre-requisite for Windows Server Backup

    • The Windows Server Backup feature must be installed on the local computer.

    Step-by-step instructions for Windows Server Backup

    To convert Exchange EDB to PST files, perform the steps:

    1. OpenServer Manager, selectTools and select Windows Server Backup.
    2. Select Local Backup.
    3. In the right pane, under Actions, clickbackup Once.
    4. In the Backup Options wizard, select Different Options and click Next.
    5. On the Select Backup Configuration page, select Full Server (recommended), and click Next.
    6. On Select Items for Backup. window, click Add Items. to select the volume(s) you want to backup, and click OK.
    7. Select Advanced Settings.
    8. On the Exclusions tab, click Add Exclusion to exclude any files or file types from the backup.
    9. Under the VSS Settings tab, select VSS full Backup and click OK. Click Next.
    10. Specify the Destination Type page, select a location where you want to save the backup, and click Next.

    11. a. When selecting local drives, the Select Backup Destination page will appear.
      i. Select an option from the Backup destination dropdown, and click Next.
      b. The Specify remote folder page will appear when selecting the remote shared folder.
      i. Specify a UNC path for the backup files and configure access control settings.
      ii. Select Do not inherit if you want the backup accessible only through a specific account.
      iii. Please provide the username and password for an account with write permissions on the computer hosting the remote folder, then click OK.
      iv. Click Next. Select Inherit if you want the backup to be accessible to everyone who has access to the remote

    12. Review the backup settings on the Confirmation page and click backup. The backup will start for the selected volumes (those you selected in Step 6 to backup).
    13. The Backup Progress page displays the status and progress of the backup operation.
    14. Click Close to exit the Backup Progress page. Any backup in progress continues to run in the background.
    15. Limitations of Windows Server Backup

      • You can only back up data on local hard drives.
      • Offers only a limited storage capacity of 2TB.
      • Only one copy of the backup is available.
      • No central management for managing backups and recovery across multiple servers.
      • No granular application support.
      • No control over the automatic deletion of older files and folders.
      • There is no support for encryption.
      • Limited options for restoration.
      • No support for virtualized Windows servers.
      • Limited backup options.
      • No support for Windows Server backups on a network location.

      Method 2: Using PowerShell cmdlets

      New-MailboxExportRequest

      Use New-MailboxExportRequestPowerShell cmdlet in Exchange Management Shell (EMS) to backup individual or selected mailboxes.
      New-MailboxExportRequest -Mailbox “MailboxName” -FilePath \\Servername\SharedFolderPathName\FileName.pst


      Pre-requisite for PowerShell cmdlet

      • The Mailbox Import/Export permission must be assigned to the user account.
      • Create a shared location and folder to save the exported Outlook PST files.

      Various Parameters with the New-MailboxExportRequest command

      Limitations of Windows Server Backup

      • This command is available in Exchange Server 2013 and later versions.
      • The process is lengthy and time-consuming.
      • It doesn’t display the status of mailboxes that are being exported.
      • Requires a large amount of space on server storage media.
      • Multiple mailbox exports may impact the server’s performance

      Third-party EDB to PST Converter

      We also suggest our users try a third-party professional EDB to PST Converter tool to efficiently convert Exchange EDB to PST files.
      The EDB to PST Converter tool allows you to back up complete Exchange Server data or select mailboxes. The EDB to PST Converter tool extracts mailboxes from Exchange EDB files and exports them to Outlook PST files. The tool scans and displays the extracted mailboxes and other items before converting them to PST files. The tool allows selective migration from Exchange EDB to PST. While performing EDB to PST conversion, the tool displays the progress of the EDB to PST export process. The EDB to PST Converter tool allows the export of Exchange EDB files directly to Microsoft Office 365 or a live Exchange Server.
      The free-to-download trial version has a few limitations and allows you to check the software’s capabilities. If you are satisfied with the demo version, you can purchase the licensed version with full capabilities.

      Conclusion

      You can backup Exchange Server mailboxes using Windows Server Backup or the New-MailboxExportRequest PowerShell cmdlet in Exchange Management Shell (EMS). You can also use a professional EDB to PST Converter to convert Exchange EDB to PST files. In addition to saving Exchange EDB to PST, the tool allows saving to other supported file formats, such as EML, MSG, HTML, RTF, and PDF.

    How do you troubleshoot a slow migration issue in the Exchange Server?

    If you are facing slow migration issues while migrating from an on-premises Exchange Server to another Server or Exchange Online (live Exchange Server or Office 365), this article will help you resolve the issue.

    Error messages that appear while Exchange migration are:

    • StalledDueToTarget_MdbAvailability

    The move monitors the replay queue of transaction logs into remote copies of databases. Migration stalls when the queue is long, and it generally lasts until it drains.

    • StalledDueToTarget_MdBReplication

    The move monitors the copy queue of transaction logs to other DAG member servers.

    Common reasons for the occurrence of the above error message are:

    • Network issues or blocked ports
    • Storage limitations or issues
    • Incorrect network configuration
    • Third-party software blocks the traffic or processes
    • Insufficient server resources, such as CPU and RAM
    • Services failed to start due to failed updates or other issues
    • StalledDuetoSource_DiskLatency or StalledDueToTarget_DiskLatency

    This error message appears when the disk latency is at a level where adding additional I/O might impact user experience on the disk. It is located in the target mailbox database (MDB).

    Common reasons for the occurrence of the above error message are:

    • Disk performance issues on the source disk or target disk
    • Insufficient system resources
    • Existing export requests in the queue
    • High response time from source or target disk.
    • StalledDueToTarget_Processor

    This error message appears when the utilization of the CPU is too high on target MRS servers involved in the move.


    • StalledDueToTarget_BigFunnel

    This error message appears when content indexing operations suddenly face an unexpected interruption and are actively recovering.


    Common reasons for the occurrence of the above error message are:

    • High CPU or disk utilization on the target server
    • Network latency or bandwidth issues
    • Database availability or replication issues
    • Antivirus or firewall interference
    • Corrupted or missing index files
    • StalledDueToSource_MdbCapacityExceeded
    • StalledDueToSource_UnknownReason


    The most common reasons for the above error message are:

    • Content Indexing health
    • CPU
    • High Availability Replication Health
    • StalledDueToTarget_MailboxLock
    • StalledDueToMRS_Quarantined
    • StalledDueToCI (Stalled due to content indexing)


    The above error message appears when content indexing is done on the database copies.

    Factors responsible for the performance of Exchange Migration

    • Exchange Server
    • Ensure that the Exchange Server is up to speed with the latest updates, hardware resources, and storage performance. Ensure that the Operating System and Exchange Server are working perfectly without any issues. Ensure that no background tasks are affecting the performance of the Exchange Server.

    • Migration Server
    • Ensure that the Exchange Server has good specifications.

    • Migration Engine
    • Ensure you choose the appropriate migration method—cutover migration, staged migration, hybrid migration, or a third-party application like an EDB to PST converter tool.

    • Network

      Ensure your network, including local infrastructure, perimeter network, and internet connectivity, is set up to perform Exchange Server migration services without delay.

    • Office 365 Service

      Ensure proper policies, subscriptions and settings are configured for the optimized hybrid deployment.

    Powershell commands to help diagnose slow migrations

    • Get-MoveRequestStatistics
    • This command provides information about where the stall is and how much time is being consumed by the stall.
      Also, this command provides the count of total stalls, which further elaborates on where the migration is stuck and where time is being consumed.

    • Get-MailboxDatabaseCopyStatus
    • Use this command to check your database’s health and state whether they are mounted or not.

    Limitations of Manual Method

    • Manual methods are challenging for new or non-technical users.
    • Need good technical knowledge to execute the steps.
    • The manual steps are complex and time-consuming.
    • There is a high risk of data loss.
    • The Exchange Server mailbox files may get corrupted or damaged during the manual steps if not performed correctly.

    Third-party Application for Exchange Server Migration

    The EDB to PST converter is the best tool for performing seamless data migration to a live Exchange Server. Using the EDB to PST Converter tool, you can access any Exchange Server EDB file of any Exchange Server version without having Exchange Server installed.
    The EDB to PST Converter tool converts Exchange Server EDB files to Outlook PST files and is also capable of converting to other file formats, such as EML, EMLX, MBOX, PDF, VCF, MSG, and HTML.
    EDB to PST Converter tool facilitates migrating Exchange Server Mailbox to a Microsoft Office 365 account.

    Who should use the EDB to PST Converter tool?

    • Administrators are performing upgrades to the Exchange Server.
    • Users facing Exchange Server EDB file corruption issue.
    • Users are migrating from Exchange Server to other email clients like Office 365, Gmail, and Yahoo.
    • To convert Exchange Server EDB files to other file formats and cloud servers.
    • To export mailbox from EDB to PST.
    • A backup is needed to avoid the risk of data loss.
    • Export Exchange to PST for Archival, Compliance, and Legal Discovery purposes.

    Key Features of EDB to PST Converter Tool

    • Supports exporting mailboxes from Exchange 2007, 2010, 2013, 2016, and 2019 to Outlook PST.
    • Efficiently converts complete Exchange mailbox items like contacts, emails, calendars, tasks, etc.
    • Allows exporting selective items from Exchange mailbox to Outlook PST.
    • Displays preview of emails before EDB to PST conversion.
    • It facilitates converting Exchange EDB files to EML, EMLX, PST, MBOX, PDF, VCF, MSG, and HTML files.
    • Allows exporting Exchange mailbox to Gmail, Yahoo Mail, Hotmail, GoDaddy, and Amazon Workmail.
    • Allows migrating Exchange Server mailbox to Microsoft Office 365 account.
    • Repairs corrupt, damaged Exchange Server database.
    • Recovers permanently deleted emails.
    • Generates detailed progress reports in CSV format.
    • Maintains original hierarchy and integrity of emails and folders.
    • There is no file size limitation for EDB to PST conversion

    How does the EDB to PST Converter tool work?

      Step1:Launch EDB to PST Converter tool.
      Step 2:Select ‘EDB file’ for scanning.
      Step 3: The tool displays a preview of mailboxes before saving.
      Step 4: Select the Saving format as a ‘PST’ file.
      Step 5: Click Next to convert Exchange Mailbox to PST file

    Conclusion

    While migrating from one Exchange Server to another, numerous factors may affect your Exchange mailbox migration process. It would be best if you handled all those factors that may impact the Exchange Server mailbox migration process. You can opt for the professional EDB to PST Converter tool to ease your accurate Exchange mailbox migration without delays.

    How to resolve Outlook disconnected from Exchange server issue

    Microsoft Outlook is one of the most common programs for email access and works well with Exchange Server for business communications. Nevertheless, a common problem bothering users is the disconnection of Outlook from the Exchange Server. This disconnectivity can cause interruptions in productivity, refusal to send/receive emails, and restricted data accessibility. This blog will discuss the causes of this problem and possible ways of solving it.

    Reasons for Outlook disconnection from Exchange Server

    The Outlook disconnected from Exchange Server problem belongs to the class of problems that may have many origins, starting with network issues and ending with complex software issues. Let’s explore some of the most frequent causes:

    • Unstable or intermittent internet connection
    • Misconfigured Outlook account settings
    • Outdated or incompatible Outlook version
    • Overly restrictive firewall settings
    • Conflicting third-party security software
    • Corrupted or oversized Outlook data file (OST)
    • Exchange Server undergoing maintenance or updates
    • DNS resolution problems
    • Expired or invalid SSL certificates
    • Group Policy changes affecting network access
    • Insufficient storage space on the Exchange Server
    • Synchronisation conflicts between devices
    • Damaged or corrupt Windows user profile
    • Incompatible or malfunctioning Outlook add-ins
    • Network proxy server issues
    • Exchange Server reaching its connection limit

    Methods to resolve the Outlook disconnected from the Exchange server

    Here are some ways to solve the Outlook disconnected from Exchange Server problem

    Method 1: Check the connectivity and status of the mailbox server

    If you encounter a particular error, you should attempt the basic solutions before going to the complex ones.

    • First, check the system’s connectivity and the mail server’s status.
    • Ensure the system is connected to the internet and the mailbox server is active

    For the mail server:

    • You can attempt to access the Exchange Server using OWA (Online Web Access).
    • If you are to log in successfully, the server will be on and functioning as it should.
    • If not, please contact the administrator

    Method 2: Check work Offline status

    Work Offline is also a feature available in Outlook, which allows one to temporarily log out of Outlook and work offline without being interrupted by new incoming messages. It is also handy when the network is unavailable or is of substandard quality. In case the Work Offline is turned on by mistake or intentionally, Outlook will indicate the disconnected from the Exchange Server message. To resolve this,

    • Click on the Send/Receive tab.
    • Look at the Work Offline feature.
    • If yes, put the pointer on it, right-click on it, and select disable.
    • Send/Receive tab

    • It can also be solved by flushing the DNS in order to allow Outlook to connect to the Exchange Server. For this, press the Windows logo + R on the keyboard, then type ipconfig /flushdns and press the ‘Enter’ button.

    Method 3: Open Outlook in Safe Mode

    The incorrect and incompatible add-ins can also lead to errors, make the Outlook data file inconsistent, and harm the OST file. To resolve the issue and ensure add-ins are not responsible for Outlook disconnection, the following steps need to be taken such as:

    1. Exit the Outlook program and then press the Windows button and the R simultaneously on the keyboard to bring up the Run box
    2. Type Outlook.exe/safe and press Enter.
      bring up the Run box
    3. Insert your login credentials and observe the connectivity status on the status bar. If it is connected to Exchange Server, turn off all the add-ins in Outlook and launch the application again.
    4. To know which is faulty, enable the add-ins one at a time and check Outlook’s status for disconnected status.
    5. Last of all, uninstall any problematic add-ins installed in Outlook and use the Outlook application without any problem.

    Method 4:Fix the certificate issue

    Outlook access needs proper certificates that offer the best application experience. Now and then, if you are logged in to your Outlook account and you are unable to connect with the Exchange server, then this might be due to damaged or expired certificates.
    Pro Tip: For certificates, the best practice is to contact the administrator and use the seamless services.

    Method 5: Create a new Outlook profile

    Sometimes, for some reason, your Outlook profile is corrupted, and creating a new one is the correct course of action.

    1. First, shut down Outlook and then go to the Control Panel in the system.
    2. On the Control Panel window, select Mail by clicking on it.
      On the Control Panel window
    3. In the Mail Setup window, you will see the option Show Profiles; click on it.
      option Show Profiles
    4. Now, click on Add.
    5. Type Outlook’s profile name and click on OK.
    6. You should now follow the instructions shown in the wizard to set up your email profile.
      Email profile
    7. Once the synchronization is complete, close the Outlook and open it again to verify the connection status. If it remains connected, then the problem has been solved. At this juncture, one is advised to delete the Outlook profile to avoid any problems.

    Method 6: OST to PST Converter

    With manual methods, the problem can indeed be solved most of the time; however, the effectiveness of these methods is in question in case of critical OST file damage. This is where the Goldytools OST to PST Converter is very useful. This powerful tool aims to solve the problem of Outlook connectivity by converting the offline OST file to PST format. After conversion, the user can easily import it into Outlook.

    The Goldytools OST to PST converter offers several advantages:

    • Repairs damaged OST files.
    • Retains all the folder structure and the properties of emails.
    • Compatible with all versions of Outlook.
    • Enables the user to choose which folders have to be converted.
    • Offers a simple design to enable proper usage and control of the application

    conclusion

    Outlook getting disconnected from the Exchange Server can greatly disadvantage productivity and communication. Although it is possible to solve the problem with the help of the manual approach, this is not always effective enough, especially if the information is severely damaged or the server is constantly experiencing problems.
    For such a situation, the OST to PST Converter can be a reliable tool to help users regain their Outlook data in the shortest time possible.

    How to fix “OST file is in use and cannot be Accessed” issue

    OST files are an integral part of Microsoft Outlook that enables users to work offline, make changes to the Outlook data, and then synchronize with the Exchange server whenever the connection is available. Nevertheless, some circumstances may cause the OST file to become unusable, and the user will receive the message “OST file is in use and cannot be accessed.”

    This error commonly happens when Outlook cannot read or write on the OST file, and thus, users cannot access their emails, contacts, and other important information. By knowing the causes and applying the correct measures, users can easily return to their Outlook information and continue working.

    Reasons for the “OST file is in Use and Cannot be Accessed” issue

    The issue “OST file is in use and cannot be accessed” is quite a popular one, and most often, it appears when the user is attempting to work with an Outlook data file. Here are some of the simple causes of this error:

    1. The Outlook data file may be opened in another application or process on your computer or device.
    2. The file may be opened in the read-only mode.
    3. The file has some problems with permissions.
    4. Multiple users running on the same OST file
    5. OST file accessed unauthorised
    6. Poor or bad internet connection
    7. The file could be damaged as a result of a virus attack or any other cause

    Methods to fix the “OST file is in use and cannot be accessed” issue

    Users can opt to work with manual and automated workarounds since error messages that state that the OST file is in use and cannot be accessed are inevitable. These solutions are:

    Method 1:Disable cached Exchange mode.

    This error can be due to several reasons, but one of the most general is that while your Exchange Server is running in Cached mode, your Outlook client is not. This can occur if you have recently transferred your emails to a new computer or upgraded your Outlook version. Here, we will explain how to turn off the Exchange cached mode to solve the error.

    1. Select the File tab in the MS Outlook.
    2. Go to Account Settings and then to Account Settings again.
    3. Account Settings

    4. Choose the Exchange account that needs to be modified and then click on the ‘Change’ button.
    5. Clear the check mark beside the “Use Cached Exchange Mode” option and click Next
    6. Exchange account

    7. Click on Finish and then on Close.
    8. Close the Microsoft Outlook and re-open it to have the changes implemented

    Method 2: Recreate OST File.

    Given below are four simple steps to repair the OST file and resolve the error:

    1. Close all programs that are accessing Outlook data files. This error is usually displayed when an application seeks to open an Outlook data file currently opened by another program.
    2. Once you are done with all the applications, shut down your computer. This ensures that all the applications are closed and do not have any link to the Outlook data file.
    3. The next step is to delete the .ost file. To do this, you should go to the file’s location on your computer and remove it.
    4. The last action that needs to be done is to restart Outlook. After Outlook has been restarted, the new .ost file will be created & the error message should no longer appear.

    Method 3: End MS Outlook Processes.

    If you are receiving the message “OST file is in use and cannot be accessed”, it means there is a process still in use with the OST file. The following are the procedures to shut down MS Outlook and other processes to address the error:

    1. Open the Task Manager by doing the Ctrl+Alt+Delete shortcut.
    2. Go to the Processes page.
    3. Go to the Task Manager, look for outlook.exe or msimn.exe, and click on End Process for all of them.
    4. Task Manager

    5. Quit the Task Manager and try to open your OST file once again.
    6. Method 4: use GoldyTools OST to PST converter.

      Goldytools OST to PST Converter is a professional tool that converts OST files to PST files in a few minutes. This tool also offers several features, including restoring deleted or permanently deleted items from an OST file, fixing damaged OST files, restoring emails, restoring password-protected OST files, converting encrypted OST files, and more. It also supports all versions of MS Outlook, including Outlook 2021 and Exchange Server 2019.

      conclusion

      The “OST file is in use and cannot be accessed” error can be quite annoying and sometimes can hinder your productivity, but the above methods can help you deal with the problem and carry on with your work without any more interruptions. If manual methods appear too complicated or take too much time to implement, Goldytools OST to PST Converter is the right solution to this problem. Get Goldytools now and ensure your Outlook data stays reachable and safe.

    How to fix errors detected in the file Outlook OST?

    Microsoft Outlook is an essential tool in business communications, storing data in OST (Offline Storage Table) and PST (Personal Storage Table) files. OST files are particularly valuable as they allow Microsoft Exchange Server to synchronize a user’s offline activities with the server once an internet connection is established.

    Despite their utility, OST files are prone to errors that can disrupt data flow and access. This blog outlines practical methods to diagnose and resolve these errors.

    Common causes of OST File Errors

    Several factors can lead to OST file errors, each affecting data integrity and Outlook performance:

  • File Corruption: This can make the file unreadable, often resulting from system crashes or software errors.
  • Virus Attacks: Malicious software can corrupt or compromise the security of OST files.
  • Improper Shutting of Outlook: Exiting Outlook abruptly might corrupt the current session’s data
  • Excessive File Size: OST files that exceed size limits may become slow or unresponsive
  • Sync Interruptions: Disruptions during synchronization with the Exchange server can corrupt the data.
  • Unexpected System Shutdowns: These can lead to unsaved data being corrupted or lost.

    Manual repair methods for OST files

    Here are a few manual methods to address and fix OST file errors:

    Method 1: Restart and open Outlook in Safe Mode

    1. Exit Outlook if it is currently running.
    2. First, reboot your computer. This action eliminates temporary files. It also stops processes that may cause the error.
    3. Next,press and hold the ‘Ctrl’ key. While holding, click the Outlook icon. This will open Outlook.

    4. When prompted, select‘Yes’ to launch Outlook in Safe Mode.
    5. Enter Safe Mode first. Then, access your emails. Check your contacts and calendar data. See if the error message persists.

    Method 2:Recreate the OST File

    1. Go to Control Panel > User Accounts > Mail.
    2. In the Mail Setup dialog, select Show Profiles.
    3. Next, click on ‘Remove’ and then confirm to delete the Profile.

    4. Select the ‘Add’ option to create a new Outlook Profile.

    5. Enter a name for the profile and click on‘OK’

    6. Proceed with entering your email account details to set up the profile.
    7. Once the profile is configured, launch Outlook to check if the error has been resolved.

    Method 3: Use the scanpst.exe Tool

    1. Execute scanpst.exe with administrative privileges.
    2. Use the Browse button to find and select the corrupted OST file.
    3. Initiate the repair by clicking Start, then Repair if errors are detected.

      Limitations of using manual methods

      While manual methods can often resolve common OST issues, they have limitations:

      1. Time-Consuming: These processes can be slow, especially when dealing with large or multiple OST files.
      2. Technical Knowledge Required: A certain level of expertise is necessary to effectively use these methods without risking further data loss.
      3. Incomplete Recovery: Manual methods may not recover all lost or corrupted data, potentially leading to partial restoration.
      4. Recurrent Errors: If the root cause of the corruption is not addressed, the same issues may recur, compromising long-term reliability

      Advanced professional solution: Goldytool’s Outlook PST Repair

      For more severe or stubborn OST file issues, Goldytool’s Outlook PST Repair offers a powerful solution. This professional tool excels in repairing OST files with features designed for both efficiency and thoroughness

      1. Simplified Interface: User-friendly, facilitating easy navigation and operation.
      2. Comprehensive File Repair: Capable of resolving a wide array of corruption issues.
      3. Data Recovery: Efficiently recovers deleted or inaccessible items from damaged OST files.
      4. Preview Capabilities: Allows users to view recoverable items before saving, ensuring selective restoration.
      5. Flexible Data Saving Options: Recovered items can be saved in various formats such as MSG, EML, etc., accommodating different user preferences.
      6. Broad Compatibility: Supports all major versions of Outlook and is compatible with every modern Windows operating system

      Conclusion

      Manual solutions work for minor and some moderate issues. However, complex problems need a more sophisticated approach. Goldytool’s Outlook PST Repair offers a reliable and straightforward solution. It ensures your OST files are not only repaired but also restored to their optimal state.
      This is truly vital for supporting continuous business operations and data integrity. Whether you opt for manual fixes or a professional tool, timely action is crucial to prevent further data loss and restore functionality.

  • How to convert OST to PST format with Goldytools OST to PST converter

    For a lot of users, changing an OST (Offline Storage Table) file to a PST (Personal Storage Table) file is an important operation required to gain access to their Outlook mailbox data, especially when they are experiencing problems with an Exchange server or moving to a different platform. Goldytools OST to PST Converter is a trustworthy tool that guarantees your OST file undergoes an efficient and secure conversion process without any data loss.

    In this guide, we will demonstrate how to change OST to PST format using the Goldytools OST to PST Converter.

    Why do you need OST to PST converter?

    You need to recognize why an OST to PST converter might be necessary before starting the conversion process. Microsoft Outlook generates Offline Storage Table (OST) files in cached exchange mode, which lets you work without an internet connection. However, owing to a variety of reasons, these files can lose accessibility, which makes it important to change them to Personal Storage Table (PST) format.
    Here are some reasons why an OST to PST converter is a requirement in the following scenarios:

      1.Corruption in OST File: Should an OST file become corrupted, converting it to a PST file might enable the recovery of the data
      2.Exchange Server Downtime or Failure: If Exchange Server is not available, users might have to change their OST files to PST format to reach their emails.
      3.Outlook Profile Issues: If an Outlook profile is gone or unreachable, transforming OST files helps to ensure that data stays intact.
      4.Backup Purpose: Converting OST files to PST can create a backup that protects your emails, contacts, and additional Outlook data.
      5 Migration to a New Email Client: Migrating is easier with OST converted to PST because PST is more broadly supported.
      6.Data Transfer to Another PC: Migrating PST files to a new computer makes it easy to carry over Outlook data.
      7.Archiving Old Emails: For the archiving of old or essential emails in a format that is both readable and portable, OST to PST conversion is important
      8.Accessing Data Offline: You can access PST files independently of an Exchange server while offline.

    Why choose Goldytools OST to PST converter?

    The Goldytools OST to PST Converter is a complete and easy-to-use tool for converting unreachable OST files into the Outlook PST format. This advanced resource assures data precision and no loss throughout the conversion process, making it one of the best alternatives for those dealing with OST file conversion. Below are the top reasons why Goldytools stands out:

    1. For all OST to PST conversion purposes

      Goldytools OST to PST Converter processes large files, including encrypted OST files, and supports all versions of Outlook from 2000 through 2019. This tool is adaptable and addresses a large spectrum of user needs in file conversion.

    2. Conversion from OST to PST for Free

      Users can take advantage of the tool to convert the first 20 emails from any folder without charge. This feature allows you to take a look at and evaluate the conversion quality before deciding on a complete license.

    3. Facility to Extract All Your Mailbox Items

      Goldytools OST to PST Converter is here for the same and gets you all mailbox items along with emails, attachments, contacts, notes, tasks, journals, and calendar data, just like other best available tools via Goldysoft.WinControls. The item is deleted, and by doing so, you can recover any deleted items.

    4. Turn OST into Any File Format You Want

      The tool supports converting OST files into different file types, including PST, MSG, and EML. This involves various applications, which include PDF readers and text readers.

    5. Split Large PST Files

      PST files are highly affected by corruption if they are large. By decomposing PST files in sizes from 1GB up to 50GB, Goldytools is able to manage the data safely and easily and make it easier for you

    Step-by-step tutorial to use Goldytools OST to PST converter to convert OST to PST format

    Goldytools OST to PST converter user interface is simple and easy for the users. Follow the given steps to convert OST to PST format in simple steps:

    1. Select OST File to convert

      After running Goldytools OST to PST converter, it asks you to select the OST file that you wish to convert. Now, navigate to the OST File Location by clicking on the Browse button. After selecting the file, you can now opt for either a standard scan or an advanced scan based on the health of the file.

      1. ➔Standard Mode is suitable for regular conversions
      2. ➔Advanced Mode should be used if the OST file is corrupted or if a deep scan is required.

      ClickNext to proceed

    2. Start the Conversion Process

      When the OST file is loaded, the converter will scan and show a list of all mailbox items in that particular OST file. It lets you preview the emails, contacts, calendar entries, tasks, and other mailbox items. It offers the ability to stop once it has detected a given number of samples.

    3. Select a location to store the PST File

      When the scanning is complete, you will need to select a destination where you want to save this newly converted PST file. Click Browse and choose the location on your computer where you want to have the PST file saved. You can also use the Split Option to split large PST files into multiple smaller ones.
      Additionally, you can append a prefix to the name of the store (to keep your folders in Outlook organized).

    4. Convert and Save the File

      Press the Save button to convert block creation mode. The converter will now start converting the selected OST file to the PST format. This might take a few minutes, depending on the file size and number of items. After successfully converting the file, you should get a notification message telling you that the file has been converted and saved in a specified place.

    5. Get into your PST File in Outlook

      Once the conversion is complete, you can import this PST file into Microsoft Outlook as usual using the import process. If you want to restore an Outlook PST file, just follow this process:
      1) Open the version of Outlook that’s still working and then go to ‘File > Open & Export > Import/Export.’

    Conclusion

    For anyone who needs to change inaccessible or corrupted OST files into PST format, Goldytools OST to PST converter is an important tool. Featuring a user-friendly interface, batch conversion options, and sturdy features, it ensures that data loss is not a concern during the process. This converter provides a dependable solution for any situation, whether it’s server troubles, shifting data, or simply making backups for your emails. Get Goldytools now and discover how simple it is to effortlessly change OST files to PST format!

    Top 5 Outlook PST Repair Tool in 2024

    There are a few issues related to managing Outlook data files, generally known as PST, which are usually used when the Outlook PST gets corrupted. Thus, due to the size of the file, problems with the system, or a power failure, PST can become damaged. It can lead to data loss, slowness in working with Outlook, or complete access to emails.

    To avoid such problems and recover your data, an Outlook PST Repair Toolis inevitable. Multiple repair tools are quite effective for fixing the corruption issue of PST files in 2024. In the next section, we provide a brief of the five best Outlook PST Repair tools as per the client’s requirement.

    Goldytools Outlook PST Repair Tool

    The GoldytoolsOutlook PST Repair Tool is a reliable and multifunctional tool for repairing highly damaged PST files. It works with all Outlook versions and allows the restoration of crucial mailbox data, including messages, contacts, and tasks.

    The tool enables a view before writing the found files, and the interface is quite simple for beginners and experts. It also recognizes encrypted and password-protected PST and to enhance its efficiency and ease of handling, it can split purely large PST files

    Key Features:

  • Repairs large and severely corrupted PST files
  • Recover essential mailbox items like emails, tasks, and contacts
  • Allows preview before saving recovered files
  • Supports encrypted and password-protected PST files
  • Easily split large PST files for better manageability

    Stellar Repair – PST File Recovery Tool

    Stellar Repair for Outlook is among the most successful and reputed OST and PST repair tools that IT professionals and several organizations widely use. Besides, it effectively repairs PST files of any size and restores all mailbox items, including emails, contacts, and calendar entries. The tool also provides the option to export the recovered PST file in various formats such as MSG, EML, RTF, PDF, and many others.

    Key Features:

  • Repairs large PST files with no size restrictions
  • Supports recovery from encrypted and password-protected files
  • Provides enhanced preview of recoverable data
  • Exports recovered PST data to Office 365 or live Exchange Server

    DataNumen Outlook Repair Tool

    Outlook Repair Tool from DataNumen is one of those that boasts a very high rate of success and speed. It helps repair damaged PST files, which can occasionally cause virus attacks, power loss, or system crashes. The tool restores all the mailbox items, such as emails, contacts, and attachments, and it supports ANSI and UNICODE PSTs. DataNumen works with all Windows versions and is able to work with extensive PST files, so its use is suitable for both personal and professional purposes.

    Key Features:

  • Repairs severely corrupted PST files and restores all mailbox data
  • Supports recovery from encrypted and password-protected PST files
  • Recover lost emails, contacts, and attachments
  • Compatible with both ANSI and UNICODE formats

    Kernel for Outlook PST Repair Tool

    Kernel for Outlook PST Repair tool is meant to recover and fix corrupt PST files without any difficulty. It supports large-sized PST files and has some professional filters to let users search for emails or certain email IDs. At a certain range of times, the tool restores lost and deleted mailbox items and exports data to Office 365 or the live Exchange Server. It also enables users to save repaired data in forms such as PST, MSG, and DBX in order to have flexibility in the recovery.

    Key Features:

  • Repairs corrupted PST files and recovers all mailbox data
  • Supports selective recovery using advanced filters
  • Saves recovered PST files in various formats like MSG, DBX, and EML
  • Exports repaired data directly to Office 365 or live Exchange Server

    Aryson Outlook PST Repair

    Aryson Outlook PST Repair tool has three scan options – Standard, Advanced, and Deep, to deal with various types of PST issues. In its effective data recovery, all the mailbox items are available, and password protection/encryption is also allowed. With Aryson, users are also capable of directly dragging and dropping repaired PST files into Outlook.

    Key Features:

  • Repairs corrupt PST files and maintains folder hierarchy
  • Supports password-protected and encrypted PST files
  • Offers preview of recoverable data before saving
  • Saves recovered data in formats like PST, DBX, MSG, and MBOX

    Conclusion

    Make the right decision when choosing the correct Outlook PST repair tool if you are having problems with a corrupted PST file. From the five options above and having used the Goldytools Outlook PST Repair Tool, we can say that it stands out from the rest because it is easy to use, has great recovery powers, and can handle large encrypted files. GoldyTools is a real solution for businesses and individuals to work safely with Outlook data when necessary.

  • Step-by-step tutorial: Backup and Restore Outlook OST Files without data loss

    Email is the most convenient method of professional communication for a business, and it requires zero investment. It is more permanent than verbal communication and you can save it for an unlimited period too. You can include several non-text items like images, videos, links, and data sheets in an email. MS Outlook is the best organizer for a complete email management process and Microsoft offers lots of benefits to manage multiple accounts separately.

    5 Advantages of having MS Outlook application for email communication

    MS Outlook desktop is the majorly used form of the application and there are distinct benefits of using it. We are listing 5 important ones:

      1.It is designed for professional usage.

      Microsoft has designed Outlook as a professional email manager and its functionalities help a business to operate email communication, run email marketing campaigns, and collaborate effectively with a team. Becoming familiar with it can help in increasing productivity substantially.

      2.Managing contacts is easy.

      In Outlook, you can create multiple address books with different contacts and utilize them to send/receive emails. You can also use different commands to manage contacts.

      3.Integration with calendar features.

      Calendar is a highly beneficial feature to access in Outlook as it allows you to plan meetings, appointments, interviews, and multiple other activities and share with others. The manager can easily send meeting requests to your contacts and view upcoming appointments using the month, week, or day layouts. The same keyboard shortcuts you use for reading and composing emails can also be used for managing calendar tasks efficiently

      4.Execute shortcut commands to run different tasks

      The shortcut commands amplify the speed in which you can execute multiple tasks like sending a new email (Alt + S), replying to an email (Ctrl+R), marking an email as read (Ctrl+Q), marking an email as unread (Ctrl+U), etc.

      5.Access multiple accounts in an organized environment.

      There is no other application in which you can manage multiple accounts from different servers in such an organized environment. Outlook employs a folder system in which emails are organized in different folders and when you click on a folder, then its emails appear distinctively.

    Why do you need to back up the Outlook OST file?

    Outlook OST files belong to the Exchange Server and reside within the computer system. Its default location is –
    C:\Users\Username\AppData\Local\Microsoft\Outlook
    Just like any other file present in your computer, OST files are equally vulnerable to various threats like virus corruption, accidental deletion, abrupt shutdown, synchronization problems, etc. There are other important reasons like compliance that compel a business to have a backup of OST files.

    Backup OST file using the export method in Outlook

    MS Outlook can export an account’s data file to an offline PST file. You can consider it as a backup file. It is the most sought-after method of creating a backup file without any third-party application. The following is the complete procedure:

    1. In the Outlook application, click on the File option.
    2. File

    3. Select ‘Open & Export.’
    4. Open & Export

    5. Choose ‘Import/Export’ wizard
    6. Import/Export’

    7. Choose ‘Export to a file’ as the action to perform. Then, click Next.
    8. Export to a file

    9. As the file type, select ‘Outlook Data File (.pst),’ and click Next
    10. Outlook Data File (.pst)

    11. Select the folder to export from and you can also include subfolders. Click Next
    12. Select the folder to export from

    13. Browse the location to save the PST file and select the suitable option for managing duplicate files. To create the backup file finally, click the Finish button.
    14. Finish button.

    Restore the OST file using the import method in Outlook

    Once you have created the backup file of your OST data file, it remains separately from the account as on the offline file. When you need to access the data again, you can restore it to Outlook again. Here is the complete procedure:

    1. Click File in the menu bar.
    2. File

    3. Click Open & Export, then choose Import/Export.
    4. Open & Export

    5. From the available list, select ‘import from another program or file,’ then click Next.
    6. Next

    7. Select Outlook Data File (.pst) as the file type to import from and click Next.
    8. Outlook Data File (.pst)

    9. Click Browse and select the backup PST file from its location.
    10. Browse

    11. Select the data file and click Finish to upload it back to the application.
    12. Finish

    Final words

    Converting Outlook OST files to PST format offers significant advantages for all users. While the manual method is free, it comes with limitations. Goldytools OST to PST Converter, on the other hand, delivers quick, efficient processing with advanced features and an intuitive interface. It streamlines the OST to PST conversion process for a smoother experience. A free demo version is also available, allowing users to test the software by converting up to 20 items per folder.

    How to choose the best OST to PST converter software?

    Protecting the contents within an email account is a significant consideration for enterprises and individuals in the current world. Microsoft Outlook users are required to convert OST to PST format, which is why the software has been developed.

    This process can be quite challenging at times unless proper tools are used. In this guide, we will discuss in detail how to select the best OST to PST converter software. It will help you to make the right decision to protect your valuable email data.

    Why do you need OST to PST converter

    Conversion of OST to PST is critical in various aspects due to the need to gain access to your emails, create backups, and migrate data. Below, you will find some of the most important situations where an OST to PST converter proves to be a necessity.:

    • Recovering data from corrupted OST files
    • Accessing mailbox data when the Exchange Server is unavailable
    • Migrating email data to a new system or Outlook profile
    • Creating backups of important emails and attachments
    • Resolving synchronization issues between local and server data
    • Extracting data from orphaned OST files after account deletion
    • Complying with legal and regulatory data retention requirements

    How to choose the best OST to PST converter software?

    There are many OST to PST converters available in the market, so it is very important to choose the right one that can help in conversion without losing data. The following factors should be considered when one is comparing various software:.

    1. Conversion Accuracy and Data Integrity

      The most important factor that should be considered while converting OST to PST is the accuracy of the emails. Search for software that comes with an assurance of preserving all the properties of the email, the attachments, and the folders.:

    2. User-Friendly Interface

      This makes it easier to convert the data since an intuitive interface can greatly reduce the conversion time, especially when dealing with non-technical users. Select the software that provides a straightforward conversion procedure and avoid selecting complex and time-consuming programs.

    3. Batch Conversion Capabilities

      While dealing with a large number of OST files, it is wise to have a batch conversion option to reduce time and effort. Make sure that the software will handle more than one file at a time.

    4. Preview and Selective Conversion

      It is very helpful to preview the contents of the OST file and then select which items should be converted. This feature enables the user to have some level of control over the conversion process and address the issue of storage

    5. Check that the converter works with your version of Outlook and can handle different types of OST files: encrypted and password-protected ones.

    6. Additional Features

      Additional features to consider are the option to split large PST files, delete duplicate items, or export to formats other than PST (e.g., EML, MSG, HTML).

    Try Goldytools OST to PST converter

    When it comes to the best OST to PST Converter, the most suitable one is Goldytools OST to PST Converter. This tool aims to satisfy the requirements of everyday users and IT specialists while providing a wide set of opportunities with ease of use.

    Key features of Goldytools OST to PST converter

    Multi-File Magic

    This feature enables the user to convert multiple OST files into PST files in one go. It is useful for the time saver especially if one has many email files to modify. It does not mean that you do each file one by one but you can set it up to convert all the files at one time. This is especially useful for IT departments or anyone who would be handling multiple accounts. It helps to make the whole process quicker and ensures all of the emails are kept secure during the transfer

    All-in-One Outlook Transfer

    The Goldytools converter does not only convert emails. It also migrates your calendars, contacts, tasks, journals, and notes from OST to PST. This means that all the users’ data is retained every time they convert their files from one format to another. It is best if you use Outlook for more than just emailing. It will be a folder for all your appointments, contact lists, and to-do lists in the same format you had them. It is like relocating Outlook setup to another location, but you don’t lose anything in the process.

    Universal Email Compatibility

    It is also worth underlining that this tool can work with OST files of different email systems. It compatible with IMAP, Office 365, Exchange, Hotmail, and Outlook. com. This means that regardless of the source of your emails, you can most likely convert them. I find it very helpful, especially when you are migrating your emails or if you have multiple emails and you want to consolidate them. It tracks new email technologies, so it is suitable for the present and the future.

    Server-Free Solution

    It is capable of operating without having to be connected to an Exchange server. This is really helpful if you no longer have access to your old email server, such as in the case of a change of employers. One very important thing is that you can migrate OST files to PST without being connected to any server. It is ideal for converting old email files or if you have to download your emails but are unable to connect with the original server. This makes it easier to either transfer or retrieve your emails in various circumstances

    Data Repair and Conversion of corrupted files

    OST files, at times, get damaged, and one cannot open it. This tool can repair these corrupted files and convert them into functional PST files. It can also save your emails in other formats, such as MSG, EML, HTML, MHT, and even PDF formats. This is rather useful if you assume that certain emails were deleted due to a damaged file. It shows you various approaches to recovering your emails, even from files that you consider useless

    Conclusion

    When deciding on the right OST to PST converter, one should be aware that the data they are going to convert is crucial and should not be altered or lost in the process of conversion. Among the features of Goldytools OST to PST Converter is its ease of use and fast processing. The most important thing is a set of functions that will allow the use of this tool for different purposes. For those who require a tool for converting imperial measurements once or for those who use the tool on a daily basis, Goldytools has the right tools that will not let you down.

    What is the difference between OST and PST files in Outlook?

    If you have ever been a user of Outlook, you might be aware of the terms OST and PST. Outlook is a go-to tool for managing emails and organizing tasks, but many users use two different types of files without even realizing. These files are: OST and PST. OST files are automatically created for Exchange or Office 365 accounts, letting you work offline and sync later. Whereas, PST files are manually set up for archiving or storing data on your computer.

    Let’s break down the major differences between these files and why they matter for your Outlook setup.

    What is an OST file?

    OST files are a handy feature in Microsoft Outlook that is designed to help you manage your emails and other mailbox data even when you are offline. Therefore, it stands for offline storage table. OST is a type of file that Outlook uses to keep a local copy of your mailbox on your computer.

    Additionally, when you set up an exchange account in Outlook, the software automatically creates an OST file on your computer. Now, this file contains a local version of your emails, calendar events, and some other important data. The best part is that you can still access and work with all this information without requiring it to be online. Thus, you can work on a plane, in a remote location or just dealing with a spotty Internet connection.

    Note that OST files are especially useful in two main situations. First, if you are using Outlook with Microsoft Exchange Server in cash exchange mode, your OST file allows you to work with your data offline. Whatever changes you will make, like reading emails or setting up appointments, will automatically be saved locally and then synchronized with the exchange server once you’re back online. Second, if you are accessing mail through Outlook using the Outlook connector, an OST file helps you manage Hotmail data offline as well.

    What is a PST file?

    A PST file is a data file used by Microsoft or where Outlook stores a local copy of all important information like emails, calendars, events, tasks, and contacts. This file format allows you to keep a backup of your data and easily transfer it to different devices if needed.

    If you are using a POP (Post Office Protocol) account or Outlook, your emails are saved in a PST file. POP, including its newer version, POP3, is one of the older email protocols. You can download emails and save them directly to your computer using POP. This means that once emails are downloaded, they can be deleted from the server. This setup was useful in the past when people typically used just one device to check their emails.

    However, now, most of us access our emails using multiple devices like smartphones, tablets, and computers, so this method is not practical at all. Since POP does not synchronize changes across devices, any action you take on one device, such as deleting an email, won’t be reflected on the server or on other devices.

    Differences between OST and PST files

    You must understand the differences between OST and PST files for using Microsoft Outlook effectively. Each type serves a specific purpose, so knowing when to use each can help you manage your email and data better.

    1. Purpose and Use

      Both OST and PST have different purposes and use like one is great for back up while other is amazing for no-internet situation.

      OST: OST is designed for offline access and synchronization with a server. It is primarily used with Exchange or Microsoft 365 accounts.
      PST:PST is used for local storage and backup. It is more about managing and archiving your personal Outlook data.

    2. File Size

      File size differs significantly between OST and PST files which impacts how you manage your data. Since these files vary in size, one goes super fast while other takes time and space.
      OST: OST files are always larger due to synchronization.
      PST: Synchronization makes PST file size smaller.

    3. Security

      Check the security of your data of OST and PST files because they are holding your sensitive info.

      OST: It is safer and more secure as it is fully encrypted.
      PST: It is less secure as data files are stored on a local computer.

    4. Accessibility

      Accessibility is key for users who need to work efficiently, regardless of their internet connection. One of these files lets you access it offline while other doesn’t.
      OST: OST files allow you to access previously downloaded data files offline, such as notes, emails, contacts, and other info.
      PST: These files allow you to archive all types of data.

    5. Automatic vs Manual Creation

      You must know if these files are automatically created or require you to set them up manually. The mode of creation decides the workflow and efficiency.

      OST: OST files are automatically made by Outlook for accounts like Exchange or Office 365.
      PST: PST files are manually created to archive or organize emails and data on your computer.

    6. Management

      Effective management of your Outlook files is crucial for maintaining organization and accessibility. Check below how both files are managed differently and if they impact your workflow.

      OST: OST files are managed automatically by Outlook and are specific to the user’s profile and server account.
      PST: PST files can be moved and managed manually (e.g., for backup or transfer).

    Why convert OST to PST Files?

    It’s a great and safe idea to convert OST to PST files. Here are six common situations where this conversion is needed:.

    1. Exchange Server Crashes: If the Exchange Server goes down, you can’t access your data online. However, PST file lets you use that data until the server is repaired so you must convert OST to PST.
    2. Server Maintenance: You can’t access your mailbox during scheduled maintenance. If you need urgent access, you can convert the OST file to PST to retrieve your data.
    3. Job Change: When you switch jobs, your old OST file won’t work with the new organization’s server. Hence, convert it to PST to access your old emails and information.
    4. Data Migration: If you’re moving to a new system, moving from OST file to PST makes it easier to transfer all your important data without compatibility issues.
    5. Recovering Deleted Data: If you accidentally delete emails from an OST file, you can often recover them by converting the file to PST, even if they’re not available on the server anymore.
    6. Mailbox Corruption: If your OST file becomes corrupted, convert it to PST as it may help recover your data. This is especially useful when standard recovery tools fail

    If you are looking for a converter that can do all the above mentioned things for you then look no other than GoldyTools OST to PST converter. Using this tool for OST to PST conversion can simplify the process and ensure better results.
    It allows you to convert the first 20 emails per folder at no cost, giving you a chance to test the tool before committing. Plus, you can convert multiple OST files to PST at once. Thus, it saves you time and effort, especially if you have a lot of data to manage. Besides, it preserves the original formatting and structure of your emails and other data during conversion, so nothing is lost or altered.

    Conclusion

    Both OST and PST files are important in Outlook but they have different functions. Indeed, PST is a more reliable and safer option so most users are converting OST to PST file formats. There are many tools available for converting OST to PST but you must choose a reliable and safer one like GoldyTools OST to PST converter. If you want to know more, you can reach out to us!

    Top 10 OST to PST converter tool in 2024

    In situations like inaccessible Outlook data, Exchange Server crash, or corrupt OST files, the OST to PST Converter tool is inevitable. OST files are used to store emails, contacts, and calendars when Outlook is working in offline mode, and for several reasons, the files may become corrupt. This is the area where OST to PST converters are of great help.

    These OST Converter Tools help migrate OST emails to PST format, which may then be loaded to Outlook later. Here are the best 10 OST to PST converter tools in 2024 and what makes them exceptional.

    1. Goldytools OST to PST Converter:

    Goldytools OST to PST converter OST to PST Converter is the best tool for converting the OST file into PST format when the OST file is not accessible. It also provides you with the ability to convert OST files into other formats, such as MSG, EML, and MHT.

    Features:

    1. Free conversion for the initial twenty emails per folder
    2. Conversion of many OST files at once to PST
    3. Full synchronization of all Outlook elements, including e-mail, calendar, and contacts, etc.
    4. Support for various sources such as IMAP, Office 365, and Exchange
    5. Does not demand an Exchange profile or server link

    2. SysTools OST to PST Converter:

    One of the most recommended options to convert an OST to a PST file is SysTools OST to a PST Converter. This is appropriate for small business venture and also large companies.

    Features:

    1. High-speed scanning functions
    2. Preview functionality for OST data with metadata
    3. Smart search option to find OST files
    4. For example, the removal of S/MIME and OpenPGP encryption
    5. Cross-platform compatibility (Windows and Mac)

    3.Kernel for OST to PST Converter:

    A highly effective tool, Kernel for OST to PST Converter is the most effective tool for converting all the orphaned and corrupted OST files and storing the information in PST format without the loss of information.

    Features:

    1. Backing up OST files and converting them in bulk and large sizes
    2. The ability to split PST files by size
    3. Selective migration for the emails that match specific criteria
    4. Cross-platform migration solutions
    5. It also supports all the Windows versions.

    4.SysInfoTools OST to PST Converter:

    SysInfoTools OST to PST Converter allows for conversion at a rather fast rate while giving users several options for exporting files in PST, EML, DBX, and MSG.

    Features:

    1. The ability to turn emails, contacts, tasks, and many others.
    2. Multiple output options (PST, EML, DBX, MBOX, etc.)
    3. Migration with filters based on the date
    4. Conversion of files and folders in batch
    5. Maintaining folder structure and data consistency.

    5.Aryson OST to PST Converter:

    Aryson OST to PST Converter is an easy-to-use software with a clear and intuitive design. It allows users to make OST file conversion possible without needing to have a computer professional.

    Features:

    1. Changes to different email file formats
    2. Advanced options of mail filtering for accurate conversions
    3. Compatibility with Outlook versions 365, 2019, 2016, etc.
    4. Preview of OST mailboxes and attachments using preview functionality
    5. Windows, Mac, and Linux compatibility

    6.Stellar OST to PST Converter:

    Relied by IT professionals to convert OST to PST files: across the globe, Stellar OST to PST Converter is well-appreciated for the accuracy it uses to convert large and encrypted OST files.

    Features:

    1. OST to PST and other file format conversion
    2. Maintenance of the original folder organization
    3. PST file splitting without user intervention
    4. Supports all the Windows operating system versions.
    5. Batch conversion capabilities

    7.Softaken OST File Exporter:

    Another top-ranking software is Softaken OST File Exporter, which supports OST file conversion at high speed and comes with strong functions.

    Features:

    1. Endorsement for converting file that has been locked by password
    2. The capability to work with large OST files with attachments
    3. Specificity of search options for data retrieval
    4. Flexible export options
    5. Automatic identification of email server and port numbers

    8.BitRecover OST to PST Converter:

    BitRecover OST to PST Converter is one of the fastest and most efficient tools to convert OST to PST files:. It has the quality to convert multiple OST files at the same time.

    Features:

    1. Saves to more than 30 file formats
    2. Size of OST file is not restricted
    3. Folder mapping feature in different languages
    4. Converting OST to PST with or without Outlook
    5. Additional filtering for specific conversions

    9.Corbett OST to PST Converter:

    Corbett OST to PST Converter sets itself apart with its search feature, and it works seamlessly with IMAP. Secures all the data to its highest level during the conversion process to avoid loss of authenticity.

    Features:

    1. Complete conversion of OST attachments, tasks, and notes
    2. The results are 100% data and folder integrity.
    3. Enhanced search options for better site exploration
    4. Conversion choices for converting large numbers of users
    5. Auto identification of email server and port number

    10.PCVITA Converter for OST to PST:

    PCVITA OST Converter Tool: is one of the most effective tools for converting OST files into PST, MSG, and MBOX. It makes conversion easy for both the users and business entities.

    Features:

    1. Platforms List of Supported Output Format: EML, EMLX, PST, MSG, etc.
    2. Standard and fast scanning options
    3. Maintenance of metadata and the attachments
    4. Compatibility with both Windows and Mac operating systems
    5. Easy to convert orphaned OST files without having to use Outlook.

    Conclusion:

    As for OST Converter Tools, all the programs mentioned above are different and offer specific options to meet all customer needs. Goldytools OST to PST Converter is the best OST to PST Converter in the market. It has an affordable price, is easy to use, and is fast; therefore, we recommend it for 2024.