All posts by harshit

How to Fix “PST is Not an Outlook Data File” Error?

Outlook uses a file called a PST to save a copy of your emails, contacts and calendar directly on your computer. But, these files can sometimes break. One common problem is an error message that says PST is Not an Outlook Data File. When this happens, Outlook refuses to open the file and you will not be able to see any of your emails. Continue reading to know more.

Methods to Fix PST is Not an Outlook Data File Error
Method 1: Restart Your System

No matter how small the computer problem looks, the first thing you should always try is a restart.
When you reboot your computer, it refreshes the whole system and closes all the apps running in the background. Sometimes, another program might be trapped or stuck using your PST file by mistake. Restarting forces that program to let go, which often fixes the error immediately. If a quick restart does not do the trick, you can move on to the next step.

Method 2: Reduce PST File Size

Older versions of Outlook struggle if a PST file is bigger than 2GB, but newer versions have a limit of 50GB. If your file gets too big, it can cause errors. Check your file size. If it is over the limit, you need to shrink it.

Step 1:First of all, open Outlook, click File, then select Account Settings and click Account Settings again.

Account Settings

Step 2: After that, hit the Data Files tab and double click the PST file you want to fix.

Step 3: Now, tap the Compact Now button to shrink the file.

Compact Now
Apart from compacting, you can also use the Mailbox Cleanup tool by going to File>Tools>Mailbox Cleanup to delete old items and save space.

Mailbox Cleanup
Method 3: Update and Repair Outlook

To update Outlook, follow these steps: Open Outlook, click File>Office Account>Update Options>Update Now.

Update Now

If updating does not fix the problem, you can try repairing the entire Microsoft Office program:

Step 1: Firstly, open your Control Panel and click on Programs and Features.

Step 2: Then, find your Microsoft Office app in the list and right click it.

Step 3:Now, select Change then choose a repair method like Quick Repair or Online Repair.

Online Repair
Method 4: Repair PST with ScanPST

If the other methods did not work, your PST file might be corrupted. Follow these steps to use the built-in repair tool:

Step 1:First of all, find the Inbox Repair Tool which is also called ScanPST.exe on your computer and open it.

Step 2: TapBrowse and select the broken PST file.

Step 3: Click Start to scan the file for errors.

Step 4: If the tool finds errors, click Repair to fix them.

Repair

The ScanPST.exe tool only works for minor damage and files smaller than 2GB.
If your file is very large or badly broken, you should use a professional repair tool like Goldytools Outlook PST Repair. This tool is highly powerful and can fix major corruption without losing your data. It safely recovers your emails and keeps your folders exactly the way they were.

Conclusion

There are several ways to fix PST is not an Outlook data file error. Try the simple steps first to get your emails back. For minor damage, use the built-in ScanPST.exe tool. For larger or badly broken files, you can try the free version of Goldytools Outlook PST Repair to recover your data safely.

How to Fix Outlook Error 0x80049dd3 Easily?

There was a time when people get frustrated about Access Denied error code 0x80049dd3 in 2024 while using the Outlook desktop app. The error would not away even after reinstalling the app or trying to login many times.
This error simply stops you from signing in. Also, it prevents you from sending emails or syncing your calendar and contacts. It actually locks you out of your professional tools.In this blog, you will know about different methods to fix Outlook error 0x80049dd3right below.

Methods to Resolve Outlook Error 0x80049dd3

Method 1: Make a New Outlook Profile

If your Outlook is not working, the chances are your profile might be broken.
Creating a fresh one usually fixes this problem. So simply follow the steps given below:

  • First of all, open Control Panel and click on Mail – Microsoft Outlook in your computer.
  • After that, click the Show Profiles button and then click Add.
  • Now, give yourname for your new profile like New Mail.
  • Then, enter your name, email and password. Then, click Next and Finish.
  • You will see your new profile in the list.
  • At last, select prompt for a profile to use and click OK.

Whenever you open your Outlook, it will ask you which profile to use. You should choose your new one to see if the error is gone.

Method 2: Uninstall and Install Microsoft Office Again

If Outlook is still giving you the 0x80049dd3 error, it just needs a quick tune up. The first step is to repair the issue yourself by fixing small glitches. It will not delete any of your emails or files. Here is the way how to do it.

  • First of all, open the Control Panel and hit on Programs.
  • Then, tap Programs and Features or click the option Uninstall a program.
  • Find Microsoft Office in the list, right click it and tap option Change.
  • At last, simply follow the prompts on your screen to repair the app.

It is better to uninstall Microsoft Office completely and then reinstall it again from the beginning if this method does not work.

Method 3: Repair the Corrupt Outlook Data File

If your Outlook data files (OST or PST) get damaged, the app will stop working and you might lose your emails. To solve Outlook error 0x80049dd3, you need to repair these files. Microsoft has a free built-in tool called ScanPST.exe that can fix minor glitches and get you back into your inbox. But, if the damage is severe, the free tool might not be strong enough. In those cases, using a professional Goldytools Outlook PST Repair software is the best way to deeply clean the files, recover your lost data and get Outlook running smoothly again.

Conclusion

If Outlook error 0x80049dd3is blocking your sign in, the steps in this guide will help you get back online. If the problem is caused by damaged data files, start by using Microsoft’s free ScanPST.exe tool to repair them. Once fixed, you can simply import the file back into Outlook.
For more serious damage that the free tool cannot handle, you can try the free version of Goldytools Outlook PST Repair before you make a purchase for extra features. It can fix PST files of any size with total accuracy. It is designed to handle deep corruption and fully restore your mailbox which ensure that you do not lose any important emails.

10 Common Outlook Issues and How to Fix Them

Microsoft Outlook often runs into technical problems. Many people do not know how to identify these errors thus they try random fixes that can accidentally delete their important data. In this blog, we will help you identify the most common errors and provide safe ways to fix them. Most of these issues happen because your PST file (the file that stores your emails) is damaged. To fix this quickly and keep your data safe, you can see few effective ways right below.

10 Common Outlook Errors

Check out the most common 10 outlook issues given below.

  • Target Machine Refusal: This issue usually happens if you enter an incorrect IP address or an invalid server name.
  • Error 0x80070002 & 0x8004210B: The first error appears when setting up a new account and the second one occurs when sending emails fails.
  • Error 0x800ccc19: This indicates the server is not responding to Outlook’s requests.
  • Error 0x800ccc0d: It is a common sign of incorrect Account Settings which prevent you from sending or receiving mail.
  • Cannot Start MS Outlook: It is often caused by a broken navigation pane or a corrupted file showing as 0KB.
  • Not a Personal Folder File: This is a clear sign of PST file corruption which is often caused by shutting down your computer improperly.
  • Cyclic Redundancy Check (CRC): This issue occurs when you save emails to your PC and it is almost always due to PST corruption.
  • POP Error 0x8004210a: This happens when your email server fails to communicate with the POP server.
  • Error 0x800CCC0F: This error is normally triggered when an antivirus firewall blocks Outlook’s connection.
  • OST File in Use: This problem happens when another application conflicts with Outlook while you are trying to access your offline data.

Simple Solutions to Fix Outlook

If you are facing these common outlook issues, you can try these easy troubleshooting steps which are as follows:

  • Check Your Internet: Ensure that your cables are plugged in and your Wi-Fi is stable. A weak connection is a frequent culprit.
  • Clean Your Mailbox: An overcrowded Inbox can cause Outlook to lag or crash. Delete large and unnecessary emails to free up space.
  • Reinstall Outlook: Sometimes, a fresh start is all you need. Uninstalling and reinstalling the app can clear out minor software bugs.
  • Adjust Antivirus Settings: If your firewall is too strict, it might block Outlook. Check your antivirus settings to ensure that Outlook is “allowed.”
  • Use the Inbox Repair Tool (ScanPST.exe): Outlook includes a built-in tool to fix corrupted PST files. Search for “ScanPST.exe” on your computer and run it to repair minor data damage.

The Best Way to Fix Severe Outlook Issues

The built-in repair tool works for minor issues, but it often fails when files are severely damaged. In these cases, the Goldytools PST Repair Tool is highly recommended. It is a fast and reliable tool that recovers all items from your PST files and can even fix complex issues like Error Code 8.

Conclusion

Most Outlook errors occur from one major problem which is PST file corruption. By identifying the error early and using the right repair methods, you can protect your data. If basic troubleshooting does not work, using a professional Goldytools PST Repair Tool is the safest way to get back to work without losing your emails

PST to Microsoft 365 Migration Guide

If your company still has old Outlook data files (PSTs) scattered across random computers and servers, you are definitely not the only one. Even though it is 2026, these digital leftovers are everywhere.
These files were once helpful for saving space, but they are now a huge risk. They are easy to lose, hard to back up and a nightmare for security. Thus, most businesses now move these files into Microsoft Office 365. There are certain methods to import PST to Office 365 which you can see below.

How to Migrate PST Files to Microsoft Office 365?

Below given is the modern and updated way tomigrate PST to Office 365.

Step 1: Identify and Locate PST Files

You would be surprised how many old files are tucked away in corners of your network.

  • Where to look:Employee laptops, shared office folders, plug-in hard drives and old backup tapes.
  • The Smart Way: Do not hunt for them one by one. Use discovery tools (like Microsoft’s own scripts) to scan your network automatically. It saves days of manual work.

Step 2: Choose Your Migration Method

  1. The Official Microsoft Way (Best for most): You upload your files to a secure digital “loading dock” (Azure Storage), and Microsoft moves them into the right mailboxes. It is free, safe, and handles large amounts of data well.
  2. The Manual Way (Only for 1-2 people): An employee manually drags and drops the file into Outlook. This is slow, prone to mistakes and hard for IT to track. Avoid this for teams.
  3. The Third-Party Migration Tools (Best for Big Companies): If you have thousands of files, use paid tools like Goldytools Import PST to Office 365. They are faster, give better reports, and let you schedule the migration for after-hours.

Step 3: Prepare Microsoft 365 for PST Import

Before you start the migration, make sure the space is ready for the files:

  • Create the user accounts and give them licenses.
  • Set up Archive Mailboxes. If a file is huge (over 40GB), it is better to put it in an archive folder so that it does not slow down the user’s main inbox.

Step 4: Upload PST Files

  • Upload the files to the secure storage area.
  • Tell the system which file belongs to which person.
  • Start the job and watch the progress on your dashboard. Microsoft does the heavy lifting while you just monitor.

Step 5: Validate the Data

Once the move says Finished, don’t just take its word for it. Check a few mailboxes to ensure:

  • The folders look right.
  • Attachments and calendar invites are all there.
  • Pro Tip: Ask a few key users to look through their Legacy Folder to make sure their most important old emails made the trip.

Step 6: Archive or Delete Old PST Files

  • Delete the old files:

    Remove the PSTs from laptops and servers so they do not take up space or get stolen.

  • Lock it down: Change your settings so that employees cannot create new PST files in the future. This keeps everything in the cloud where it belongs.

Conclusion

There might be various methods to migrate PST files to office. But, it is always better to use third party tools like Goldytools for faster and better results. You can use the free version of Goldytools import PST to Office 365 free.

Unable to Load Outlook 365 Profile Problem

Outlook 365 is a popular choice for businesses as it offers more storage and better features than the older desktop version. It is a great all-in-one tool for handling emails, notes, and meetings quickly and easily. But, users sometimes run into an error where their profile do not load properly. You can see a few simple ways to fix Unable to Load Outlook 365 Profile problem and get you back to work.

How to Resolve “Unable to Load Outlook 365 Profile Problem?

Here is a simplified version of those troubleshooting steps:

Method 1: Run MS Outlook as Administrator

Giving Outlook extra permissions can sometimes bypass loading errors. So you can follow the below given steps.

  • First of all, type Outlook into your Windows search bar.
  • Then, right-click the Outlook icon and select Run as Administrator.
  • Now, click Yes to let the program open.

Method 2: Open Outlook in Safe Mode

This helps you find out if a plug-in (an extra feature) is crashing the app.

  • Press the Windows Key + R, type outlook.exe /safe, and hit Enter.
  • Once it is open, go to File>Options>Add-ins.
  • At the bottom, select COM Add-ins and click Go.
  • Then, uncheck all the boxes and click OK.
  • Now, restart Outlook normally and turn the add-ins back on one by one to see which one causes the crash.

Method 3: Create a New Microsoft Outlook Profile

If your current settings are broken, starting fresh usually works.

  • Firstly, open the Control Panel and click Mail.
  • After that, click Show Profiles, then click Add.
  • Name your new profile, follow the prompts to add your email, and click OK.
  • Open Outlook using this new profile.

Method 4: Turn Off the Internet Connection/Enable Airplane Mode

Sometimes Outlook gets stuck trying to connect to a server.

  • Turn off your Wi-Fi or turn on Airplane Mode in your computer’s settings.
  • Try opening Outlook while offline. Once it opens, you can turn the internet back on.

Method 5: Repair Your Profile Inside Outlook

  • If Outlook is open but acting up, you can try fixing your account settings directly.
    • Click the File menu at the top, then click Account Settings.
    • Choose Account Settings again from the list that appears.
    • On the Email tab, click on your account and hit the Repair button.
    • Follow the prompts by clicking Next, then Finish, and restart Outlook.

    Method 6: Uninstall and Reinstall Office 365

    If nothing else works, a clean start is best.

    • Uninstall Office 365 from your computer, then download and install the latest version from the official website. This fixes most hidden software bugs.

    Method 7: Fix Damaged Files

    Sometimes the actual file that stores your emails is corrupted.

      If your email file (PST or OST) is damaged, you will need to use a Repair Tool or a File Converter from Goldytools to fix the data so that Outlook can read it again.

    Method 8: Problem with Outlook Data Files

    An issue with Microsoft Outlook data file prevent profile from loading properly .Now PST repair or recover OST or PST file file first. To fix corruption PST file user use Goldytools PST Repair Tool. an Goldytools OST to PST Converter tool use recover and convert data into healthy PST format.

    Conclusion

    There are many ways to fix a profile that will not load. Try these steps one by one and you should be back to your emails in no time. The most suggested ways to use the tools of Goldytools. You can try their free version before you make a purchase.

    How to Find Outlook OST File Location in Windows?

    Finding your Outlook data doesn’t have to be a technical headache. When you use Outlook with accounts like Office 365, Exchange, or Gmail (IMAP), the app creates a special file on your computer called an OST file.
    This file is a local copy of everything in your inbox. It allows you to read emails, draft replies and check your calendar even when you are not connected to the internet. Once you go back online, Outlook syncs those changes automatically. Check out a simple guide on how to find Outlook OST file location and why it matters.

    How to Find OST File Location?

    OST file stored in AppData folder of Windows user Profile .However Exact location vary depending on version Microsoft Outlook and Windows operating system install on computer

    Browse to Default OST file Location

    You check table below to find default OST file location on Windows Windows XP, 7, 8, 8.1, 10, or 11 system

    Default OST file Location
    Methods to Find Your OST File

    Regardless of which version of Windows you use (XP, 7, 10, or 11), these are the fastest ways to find your data.

    Method 1: The “Right-Click” Shortcut

    This is the quickest trick and works for almost everyone

    • First of all, open Outlook.
    • On the left side of the screen, look at your Email Address (the top-level folder).
    • Then, right-click on your email address.
    • Now, select Open File Location.
    • A folder window will pop up that highlights your OST file immediately.

    Method 2: Using Outlook Settings

    If Method 1 does not work, you can find the path through the menu:

    For Outlook 2013, 2016, 2019, and 2021:

    • Firstly, click File in the top left corner.
    • Then, click Info, then Account Settings and select Account Settings again from the dropdown.
    • Account Settings

    • In the window that opens, click the Data Files tab.
    • Data Files
      For Outlook 2010:

      • First of all, go to File > Info > Account Settings.
      • After that, pick your account from the list and click Change.
      • Now, click More Settings and go to the Advanced tab.
      • Lastly, click Offline Folder File Settings to see the file path

      What If You Can’t Find the File?

      Sometimes the folders that hold these files are hidden by Windows. If you are struggling to see them, you might need a professional tool. Tools like Goldytools Converter for OST are designed to scan your computer and find these files automatically. They can also help you turn an OST file into a PST file which is easier to move to a different computer or a new email account.

      Important Tips for Safety

      • Do Not Delete It Blindly:

        If you delete an OST file, Outlook will try to download everything from the server again. You might lose your data if the server is empty.

      • Back it Up:

        Before you move or change your OST file, it is better to copy it to a USB drive or a different folder just in case.

      • Converting Data:

        If your Outlook do not open at all, you might need to use an online converter like Goldytools to get your emails out of the OST file so that you can read them again

      Conclusion

      Finding your OST file is mostly about knowing which menu to click. No matter you use the Right-Click shortcut or the Account Settings menu, the file is usually tucked away in your computer’s AppData folder. Once you get OST file location, you can manage your storage better or move your data to a brand new PC. If you do not get the file, you can try the free version of Goldytools OST to PST Converter to get them automatically

    How to Fix Outlook Error 0x80049dd3?

    Many Outlook users are currently facing a frustrating “Access Denied” error which is mainly identified by the code 0x80049dd3. This issue usually triggers when you try to open an email, sign into your account or sync your calendar and contacts. This error occurs when Outlook has trouble verifying your login credentials with the server which leads to a loop where the app asks you to sign in but then fails to complete the process. This blog explains why this verification failure happens and gives you easy steps to resolve the error.

    Troubleshooting Methods to Resolve Outlook Error0x80049dd3
    Method 1 – Repair or Reinstall Outlook (MS Office)

    If Outlook is acting up because its files are damaged, you can often fix it by repairing the app or reinstalling it. Here is how to do a repair:

    • Open the Control Panel:

      First of all, go to Programs, then Programs & Features and select Uninstall a program.

    • Select Office:

      Find Microsoft Office in your list of apps and click the Change button.

    • Follow the Prompts:

      Click through the instructions on your screen to let the computer fix Office and Outlook automatically.

    If repairing the app does not work, try uninstalling Microsoft Office and then installing it again for a fresh start.

    Method 2 – Clear Cached Credentials

  • If Outlook keeps having trouble logging you in, it might be because of old or broken login info saved on your computer. You can fix this by clearing out those saved passwords:
    • Open Credential Manager:

      Firstly, go to the Control Panel, click User Accounts and then select Credential Manager.

      Credential Manager

    • Find Office Entries:

      After that, click on the Windows Credentials tab and look for anything related to Outlook or Microsoft Office.

    • Remove the Info:

      Click on those entries to open them up and select Remove or Remove from Vault.

    • Restart and Sign In:

      Now, close and reopen Outlook. It will ask for your password again; just sign in normally to create a fresh, working connection.

    Method 3 – Repair Corrupt PST File

    Outlook saves your emails and data in a file on your computer called a PST file. If this file gets damaged, you won’t be able to see your messages. To fix this, you can use a built-in tool called ScanPST.exe to scan and repair the file. But, this tool only works for small, simple problems and often fails if the file is very large or badly broken.
    If the standard tool does not work, you can use a powerful Goldytools PST Repair tool. This software is designed to handle much tougher repairs, no matter how big the file is. It recovers everything like your emails, attachments, and calendar. Then, it puts them into a brand-new, healthy file while keeping all your folders exactly where they were. It works on any version of Outlook and is a reliable way to get your data back when the basic methods fail.

    Conclusion

    The 0x80049dd3 error can block you from opening your emails or sending and receiving messages. You have seen various ways above to fix this. But, if the problem is caused by a damaged PST file, the most reliable solution is to try the free version of Goldytools PST Viewer tool which helps you to safely fix your data and restores all your emails and folders without losing any data.

    How to Export Large Exchange Mailboxes to Multiple PST Files?

    Organizations often move old emails into PST files to keep servers fast, comply with legal rules, or switch to new systems. However, exporting large mailboxes is difficult as the huge amount of data can lead to corrupted files or lost information. Standard tools are not always powerful enough to handle these huge transfers efficiently and the process can take a very long time. In addition, these exports use significant server power and internet bandwidth which can slow down the network for employees. To prevent these problems, it is vital to plan carefully and run exports during off-peak hours when fewer people are working.

    Choosing Right Tool for Export

    Export large Exchange mailboxes to PST file are critical task for organizations that depend on Microsoft Exchange for email communication .Choosing right tool to ensure smooth ,reliable , and efficient export process with minimal effort and maximum accuracy. Several method available for this task such as Exchange Admin Centre (EAC) and the Exchange Management Shell and Third party tools
    Exchange Admin Center is web -based management console that enable administrator to perform many tasks, including export mailboxes to PST .Its user interface design for administrator who are not comfortable with script writing .However EAC not able large mailboxes. Export process slow and often require substantial manual effort .
    Exchange Management Shell is command -line interface that provide grater control and flexibility .It enable administrator to export mailbox to PST file using PowerShell command ,it handles large mailboxes. this approach support automation by scripts which reduce manual effort .However it require higher level of technical expert .
    Third-party provide alternative approach for exporting Exchange mailbox to PST file. These tool specifically design to export process and include advanced feature such filter and improve performance when handling large mailboxes .This usually offer easy user interface with reliable customer support.

    Using Exchange Admin Center (EAC)

      Step 1:

      Go to Recipients – On the left side of the dashboard, click Recipients to see a list of all available mailboxes.

      Step 2:

      Pick the Mailbox – Click on the mailbox you want to move. If you need more than one, select them, click the three dots and choose Export to a PST file.

      Step 3:

      Choose Where to Save It – A box will pop up asking for a “UNC path” (like \\Server\Folder\Name.pst). Make sure that the folder has enough room and that you have permission to save files there.

      Step 4:

      Select What to Export – Decide if you want everything or simply specific items like your calendar or contacts. You can also filter by date if you only need new or old emails.

      Step 5:

      Start the Process – Then, click Next to begin. You can check how it is going under the Mail Flow section in the Export Requests tab.

    Important Things to Remember

    Exporting through the web interface has some limits. It can be very slow for large mailboxes and the progress bar is not very detailed. You might need to use professional tools instead of this built-in tool.

    Using Exchange Management Shell

    Using the Exchange Management Shell (PowerShell) is often faster and more reliable than the web interface for large mailboxes. Here is how to do it in simple steps:

      Step 1:

      Open the Shell – Firstly, launch the Exchange Management Shell to start typing commands.

      Step 2:

      Give Yourself Permission – Before you start, you must make sure that your account is allowed to export data. Run this command: New-ManagementRoleAssignment -Role “Mailbox Import Export” -User “YourUsername”

      Step 3:

      Start the Export – Use this command to begin moving a mailbox to a specific folder: New-MailboxExportRequest -Mailbox “UserMailbox” -FilePath “\\Server\Share\UserMailbox.pst”

      Step 4:

      Check Progress – Since there is no progress bar, use this command to see how much of the export is finished: Get-MailboxExportRequest | Get-MailboxExportRequestStatistics

      Step 5:

      Clean Up – Once the status shows as “Completed,” remove the request from the system’s memory: Remove-MailboxExportRequest -Identity “UserMailbox\MailboxExport”.

      Conclusion
      Moving large Exchange mailboxes to PST files is a major task that requires careful planning and the right tools. By following the proper steps and using Microsoft’s built-in features correctly, you can protect your data and prevent service interruptions. The better option is to choose the professional tool from Goldytools EDB to PST Converter for extra features and ease of use. You can use the trial version of GoldyTools EDB Viewer products before you buy it.

    How to Split Large EDB Files during Export to Avoid Mailbox Size Limits?

    Managing a huge Exchange database can slow down your server, make backups take forever and be a nightmare to fix if it gets corrupted. To avoid these risks, administrators usually split big files into smaller and more manageable ones. This not only keeps the system running fast and makes data easier to organize, but it also prevents the database from automatically shutting down if it hits its size limit.

    Easy Methods to Split Large EDB Files
    Split EDB Using Exchange Server

    You can reduce the size of your database by exporting mailboxes into PST files. To do this, you can use the Exchange Admin Center (EAC) or the Exchange Management Shell (EMS).
    Before you start, make sure that you have these two things ready:

    • Permission:

      Your user account must be assigned the “Mailbox Import Export” role.

    • Storage Folder:

      You need to create a shared network folder (using a UNC path, like \\Server\Folder\) to save the PST files.

      Once these steps are complete, you can start splitting your large database files.

      Split Exchange EDB File through EAC
      Step 1:

      Firstly, open the Exchange Admin Center (EAC) on your server.

      Step 2:

      Then, go to Recipients and then click on Mailboxes.

      Step 3:

      Choose the mailbox you want to move. Now, click the More options icon (three dots) and select Export to a PST file.

      mailbox
      Step 4:

      Use the Browse button to pick the mailbox you want to export. Choose your export settings and click Next.

      export
      Step 5:

      Type in the network folder path (the UNC path) where you want to save the file and click Next.

      Step 6:

      If you want a confirmation email when it is done, check the box and select who should receive the alert. Click Finish to start the export.

      Click Finish
      Split Exchange EDB File through EMS

      If you prefer using commands, follow these simple steps:

      Step 1:

      Open the Exchange Management Shell.

      Step 2:

      Run this command:

      New-MailboxExportRequest -Mailbox “mailbox-name” -FilePath “\\Server\Folder\filename.pst”
      (Note: Replace “UNC-file-path” with the network folder path you set up earlier.)
      This method works for both ExchangeOffline and Exchange Online. Once the export is finished, you get a compact PST file that you can archive, share or move back into a live Exchange server

      Split EDB Using Outlook

      Outlook ’s built-in Import/Export feature use to Split Large EDB file .Your Outlook connect with Exchange Server Account associated with EDB file .You export mailbox to PST following steps below

      Step 1:

      Open Outlook click File tab and select Open & Export> Import/Export.

      Open & Export
      Step2:

      choose Export to file option and click Next

      Step3:

      Choose Outlook Data File (.pst), then click Next.

      Step4 :

      Choose mailbox to export and check Include subfolder and click Next.

      Include subfolder
      Step5:

      Select Browse , choose location to save PST file and click Finish

      Split EDB Files with a Professional Tool

      Manual methods are slow, strain your server, and cannot handle disconnected mailboxes. Use the professional Goldytools EDB to PSTconverter tool for a faster solution. It quickly converts large or corrupt EDB files from any Exchange version without data loss. You can filter specific data, save emails in various formats (like PDF or MSG) and use a built-in feature to automatically split large results into smaller, manageable PST files easily.

      Conclusion

      In this blog, you can choose whichever method works best for you. Keep in mind that manual steps are often slow and only work under specific conditions. For an easier and faster solution, try the trial version of Goldytools EDB to PSTconverter tool. It also works for data recovery which allow you to get back lost or deleted information from a corrupted database.

    How to Safe Splite Large OST file into Smaller PST files

    Large OST file can negative impact Outlook performance by slowdown ,crash and unexpected error .Splitting oversized OST files into small part for improve stability and smooth performance . This blog offer complete guidance for splitting oversized OST file s using both manual and automated methods.

    Understanding OST Files:

    In Microsoft Outlook ,an OST files plays a crucial role for locally storing mailbox data such as emails, contacts, calendars, tasks, and other items on system. OST file support offline access and ensure automatic synchronization of mailbox changes after reconnect to Exchange server.
    Mailbox data accumulate ,OST file become oversize, result in Outlook performance issue and unexpected error .Understanding when and how to split OST files for smooth Outlook function and effect data management.

    Common issue cause by Oversized OST files

    If OST file become too large ,it can cause performance slowdown and functional problem in Outlook ,including

    • Microsoft Outlook runs slowly or degraded performance .
    • Outlook often hang or stop responding during use
    • slow delivery of incoming and outgoing emails.
    • Issue synchronize Outlook data with Exchange Server
    • Unable to open OST file and add new data to it
    • Error notification appear frequently during mailbox operation

    Reason for Split or reduce Large OST file.

    Handle large OST file for Outlook better performance and improve data safety .Here why it matters:
    Improves Performance -Ensure smooth Outlook operation and minizine load times
    Prevents Data Corruption: Minimize risk of data corruption and file damage
    Reduce Sync Error: Improve connection with Exchange Server
    Easy of Manage: Smaller OST file are simple to manage and organize than working one massive file
    Optimize Disk Space Usage: Manage Large OST file by splitting it and enhances system efficiency .
    Reduce Crash and Freezing Issue: Managing OST file size reduce risk of Outlook hanging or crashing.
    Maintains Regulatory Compliance: Splitting OST file to mailbox size limit set by organization for consistent and reliable email delivery

    Manual Solutions to Repair or Split OST files

    When an Outlook OST file become oversize ,it cause performance slowdowns ,synchronization issue, and data corruption .Outlook include several built methods to manage or split OST files .Below are most effective techniques

    Method 1:: Archive Older Email to Manage OST File Size

    Archiving move older or infrequently use email to separate PST file,reduce size of OST file while keep your data secure.

    • Open Outlook and navigate to File >Info>Tools>Clean Up Old Items
    • Select mailbox or specific folder you want to archive
    • Define data range ,such as emails older than six months
    • Select location where you want save the archive PST file and click OK

    Method 2: Optimize OST file size by Compacting

    Compact reduce OST file by eliminating unused space without delete any data

    • Open Outlook and navigate > File > Account Settings > Account Settings.
    • In data Files tab ,select OST file and Click Settings
    • In the opened dialog box, click Compact Now to reduce the file size

    Method 3: Disable Unnecessary Add-ins

    Unnecessary add-ins can slow down Outlook performance and increase load time with large OST file

    • Open Outlook > Options > Add-ins.
    • Click Manage > COM Add-ins > Go
    • Disable any unnecessary add-ins and click OK.

    Method 4: Remove large Attachment and Empty Deleted items folder

    Email contain large attachment use lot of storage .Moving or deleing attachment outside Outlook reclaim space

    • Use search filter hasattachments : yes to find emails with large attachment
    • Save important attachment to your computer local storage
    • Remove email or attachment after saving
    • Empty the Deleted Items folder by right-clicking it and selectingEmpty Folder.

    Method 5: Disable Synchronization for Share Folders

    Shared folder increase OST file size because continues syncing .Disable them reduce unwanted data accumulation.

    • Open and navigate File > Account Settings > Account Settings
    • Choose your account and click Change > More Settings > Advanced.
    • Clear uncheck box for Download Shared Folders and click OK.
    • Close and Restart Outlook.

    Method 6: Utilize Outlook Data Export Option

    Using this method important mailbox data export to PST file, and reduce OST file size

    • Go to File > Open & Export > Import/Export.
    • Select Export to a File > Outlook Data File (.pst).
    • Select require folder for export and define designation path
    • Click Finish to save selected data into new PST file.

    Method 7: Disable Outlook RSS Feed

    RSS feeds unnecessarily increase OST file size .turn off them reduce mailbox clutter.

    • Go to File > Account Settings > RSS Feeds.
    • Remove and disable unwanted RSS feed subscription

    Disadvantages of Manual Methods

    Manual solution cost free and effective for basic maintenance ,but they come with several limitations

    • Archived or shared data not accessible offline
    • No automation is available ,making ongoing manage time-consuming
    • Not recommend for handling large ,heavily corrupted
    • Provide minimal space saving and performance enhancement.
    • Process carry a risk of accidental data lose or lost attachments

    Conclusion:

    In this blog we discuss cause of oversized OST file and various way to manage it. Manual method reduce OST file they have limitation and not prevent recurring issue.
    Reliable and efficient solution ,using Goldytools OST to PST convert is recommend.it automates OST file splitting ,prevent data loss and maintain smooth Outlook functionality with minimal effort

    Resolve “Outlook Data File PST Usage is Disabled on this Computer” Error

    Are you encounter “Outlook Data File PST Usage Is Disabled on This Computer” error in Outlook ?This issue can disruptive ,especially when you depend on Outlook .
    Today Many user using Outlook for its powerful features and performance .However some user encounter “Outlook Data File PST Usage Is Disabled on This Computer” error which disrupt your workflow and negatively impact your email communication experience.
    In this blog we explore all possible reason behind “Outlook Data Files (.pst) Usage Is Disabled on This Computer” error and discuss about manual and automated method to resolve issue quickly.

    Why you face Outlook data file PST usage is disabled error?

    Below are some common reason why “Outlook Data File (PST) usage is disabled” error occurs.”

    • When Outlook running safe mode restict access to PST file
    • PST file usage restricted due to configured Outlook group Policy settings
    • If PST file become corrupt, Outlook fail to open or access it
    • Outlook conflict with third -party add-ins ,limit access to PST file
    • Some time Antivirus or firewall unexpectedly block PST file access

    Manual method to resolve “Outlook data file (PST) usage is disabled on this computer” error

    Multiple free methods can help you for troubleshoot “Outlook data file (.pst) usage is disabled on this computer” error without losing important emails and attachment

    Method 1: Utilize Registry Editor

    This issue occur after making change in Registry Editor. Resolve it, that Registry editor setting are correctly configure to enable PST file usage on Computer

    Step 1: Press Windows + R to Open Run Dialog box
    Step 2:Type regedit in search bar and press Enter
    Run Dialog
    Step3: Go to HKEY_CURRENT_USER\Software\Policies\Microsoft\Office16\Outlook\PST
    HKEY_CURRENT_USER
    Step 4: Create a new DWORD value and name PSTDisableGrow.
    Step 5: Double -click PSTDisableGrow and set 0 Value
    Step 6: Save change ,navigate to HKEY_CURRENT_USER\Software\Policies\Microsoft\Office\16.0\Outlook and create new DWORD value name DisablePST
    Step 7:Set DisablePST value to 0 and save the change.

    Points to Remember:

    • When value is set 0, user permits to add new data and PST files by default.
    • 1 Value restricts add new content to exist PST file and block create new PST file.
    • When set 2, Registry value only exclusive PST data ,such as SharePoint PST files

    Method 2: turn off unused Outlook add-ins

    Incompatible , unnecessary ,or faulty add-ins pop up error “Outlook data file PST usage is disabled.” Disable all add -ins and check error resolved or not
    Step1: Close Outlook and Run dialog box
    Step2:In Run dialog box, type outlook.exe/safe and click OK.

    outlook.exe
    Step3:Click File ,then select Options.select Options
    Step 4:Go to Ads-ins section, then click next to manage
    Step5:In COM Add -ins windows ,uncheck unnesaary add-ins ,click OK
    In COM Add -ins
    Step 6. Restart Outlook and check “Outlook data file PST usage is disabled on this computer” resolve
    Outlook data

    Method 3:Reduce Outlook Mailbox Size

    This error occur due to oversized Outlook mailbox. Issue Fix by reduce PST file size.
    Step1:Open Outlook ,navigate to File>Info>Tool and click Clean Up Old items

    Info
    Step2:In Archive Wizard, select a folder ,choose location to save archived file and click OK to reduce mailbox size.
    Archive Wizard

    Method 4: Update Outlook

    An Outdated Outlook version can block PST file usage .Update Outlook to latest version to fix problem
    Step 1: Open Outlook and click on File>Office Account.
    Office Account
    Step2:Go to Update Options and Update NowUpdate Options
    After complete Outlook update ,restart application to to access latest features

    Method 5:Resolve Outlook Profile issue

    If your profile become corrupt ,you may encounter error “Outlook data file (.pst) usage is disabled on this computer. ” Repairing Outlook profile for remove corruption and can resolve issue

    Method 6:Resolve Outlook PST File Corruption

    When PST file become corrupted ,Outlook display this error. To resolve issue by repair corrupted PST file using ScanPST,exe .Follow below steps
    Step1:Fist close Outlook .Next run SCANPST.EXE and click Browse .
    Step2: click start button to begin repair process
    Step3:Tool scan PST file to detcted error and inconsistencies.
    Step4: Click Repair to begin resolve all detected error
    Step5:after repair process completed ,restart Outlook
    ScanPST ,exe can not repair severe corrupted PST file or file larger than 2GB

    Best Soluation for Instant Repair Corrupted PST files

    Goldytools Outlook PST Repair Tool is designed to repair severely corrupted PST file without data lose . it can easily fix corruption PST file .You can easily preview PST email with their attachment before recovery

    Top Advanced Feature of Outlook PST Repair Tool

    1. Fix broken ,inacessible ,damage and corrupted PST file
    2. Repair large and bulk PST file without limitation
    3. Multiple output save option including PST,MSG,EML,HTML,MHT,PDF and more
    4. Use various filters to selective save data from PST file
    5. Trial version fix and save 25 items per folder for free

    Conclusion

    Facing the “Outlook Data File PST Usage is Disabled on this Computer” error cab disrupted worked flow .You can use manual methods to effectively resolve issue If you follow then you carry certain risks .To minimize data lose and safely repair corrupted PST to use Trusted Goldytools Outlook PST Repair Tool.

    Repair and Restore Corrupt PST file with Outlook PST Repair Tool

    Microsoft Outlook is mostly email client used by organization worldwide.it provide a set of feature
    that many other email platform not match . Outlook store its data in two file format : OST and PST File .These files used to save emails ,calendar ,event ,contact and other items ,Users is access their data both online and Offline . In this blog, you learn How to repair PST file by using download Scanpst.exe and free PST repair tool .Before that understand Why PST file become corrupt?

    Common Reason Behind PST file Corruption

    There are several reason why PST file become corrupt .Some of most common cause include:

    • virus or malware attach
    • Power supply failure
    • Faulty or unstable network device
    • Damage of data storage device
    • Defect and issues within Outlook application
    • Failure of data storage device
    • PST file exceed it size limit
    • Improper termination of Outlook application

    Best way to repair corrupt PST file?

    Manual method to repair corrupt PST file using inbuilt utility call ScanPST.exe .You are not need to download ScanPST.exe ,it come with Microsoft Outlook .This tool san ,detect and repair corrupt PST files

    Repair corrupted PST file using ScanPST.exe

    • You can find location of scanpst.exe {C:/Program files/x86/ Microsoft Office/root/Outlook version}.
    • Run ScanPST.exe
    • Browse and select PST file you want to scan ,and then click on start
    • If scan detect any error ,click repair button to start fix them
    • Once repair process is complete ,create a new outlook profile link with repaired PST file

    Limitation of ScanPST.exe

    • ScanPST.exe fail to repair complete content of PST file It only repair issue in Header section in file
    • It can not repair severe corruption ; this utility repair only minor corruption in PST file
    • ScanPST.exe is generally repair only PST file smaller than 2GB
    • It is not a preferred method for recover PST file ,High risk of data loss and no guarantee of preserving data integrity

    By Using a Third party tool

    there are many PST repair utilities available on internet, But Goldy Outlook PST repair tool one of most effective solution for recover corrupted PST file. Goldytools Outlook PST repair tool repair damaged PST file and convert recovered file into multiple formats.

    • It allow user to add PST file and recover PST file items without altering original property .Tool impose no size limitation
    • It effectively maintains folder hierarchy and data integrity without changing original content.it support of all email items property ,including To/From, CC/BCC, contact details, attachments, tasks, calendars, date/time, and more.
    • In include a unique split feature designed to resolve large PST file issue. After you select specify desire file size, Software automatically divided oversized resultant PST file into multiple smaller PST
    • User can try free trial version of Goldytools PST repair software to evaluate it performance Trial version allow user to convert PST file and save first 25 items per folder without any limitations .we recommended to use trial version before purchase full version
    • Goldytools outlook PST repair tool is comapatible with Outlook 2010, 2013, 2016, 2019, and all other available version.”
    • Conclusion:

      For professional result ,Outlook PST recovery tool provide powerful feature and deliver efficient performance .A free trail version of Goldytools Outlook PST repair Tool is also available ,User to easily check it functionality before purchase.

    How Convert an OST file to PST without using Outlook?

    OST and PST file format use by Microsoft Outlook for store mailbox data. which serve as storage containers but function differently.PST file save Outlook data on local system and synchronization with various mail server . except Microsoft Exchange Server. OST Outlook user work offline and automatically synchronize change data with Exchange server once internet connection connect .However Some times user need to convert OST to PST without using Outlook -when access mailbox data to another platforms or create backup of OST file.

    Method Convert OST to PST Without Using Outlook
    Before answer this question ,First understand that there are two type of OST file- Many user not aware about it .Below describe two types OST file.
    Orphaned OST Files:

    These OST files no longer connect to Exchange Server, because associated Outlook profile deleted or server connection has lost. As a Result user Can not access these file if Outlook is available.

    Exchange -connected OST files:

    These OST file connect with Exchange server ,allow user to access their mailbox data. Outlook provide feature to convert data from these files .If you want to convert Exchange connect OST file to PST without using Outlook ,no method currently exits
    By Understanding different types of OST file .it clear that orphaned OST files not be convert to PST manually – whether Outlook is available or not. Convert Orphaned OST file to PST ,you use third -party OST to PST conversion tool

    Is it possible to open OST file with different Outlook profile?

    You can not open OST file with another users Outlook profile.OST file link with MAPI profile and Outlook block access if you often with different profile.OST file contain encrypted authentication token generated from Original Outlook profile ‘s unique ID.

    Method to Convert OST to PST without Outlook

    There is no manual method to convert OST file to PST without Outlook – whether OST file healthy or orphaned .therefore access OST data in PST format or migrate to new Outlook profile then you use third -party OST to PST converter tool

    Goldytools Microsoft OST to PST Converter

    Goldytools OST to PST Converter is unrestricting tool. enable user to process multiple OST files without any size limitation . Software is equipped with user -oriented features to deliver accurate result and provide efficient conversion experience.

    What make Goldytools OST to PST Converter a standout solution?

    1. Goldytools OST to PST Converter is designed for universal compatibility ,support all Windows operating system from XP to Windows 11and Outlook version from Outlook 2000 to Outlook 2019.
    2. Create both (ANSI and Unicode) PST file of Custom size : Goldytools OST to PST Converter is a standalone tool you can convert OST to PST without need Outlook installed .During conversion process ,user select PST file format – NASI or Unicode and define specific size for Output PST file.
    3. Recover Corrupt OST file and Deleted Items:
      Orphaned OST file become inaccessible and corrupted .Our Software repair damage OST file and restore delete mailbox items. It provide preview of recovered data, allow user to recover and convert – ensure complete control and accuracy during conversion process
    4. Software include advanced filter option .While converting OST to PST without Outlook ,user choose to include email or folder based date range .This allow you to convert only necessary data and skip unwanted items.
    5. We understand importance of data integrity -Our software work in read-only mode ,it do not modify or alter original OST file in any way ,it simply read data and maintains original mailbox structure in output PST file file

    These key feature make Goldytools OST to PST Converter and complete solution for Convert OST file to PST without Outlook. you use all major functionality using free trial version ,Below step-by-step process to use tool

    How to convert OST file to PST without Using Outlook

    • Launch free OST to PST Converter on your system
    • Click add OST file from ribbon bar
    • Browse and add OST file , selecting Advance scanning mode if need
    • Select or deselect OST folder/subfolder for conversion
    • Choose destination path to save resulting PST file.
    • Apply filter option to make conversion process preferer criteria

    Conclusion

    Reality is that there no manual method to convert OSt file to PST without Outllook .Whether OST file is healthy or corrupted .for conversion Third -party tool is require. Goldytools OST to PST Converter provide a reliable and error – free solution for converting OST file into PST format.

    How to fix Outlook keep Asking for Password issue

    Microsoft Outlook is most widely used email client, known for powerful feature and user -friendly interface ,it provide  platform to manage  email , contact ,calendar, task etc. However most common problem face by user  Outlook repeatedly asking password ,even  after it has enter correctly

    This common issue interrupted your workflow and face unnecessary frustration .Fortunately ,it resolved with few manual troubleshooting methods .or if require, using reliable third party tools.

    In this blog , we discuss possible issue, and provide step-step solution to help you resolve it

    Why Outlook asking for Password(and How to Fix it )

    Before describe solution ,Important to understand key reason why Outlook repeatedly for password:

    • Cached credential issues
    • Outdated Outlook version
    • “Remember Password” option not enabled
    • Network or firewall restrictions
    • Corrupt Outlook profile
    • Account security changes (such as multi-factor authentication)

    How to Fix “Outlook Keep Asking for Password” Issue
    Now I explore all common challenges behind Outlook password er

    Remove Cached Credentials

    Windows Credential manager store outdated credentials login details, which disrupt Outlooks authentication process.to Fix this this by clearing catch credentials .Follow below steps

    • Click Strat button and Open Control Panel
    • Navigate User Account >Credential Manager
    • Under Windows Credentials locate any entries to Outlook or Microsoft Office
    • Expand each entry and delete it

    Enable “Remember Password” option

    If Outlook “Remember Password” option is disable .you need enter password every time you connect

    • To enable Remember Password option
    • Launch Outlook
    • Go to File>Account Setting.
    • Select email account and click Change.
    • Check box lable Remember password
    • Click Next for Finish.

    Update Microsoft Outlook

    Keep Microsoft Outlook up to date resolve issue such as repeat passwords prompts ,since update critical bug fix, security patch and performance improvements.

    • To Update Outlook
    • Open Outlook
    • Click File Menu in Top-Left corner
    • Select Office Account
    • Under Update Option ,choose Update Now for install latest updates.

    Check Network connection

    Weak internet connection prevent Outlook from connected to email server. Repeated password prompts .To resolve improve current connection

    Resolve Profile issue in Outlook

    In some case ,Outlook fail to save your passwords due to corrupted profile .To fix it ,create new profile in Outlook

    To Create a new Outlook Profile

    1. Open Control panel and navigate Mail
    2. Click Show Profile then select Add
    3. Enter name for new profile
    4. provide your email account details and complete setup
    5. After Setup ,select Always use this profile, choose new profile and click OK

    Use an App Password (When Using Two-Factor Authentication)

    if your email provider uses two step verification(such as Gmail or Yahoo):

    • Log in your email account by web browser
    • Navigate to security Setting and generate App Password.
    • Enter new password when prompted by Outlook.

    Still Getting Password Prompt ? Time to reinstall Outlook.

    Before reinstall ,backup up your Outlook data files ,then uninstall Outlook from Your Pc.
    To recover data from file, you use Goldytools OST to PST Converter or Goldytools PST Repair Tool .These tool quickly scan corrupted file OST and PST files and recover data save into PST file Format. Reinstall Microsoft Outlook your PC and setup new outlook profile and import PST into Outlook .not require old Outlook password.

    Fix Outlook AutoComplete Not Working issue Quickly

    Outlook recognized for advance user-friend feature ,make it prefer choice for both person and professional communication . AutoComplete feature automatically suggest address in “To” field base on user’s email history. When this feature fail, user not access one of Outlook valuable convenience ,necessary to restore its functionality . This blog explain common cause of Outlook AutoComplete/Autofill issue and provide practical solution to fix them

    What do When Outlook AutoComplete is not working?

    “AutoComplete Not working” issue in Outlook occur when application fail to suggest previously used email address when composing a message .Normally you start typing ‘To,’ ‘Cc,’ or ‘Bcc’ fields , Outlook display a drop- down list of recently use contact .When this feature not working ,user forced to manually search for or type complete email address, unnecessary effort and wasted time.

    Why AutoComplete not working in Outlook ?

    Various factors can cause the Outlook AutoComplete function to stop operating correctly.

    • AutoComplete option disabled
    • Cache memory limit competed
    • Corrupted AutoComplete cache
    • A corrupted user profile
    • Use outdates version of Outlook
    • Damage roamCache folder
    • Oversized or corrupted OST file
    • Excessive mailbox size
    • Missing or Corrupted Outlook files

    How we resolve “Outlook AutoFill / AutoComplete Not Working” issue?

    Below are many manual troubleshooting steps to resolve AutoComplete issue in Outlook .Follow every step to determine which solution work best for your specific situation.

    Method 1:Enable AutoComplete Feature in Outlook

    Sometimes ,Users accidentally disable Outlook’s AutoComplete feature or default settings .When this feature disable, Outlook not suggest email address as you type. To resolve this, Enable AutoComplete feature by following these steps.

    • Open Microsoft Outlook and go to file menu.
    • Select Options ,then click on Mail tab
    • Select Send Message by scrolling down
    • check checkbox “Use Auto-Complete List to suggest names when typing in the To, Cc, and Bcc lines” select
    • Click Empty Auto-Complete list then confirm by yes.
    • Click Ok to apply change
    • Finally compose and send new email to see if issue resolved

    Method 2: Rebuild Outlook AutoComplete List

    If enable AutoComplete do not resolve issue, Problem stem from AutoComplete list itself. An overload or corrupted list cause malfunctions .Deleting current list and recreating it using steps below help.

    • Open Outlook and click File tab
    • From menu ,Select Options.
    • In Mail category ,scroll down to send message section
    • Click Empty AutoComplete List to clear current suggestion
    • Confirm action then select Ok to save changes
    • start sending email again – Outlook AutoComplete feature

    Method 3:Configure New Outlook Profile

    A corrupt Outlook profile cause AutoComplete issue, Create a new profile for resolve the problem .Follow below steps:

    • Close Outlook and open Control panel
    • Go User Account select Mail then click Show Profile and select Add
    • Enter name new profile ,configure email account and click OK to Save
    • Complete account Setup by following on screen instruction ,then Next and Finish.
    • After setup , set new profile as default or select “Prompt for a profile to be used.”
    • Click Ok and close Mail dialog Box

    Limitation of Manual Methods:

    • Not resolve issue if root cause data corruption or profile-related problems
    • Delete all save address , which inconvenient for user who reply on previous suggestions.
    • Time -consuming and result in loss local setting and preferences
    • Require stable internet connection and introduce new bugs
    • Provide temporary fix: issue may return if root cause not addressed.
    • Troubleshooting conflict add -ins time consuming and impact productivity if essential add-ins disabled.
    • Risk of data loss if unsinged change are present ;re-synchronization take extra time.

    Outlook not recreate OST file due to Exchange server crash or profile corruption ,convert OST to PST format is most effective solution. Goldytools OST to PST Converter provide a reliable solution for recover data from inaccessible or orphaned OST files. This method restore emails, contact and other items and enable seamless conversion to PST. User interface and powerful feature ensure fast , recovery without data loss make it prefect professional solution.

    Best two ways to Convert NSF Files to PST Format

    If you are planning to move from Lotus Notes to Outlook, this blog is for you. Here, you will know how to export emails and other data from NSF files to PST format.
    Lotus Notes and Microsoft Outlook are widely used email applications, but they work differently. Many people need to switch from one to the other for various reasons, such as changing jobs or organizations. But, moving data between these two email clients is not straightforward.
    For example, if you used Lotus Notes in your old company and now need to use Outlook in your new one, you cannot directly import NSF files into Outlook. This is because both programs use different file formats to save mailbox data. Thus, you need a proper method to convert NSF files into PST files.Continue reading to know more about it.

    NSF to PST Converter

    Lotus Notes and Outlook use different file formats, it is not easy to move emails between them. If you are trying to open your NSF files in Outlook, you must first convert them into PST format as Outlook only supports PST files.
    The best way to do this is by using a professional tool called an NSF to PST Converter. Many IT companies offer these tools, often with a free trial or demo version. However, you can also first try a manual method.

    How to Convert NSF to PST?

    First, you need to export your Lotus Notes emails into a file format like Comma Separated Value (CSV) or Structured Text. Then, you can import that file into Microsoft Outlook. Check out the steps below to convert NSF to PST.

    • First of all, open the Lotus Notes application on your computer and load the NSF file.
    • Then, go to the File menu and select Export.
    • In the Export window, choose a location to save the file. From the Save as type drop-down, pick a format.
    • You can select either Comma Separated Value (CSV) or Structured Text. Give the file a name and click Export.
    • Now open Microsoft Outlook on your computer.
    • Go to the File menu, click Open & Export, then choose Import/Export.
    • In the wizard, select Import from another program or file and then click Next.
    • Choose Comma Separated Values (Windows) as the format and click Next.
    • Browse and select the CSV file you exported earlier.
    • Pick the Outlook folder where you want to import the data and then click Next.
    • Wait for the import process to finish. It usually takes a few minutes.
    • Once done, click Finish to complete the process.

    Professional Solution to Convert NSF to PST

    If the manual method does not work for you, then it is better to use a professional tool. There are many Lotus Notes to PST Converter tools available online, but choosing the right one can be confusing. Most software providers offer a free demo version so that you can test the tool before buying it. One reliable option is the Goldytools NSF to PST Converter, which lets you easily convert NSF files to PST without the need of any technical skills.

    Conclusion

    Now you know the difference between Lotus Notes and Microsoft Outlook in this blog and had a look on how to convert NSF files to PST. You can do this in two ways: either by using the manual method described above or by using a professional tool like the Goldytools NSF to PST Converter. If you want, you can first try its trial version before you proceed to buy its paid plan. Make a note that you will get limited features in the free trial version.

    Goldytools EDB to PST Converter – Why and How to Use this Conversion Tool?

    An Introduction
    When it comes to Exchange Servers, we are all familiar with why it is used. It is commonly put into use for emailing, calendaring, and other purposes. Typical users would want to export Exchange EDB to Outlook PST for specific purposes. This blog offers an insight on how and when to use a professional EDB to PST converter. We’ll also know if there is a manual approach to complete this activity. Stick with the blog until the conclusion and then make a decision on how you would like to proceed with your conversion task.

    Why would you need the EDB to PST Converter Software?

    • To clear up storage space, users can convert EDB files to PST format for backup purposes.
    • Users can access data stored in PST files by simply adding them to any Outlook account.
    • Data saved in PST files is straightforward to access.

    Is there a way to manually convert EDB to PST?

    Although there is a manual approach to convert EDB to PST file format, it is both time-consuming and complicated. A manual approach to conversion is therefore not advisable as it may not be accurate and the outcome may not be as expected. The entire process becomes cumbersome and eats up a lot of your efforts and time.

    How can I use a Professional EDB to PST Converter?

    Professionals who seek an error-free and efficient program to help convert EDB to PST file format, Goldytools has come up with an exceptional EDB to PST Converter Tool to help cater to the common needs and requirements of most users. The tool offers numerous features to facilitate the EDB to PST conversion. Here is how and why you would want to use a professional EDB to PST converter:

    • Users can convert numerous EDB files of any size to PST.
    • The Goldytools EDB to PST Converter Tool can recover corrupted EDB files before converting them to PST format.
    • Goldytools EDB to PST Converter works with all Windows and Exchange Server versions.
    • The program also has a filtering function and an incremental export facility-like functionality.
    • This application maintains folder organization and data integrity.
    • The Goldytools EDB to PST Converter also provides users with free technical help.

    Conclusion

    This blog explains the benefits and effectiveness of converting EDB to PST file formats. In addition, a professional EDB to PST converter tool is explained. Although a manual approach exists but it is not commonly used by experts. A free demo version of this tool can also be downloaded. GoldyTools EDB Viewer also provides users with free technical help.

    Are you still unfamiliar with two most effective ways to convert NSF to PST Format

    If you are planning to move from Lotus Notes to Outlook, this blog is for you. Here, you will know how to export emails and other data from NSF files to PST format.
    Lotus Notes and Microsoft Outlook are widely used email applications, but they work differently. Many people need to switch from one to the other for various reasons, such as changing jobs or organizations. But, moving data between these two email clients is not straightforward.
    For example, if you used Lotus Notes in your old company and now need to use Outlook in your new one, you cannot directly import NSF files into Outlook. This is because both programs use different file formats to save mailbox data. Thus, you need a proper method to convert NSF files into PST files.Continue reading to know more about it.

    Download a trial version of Shoviv OST to PST Converter Tool to know in a better way.

    Free
    Download

    NSF to PST Converter

    Lotus Notes and Outlook use different file formats, it is not easy to move emails between them. If you are trying to open your NSF files in Outlook, you must first convert them into PST format as Outlook only supports PST files.
    The best way to do this is by using a professional tool called an NSF to PST Converter. Many IT companies offer these tools, often with a free trial or demo version. However, you can also first try a manual method.

    How to Convert NSF to PST?

    First, you need to export your Lotus Notes emails into a file format like Comma Separated Value (CSV) or Structured Text. Then, you can import that file into Microsoft Outlook. Check out the steps below to convert NSF to PST.

    • First of all, open the Lotus Notes application on your computer and load the NSF file.
    • Then, go to the File menu and select Export.
    • In the Export window, choose a location to save the file. From the Save as type drop-down, pick a format.
    • You can select either Comma Separated Value (CSV) or Structured Text. Give the file a name and click Export.
    • Now open Microsoft Outlook on your computer.
    • Go to the File menu, click Open & Export, then choose Import/Export.
    • In the wizard, select Import from another program or file and then click Next.
    • Choose Comma Separated Values (Windows) as the format and click Next.
    • Browse and select the CSV file you exported earlier.
    • Pick the Outlook folder where you want to import the data and then click Next.
    • Wait for the import process to finish. It usually takes a few minutes.
    • Once done, click Finish to complete the process.

    Professional Solution to Convert NSF to PST

    If the manual method does not work for you, then it is better to use a professional tool. There are many Lotus Notes to PST Converter tools available online, but choosing the right one can be confusing. Most software providers offer a free demo version so that you can test the tool before buying it. One reliable option is the Goldytools NSF to PST Converter, which lets you easily convert NSF files to PST without the need of any technical skills.

    Conclusion

    Now you know the difference between Lotus Notes and Microsoft Outlook in this blog and had a look on how to convert NSF files to PST. You can do this in two ways: either by using the manual method described above or by using a professional tool like the Goldytools NSF to PST Converter. If you want, you can first try its trial version before you proceed to buy its paid plan. Make a note that you will get limited features in the free trial version.

    Why is Outlook Offline ?Easy solution to Get Back Online

    When you face problem with Outlook show as Offline ?Is it disrupt your work for switching to offline mode? If yes, you need quick solution for solve this issue. In this blog you understand common reason why outlook display offline error and how resolve this error. Follow this step for bring online back online for smooth operation

    Understanding Outlook Offline Mode

    Outlook provide user to access their email without internet connection ,In simple word, you can switch between online and offline mode whenever you need. Sometimes Outlook may disconnect if sync failures ,disable profile or corrupted data files .Now we explore reason for Outlook going offline and when you are unable switch Outlook to Online mode

    Reason Why Outlook go into Offline Mode

    Several factor when Outlook to switch to Offline mode

    • Unstable Internet Connection :If your internet connection interrupted when Outlook switch to Offline mode .It not reconnect until network is stable state .Outlook appear disconnect when internet working ,Main issue with Outlook
    • Microsoft Exchange Server Issues: Outlook show Disconnected status if Exchange mail server temporarily unavailable due to maintenance or technical problem .If internet connection work fine but Outlook can not connect with mailbox server.
    • Account Credential Issue: Incorrect credential login credentials in outlook account setting stop connecting to mail server ,application stuck in offline mode.
    • Corrupted Outlook profile: A Damage Outlook profile prevent connection o mail server ,Causing Outlook to remain in offline mode
    • Cached Mode: If Cached mode enable ,Outlook sometimes appear offline due synchronization delay
    • Server Maintenance : Outlook switch offline mode if email server is down due to scheduled maintenance or unexpected downtime.
    • Malware or Virus Infection: If your system affect by malware or Virus .Outlook disconnect or remain offline mode .Malicious software interfere with Outlook process.

    We discuss common reason why Outlook not switch offline to online mode. Now we discuss different method to fix issue and get Outlook back online .
    There are many effective ways to fix Outlook issue when it go to Offline .Below we explore most reliable method

    Method1: Check and Stabilize Internet connection:

    A weak or unstable connection force Outlook switch to offline mode.SO you check your internet connection stable and working properly. Resolve issue by reset your router ,check your network setting or verify your net connection. verify connection by login Outlook Through web browser.

    Method 2: Verify Microsoft Exchange Mail Server Setting

    If your internet connection working properly but Outlook show offline, issue with Exchange server .Server relative problem prevent Outlook from connecting properly .To check and configure your Exchange server setting ,Ensure Outlook connect and manage network connection

    • In outlook ,Navigate File Menu ,select Account Setting, and then choose Account Setting
    • From Email tab select Microsoft Exchange Server account
    • Click Change to Open additional setting and adjustments
    • In Manually Control Connection State menu, select Connect with Network.
    • To finalize setup, choose OK, then Next, and finish by select Finish.
    • Select Close button to exit account Setting window

    Method3: Verify your Account Credentails

    If your account details not configure properly ,Outlook fail to connect to mail server and stay offline.To resolve issue follow below step

    • Sign In your Outlook email account
    • Then Check your Credential details.
    • Test connection by sending and recieving email

    Note: If server is unavailable ,please contact your administrator for resolving issue

    Method 4: Create New Outlook Profile

    Issue related to your current Outlook profile .In this case, In this case create new profile .Follow below steps

    • Open Microsoft Outlook application on Your system.
    • Click on File and navigate to Account Settings
    • Select Account Setting again, then choose Manage Profiles
    • Click on Show Profile ,then select Add to create new profile

    Show Profile

  • Enter profile name and Click OK to complete process
  • Click OK

    Once new profile create ,follow these step:

    • Open File menu in Outlook
    • Go to Account setting and choose Profile option
    • Restarting Outlook when close current session .
    • When it open select new create profile from dropdown list

    Method 9: Repair PST Files

    If PST files link to your Outlook account become corrupted .corrupt PST file disrupt Outlook performance in multiple ways So repair process essential . Corrupt Outlook PST file are most common cause of Outlook issue. Goldytools Outlook PST Repair tool provide advanced solution to repair corrupt PST file .
    We listed many effective solution to fix “Outlook Offline issue”.If these method not solve problem ,you can use advanced professional Goldytools Outlook PST Repair Solution which quickly and efficiently fix all Outlook -relative issue with few click

    Blog Overview:

    This blog explain many reason why Outlook switch to offline mode and provide multiple solution for back in online .If manual method fail to fix issue repairing PST file .For all solution for Outlook , Goldytools Exchange Recovery provide one -stop solution

    How to Extract Exchange Mailbox Data from EDB files to PST file.

    Extracting mailbox data from EDB files require deep knowledge in Exchange server .Some time Exchange Server issue such as database dismounting, corruption and Inaccessibility. Microsoft Exchange Server plays important role organizations manage daily email and collaborative activities .If any issue in EDB files disruption in organization operations .EDB file store Exchange server mailboxes data such as emails, contacts, calendars, tasks etc.
    When Exchange server face any issue ,accessing mailbox data become very challenge . Most reliable way to access data from EDB file .there are multiple methods and professional solution. In this article we explore common reason for EDB file issue and solution for extract mailbox data from EDB file.

    Why Extract mailbox data from EDB file is Necessary

    Exchange aware of practices use to extract mailbox data from EDB files .This process require in several situation where mailbox data is necessary .Below some common reason to extract data from an EDB mailbox

    1. To retrieve mailbox data from dismounted EDB files
    2. To backup business important data and uninterrupted workflow during downtime.
    3. To access share ,archive or public folders independently .
    4. To migrate mailboxes data to another database or different database.
    5. To archive entire or select Exchange Server data for future.
    6. To access EDB file without connection to Exchange Server.
    7. To retrieve and access data when Exchange database fails to mount
    8. Above scenario important of extracting Exchange data from files.

    Repair common Exchange Server issue

    Exchange database become corrupt due to many factors such as virus attack ,hard derive failure ,dirty shutdown or system failure.
    If you attempt to repair EDB file immediately using Microsoft’s built-in utility .Run ESEUTIL command for repair and restore EDB file

    1. Running Eseutil.exe
    2. To check Exchange database in Dirty shutdown or Clean Shutdown state ,run eseutil /mh command.

    However major corruption or damage repaired using EseUtil tool.So you familiar with both manual and automate method for Extract Exchange mailboxes data from EDB files

    Method for Extracting Exchange Mailbox from EDB file.

    Develop proper strategies to recover EDB file data .Below are three manual method to extract Exchange mailboxes data from EDB files

    Extract Mailbox using Exchange Admin Center

    you use Exchange Admin Center to export EDB mailboxes to PST. This method support new Exchange version such as Exchange Server 2013, 2016, and 2019.Follow below step to extract mailboxes from an EDB file.

    1. Step1.Sign in Exchange Online and open Exchange Admin Center .Navigate to Recipients >Mailboxes. A List of all available mailboxes display
    2. Mailboxes

    3. Step2.Right click mailbox you want to export and now select export to PST file
    4. click mailbox

    5. Step3:Export to PST dialog box appear on Screen on Screen .Browse and select mailbox which you want to export ,select require option and click Next.
    6. click Next

    7. Step4 :Choose destination folder where you want to save Exchange mailbox data and click Next to process
    8. click Next

    9. Step 5.Enable checkbox for email notification ,enter mailbox name that receive notification and click finish.

    This complete mailbox extraction process. After export finish , a confirmation message sent to specified mailbox.

    Limitations of Using Exchange Admin Center to Export EDB files to PST:

    • Require administrator privileges to perform export.
    • Unable recover data from corrupted mailboxes
    • Require fully operational Exchange Server environment.

    Conclusion

    Be prepared for a database disaster prevent significant data lose .This article provide method to extract EDB files and data lose Exchange Server data.
    Manual method have limitation and require advance technical expertise . For faster and error-free results .It recommend to use a professional EDB to PST Converter .
    Goldytools EDB to PST Converter is excellent solution for extract Extract mailboxes .It provide advanced features that ensure seamless ,secure and loss-free conversion process .Integration of advanced software to migrate EDB mailboxes to Offices 365.

    A suitable solution to open PST files without Outlook effectively

    Outlook saves emails and other data of users in PST files. These files are also useful for backup, archiving, or moving data. But sometimes users face issues when they want to open a PST file without having Outlook installed, or if the PST file gets damaged. In this blog, you will know easy ways to open PST files both with Outlook and without Outlook for free.

    Opening a PST File without Outlook

    There are various built-in methods to open a PST file without Outlook. One of them is using the Google GAMMO Tool, which you can see below.

    Steps to Use the Google GAMMO Tool

    It is a free tool from Google that allows you to export PST files into Gmail and access them without Outlook. You should have a Google account to use this tool.

    • First of all, download and open the Google GAMMO tool.
    • Then, give your Gmail address and click Continue.
    • Gmail address

    • The tool will open your browser and ask you to sign in.
    • sign in

    • After that, allow the required permissions.
    • required permissions

    • Now, choose your Outlook profile or PST file. Then select whether you want to migrate
    • want to migrate

    • everything or only new data and click Next.
    • migrate

    • In the next window, pick the data you want to move to Gmail and click Migrate
    • Gmail and click Migrate

    • Wait until the PST file is uploaded to your Gmail account. Once it is done, open Gmail, and you will be able to access your PST file without Outlook.

    How to Open PST File in Outlook 2010 and Above Versions?

    To open a PST file in Outlook 2010 or later versions, follow these steps:

    • Firstly, open the Outlook app on your computer and click on the File option in the top left corner.
    • File option

    • Then, go to Open & Export and select Open Outlook Data File.
    • Open & Export

    • Browse and select the PST file you want to open, and then hit OK.
    • OK

    • It is easy to open PST files in Outlook 2010 and later versions, but not if the file is corrupted. If the file is corrupted, you can use Goldytools Outlook PST Repair tool. The above given manual methods will only work with healthy PST files. If you want, you can still open and read corrupted PST files, but you will need a professional third-party PST viewer tool like Goldytools Outlook PST Viewer. Keep in mind that not all PST viewers support corrupted files. Below, you can see a PST viewer tool that can open them.

    Goldytools Outlook PST Viewer

    Goldytools PST Viewer is a free and easy tool to open both healthy and damaged PST files. It works with all versions of Outlook and lets you view emails, contacts, calendars, drafts, etc. through a simple interface. This tool can also handle corrupted or password-protected PST files using its advanced scanning feature.

    • Scan and check all data from both healthy and damaged PST files without the need of Outlook.
    • Open password-protected PST files.
    • Supports PST files from all versions of Outlook.
    • Easily preview emails and other mailbox items.
    • Repair large or badly corrupted PST files without issues.
    • Recover deleted emails from Outlook.
    • Restore important items like emails, tasks, calendars, notes, and attachments.
    • Preview email contents along with attachments.
    • No file size limit when using the PST Viewer tool.

    This blog shares ways to open PST files both with and without Outlook. With the Goldytools Outlook PST Viewer tool and Goldytools Outlook PST Repair tool, you can open, read, and repair corrupted PST files. Before buying the paid plans of these tools, you can try out their free trial versions with limited features.

    How to Convert MBOX to PST Manually?

    MBOX is a popular file format that comes after Microsoft Outlook’s PST format. It is used by around 20 email programs like Thunderbird, Apple Mail, Powermail, SeaMonkey, and others. But many users prefer Outlook as it is easy to use and offers more features.

    Download a trial version of Goldytools MBOX to PST Converter Tool to know in a better way.

    Free
    Download

    But what if your emails are saved in MBOX format? Do not worry, as you can convert MBOX to PST file format to use them in Outlook. This conversion process can be tricky and requires careful steps to avoid data loss. If you are a beginner, this blog will help you understand and perform the MBOX to PST conversion easily.

    Advantages of Converting MBOX to PST File Format

    Before you start, it is important to understand the benefits. Knowing why you should convert MBOX to PST will help you better understand the process. Here are some key advantages of switching from MBOX to PST format.

    • MBOX files only store emails, butPST files can store emails, contacts, calendars, tasks, notes, etc., which makes them more useful.
    • PST files work smoothly with Microsoft Outlook and keep everything organized, but MBOX files simply save emails and attachments.
    • PST files offer better security compared to MBOX. You can even add a password to protect your data in PST files

    How to Convert MBOX to PST Format?

    Have a look at the methods given below to convert MBOX to PST format.

    Method 1- Using The Inbuilt Gmail Loader Tool

    Gmail Loader is an in-built tool that helps move emails from Thunderbird to Gmail. You can follow the steps given below to do it:

    • First of all, add your MBOX file to Thunderbird and then transfer those emails to Gmail.
    • Then, set up your Outlook with the same Gmail account.

    Now follow the steps below for a detailed process:

    • Firstly, open Thunderbird and make sure that all folders are visible
    • After that, download Gmail Loader
    • Then, open the setup file to run Gmail Loader
    • Now, click on Configure Email File and then click the Findbutton
    • Look for the MBOX files you want to transfer, which are saved in Thunderbird’s storage
    • Click the Open button
    • Select the MBOX file under File Type in Gmail Loader
    • Choose either Mail I Sent or Mail I Received, which is essential
    • Then, enter your Gmail address
    • Finally, hit the Send to Gmail button to start the transfer

    Method 2 – Using Goldytools MBOX to PST Converter

    Using the Goldytools MBOX to PST converter, you can now convert multiple MBOX files to different formats like PST, EML, MSG, HTML, PDF, MHT, and DOC without losing any data. This tool safely transfers MBOX data from more than 20 email apps, including Apple Mail, Thunderbird, Zoho Mail, Eudora, WebMail, etc. It keeps your data safe and accurate during the process.

    • Converts MBOX files into PST, EML, and MSG formats
    • Shows a preview of email details before exporting to PST
    • Moves all emails from chosen MBOX files and folders
    • Easily changes MBX, MBS, and MBOX files into Outlook PST format
    • Converts orphan MBOX files to PST or other formats
    • Automatically detects mailboxes from commonly used email apps
    • Works in folder mode so that you can add a whole folder with many MBOX files at once

    Conclusion

    Manual methods can work well, but they are best for people who are comfortable with technical steps and fully understand the process. If you are a beginner, it is safer to use a reliable MBOX to PST Converter like the one given above. It makes the conversion process of MBOX files to PST format much easier and ensures that all of your data is completely safe.

    Solution to Overcome Issue when Outlook Keeps Asking for Your Password

    Microsoft Outlook is a popular email program that due to its great features and ease of use. It helps you manage your emails, contacts, calendars and tasks. But sometimes, a common problem occurs where Outlook keeps asking for your password again and again even if you have already enter it in correctly. This issue can interrupt your work and make you feel stuck.
    The good news is that there are ways to fix it by following simple steps or using third-party tools like Goldytools Outlook PST Repair if needed. In this blog, you will see why this happens and clear steps to solve it. So keep reading.

    Steps to Fix Outlook Password Error

    Have a look at the steps given below to repair the Outlook password error.

    Clear Cached Passwords

    Outlook might be using an old or incorrect password that is saved in Windows, and it can cause issues.

    • First of all, click the Startbutton and open Control Panel.
    • Then, go to User Accountsand thenCredential Manager.
    • Under Windows Credentials, find anything related to Outlook or Microsoft Office.
    • Expand each one and click Remove.

    Enable “Remember Password”

    If this option is off, Outlook will keep asking for your password.

    • Firstly, open Outlook.
    • After that, hitFile and then Account Settings.
    • Select your email account and click Change.
    • Then, tick the box ofRemember Password.
    • Lastly, click Next and then Finish.

    Update Outlook

    Using an outdated version can cause bugs and password problems.

    • First of all, open Outlook.
    • Then, click File, and after that, hit Office Account.
    • Under Update Options, click Update Now.
    • Let it check and install any updates.

    Check Your Network Connection

    A slow or weak connection can cause Outlook to lose contact with the mail server.

    • Make sure you are using a strong and stable internet connection.
    • Try switching networks or restarting your router if needed.

    Repair or Create a New Outlook Profile

    • Open the Control Paneland the Mail option.
    • TapShow Profiles and then Add.
    • Type a new profile name and add your email details.
    • Choose Always use this profile and select your new one.
    • At last, click OK.

    Use an App Password (If Using 2FA)

    • Log in to your email through a browser.
    • Then, go to Security Settings and create an App Password.
    • Use this special password in Outlook instead of your usual one.

    These steps should help stop Outlook from asking for your password again and again.

    How to Repair Corrupted Outlook Data Files? – Use Goldytools Outlook PST Repair tool

    If Outlook is still asking for your password again and again, it might be time to reinstall it. But first, make sure to back up your Outlook data file.
    You can use tools like Goldytools Outlook PST Repairtool.These tools help recover data from damaged files by converting them into a PST format, which you can easily open in Outlook.
    Once your data is backed up:

    • Uninstall Outlook completely from your computer.
    • Reinstall Outlook on your Windows system.
    • Create a new Outlook profile.
    • Import the PST file you saved earlier.

    This way, you will get a fresh Outlook setup and will not need your old password anymore.

    Conclusion

    It is quite annoying when Outlook keeps asking for your password, but do not worry, as it is usually easy to fix. In most cases, the problem goes away after you clear saved passwords or update Outlook. And for repairing corrupted Outlook data files, it is better to use a third-party tool like Goldytools Outlook PST Repair and free tool Goldytools Outlook PST Viewer. To get familiar with all the functionalities of the application, one can also access the trial version at free of cost.
    Tip: Always keep both Outlook and Windows updated. This helps protect your system, fix bugs, and make everything run more smoothly.

    How to Fix ‘Outlook Cannot Display the Folder’ Error in Easy Steps

    Outlook helps you keep your inbox tidy by letting you create different folders. But sometimes, you might face problems opening these folders. You might see errors like “Cannot display the folder” or “Unable to expand the folder. Client Operation failed.” These errors can stop you from accessing your emails and affect your work. This guide will explain the common reasons for these errors, show you different ways to fix them, and suggest reliable software like Goldytools OST to PST converter to help you manage Outlook smoothly. So continue reading.

    Ways to Fix Outlook Cannot Display the Folder

    Have a look at the ways given below to repair Outlook not displaying the folder.

    Delete or Rename the OST File

    If you get this Outlook error while using an OST file, it might be because of sync issues. To fix it, you can delete or rename the OST file.

    Note:

    Always back up the OST file first to avoid losing data. Also, make sure Microsoft Outlook is fully closed before you start.

    • Simply follow the steps right below to delete an OST File:
    • First of all, press Win + R on your keyboard to open the Run box.
    • Then, copy and paste the command given below.
    • A folder will open that show your OST file.
    • At last, find the damaged file, right-click on it, and select Delete.

    Change Folder Visible Permission if Outlook is Unable to Display the Folder

    This method works only if you have admin rights to the shared Outlook mailbox. It lets you fix the problem by managing who can access the folder.

    Note:

    You must have both an Exchange email account and a Microsoft Exchange Server.

    • Just follow these steps for the solution:
    • Firstly, right-click the public folder and selectProperties.
    • After that, go to the Permissions tab, choose Permissions, and set your permission level.
    • In the Other section, make sure Folder Visible is checked.
    • If you do not have permission, click Edit, allow the permission, and then click OK to save.

    Disable the Outlook “Anywhere” Protocol

    Here are the steps to fix this problem:

    • Open Outlook first and click on File.
    • Then, go to Info>Account Settings>Account Settings.
    • Now, select the email account you want to change.
    • Lastly, click More Settings>Connection and then turn off the Outlook Anywhere option.

    The Easiest Way to Fix “Outlook Cannot Display the Folder” Error

    You have now seen several ways to fix the issue. But if your OST file still does not work, the only option left is to repair it. For this, you can use Goldytools OST to PST Converter, which can safely fix the problem. It is made to repair damaged or corrupted OST files without losing any data. Check out the simple steps to fix the damaged OST File:

    • First of all, open the software on your computer.
    • Then, click Openand find the OST files on your system.
    • After that, choose the Recovery Mode and enter the OST file details.
    • Wait for the scan to finish and then click OK.
    • Choose the file format and location where you want to save the repaired OST file.
    • Click Save to store the repaired file on your computer.
    • Finally, click OK.

    Conclusion

    The “Outlook Cannot Display the Folder” error can happen for many reasons such as limited access permissions, damaged OST files, or sync problems. You can fix these issues either manually or by using the Goldytools OST to PST converter for a safe and reliable solution. You can also try the trial version of this Goldytools OST viewer before you subscribe to its pricing plans.

    Get familiar with manual ways to Export & Import Mails from OST into Outlook PST

    Many people usually ask; “How can I convert or import OST to PST in Outlook for free?” or “Is there any free tool to export emails from OST to PST?” The truth is that there are no completely free tools available for this task. Most software options you find online are paid, like Goldytools OST to PST converter. But, there are some manual methods also that you can use to do it yourself without spending any money. It is all up to you which method you would like to opt for.

    Reasons Users Import from Offline OST Files into Outlook PST

    There are several reasons why someone might want to export their Outlook data into a PST file:

    • Switching From One Email to Another: If you are changing your email account, for example, from a personal Gmail account xyx@gmail.com to a work account xyz@adtconsultants.com on Office 365, Outlook lets you easily move your emails between different accounts.
    • Moving Outlook to a New Computer: Suppose you were using Outlook 2007 on your old desktop and just bought a new laptop with Outlook 2013. You can export your data from the old Outlook and import it into the new one to keep all your emails, contacts, and calendar items.
    • Creating Regular Backups: It is a good idea to back up your Outlook data from time to time. You can export your emails, contacts, and calendars to a PST file and save it on your computer or an external hard drive for safety.
    • Backing Up Your Contacts: Sometimes, you might only want to save your contacts. Outlook allows you to export only the contact list in case you want a backup or need to move them somewhere else.

    How To Manually Import Mails From OST to PST in Outlook?

    You can use three simple methods to move your emails from an Outlook OST file to a PST file manually, and the last method is using the affordable software given below.

    Method 1: Using Export Feature

    • First of all, open Microsoft Outlook.
    • Then, click on ‘File’, then choose ‘Export to a file’ and click ‘Next’.
    • Now, select ‘Personal File Folder (.pst)’ and click ‘Next’.
    • Choose the folders you want to export, like Inbox, Sent Items, etc., and then click ‘Next’.
    • Pick the location where you want to save the file and click ‘Finish’.

    Note:

    This method will only work if your Outlook is connected to the Exchange server.

    Method 2: Using Goldytools OST to PST Converter

    Even though many users know about this manual option, they still prefer to use reliable third-party software like Goldytools OST to PST Converter to move their emails from OST to PST easily and without issues. Features of this tool are as follows:

    • Allows you to convert the first 20 emails from each folder for free.
    • Supports batch conversion to convert multiple OST files at once.
    • Converts all Outlook items like emails, calendars, contacts, tasks, journals, and notes.
    • Works with OST files from IMAP, Office 365, Exchange, Hotmail, and Outlook.com.
    • Can convert OST to PST without the need of an Exchange profile or server connection.
    • Repairs and converts damaged OST files into formats like PST, MSG, EML, HTML, MHT, and PDF.
    • Splits or compresses large PST files to make them easier to manage.
    • Also converts large and encrypted OST files to PST.

    Conclusion

    It is all up to you which method you want to choose. Using Goldytools OST to PST converter might be the best option as it is available with full features at an affordable rate. You can use its trial version first before you purchase it. Free version allows you to save 20 items per folder with a preview of the converted file.

    Convert NSF to PST: Top Methods & Best Practices in 2025

    Lotus Notes saves emails in NSF format, and Microsoft Outlook uses PST format. Thus, if you want to switch from Lotus Notes to Outlook, you must convert your NSF files to PST. This is not something people usually do, so it might be difficult. But do not worry, as in this blog, you will know how to convert or export NSF files to PST using two methods. Continue reading.

    What are the Ways to Convert Lotus Notes NSF to Outlook PST?

    You can use two methods:

    • Using the manual method
    • Using a professional NSF to PST converter

    How Can You Manually Import NSF files to Outlook?

    You can move NSF files to Outlook manually using both Lotus Notes and Microsoft Outlook. But before you start, it is important to create a backup of your NSF file to avoid losing any data during the process. There are two stages in this solution.

    • Export Lotus Notes NSF files to CSV format
    • Import CSV file into Microsoft Outlook

    Stage 1: Export NSF from Lotus Notes to a CSV file:

    • Open the HCL Lotus Notes email program on your computer after installation.
    • After that, click on File > Open > Lotus Notes Application.
    • Then, find and select the NSF file you want to export and hit Open.
    • Click the Export option to begin the export process.
    • Give the file a name and choose the folder where you want to save it.
    • Choose CSV (Comma Separated Values) as the file type.
    • Make changes if needed and then click OK.

    Your file will now be saved as a CSV in the location you chose.

    Stage 2: Import CSV file into Microsoft Outlook account:

    • First of all, open the Microsoft Outlook application.
    • Then, click on the File tab at the top.
    • Now, choose Open & Export and then select Import or Export.
    • Select Import from another program or file and tap Next.
    • After that, choose CSV (Comma Separated Values) as the file type and click Next.
    • Click Browse to find your CSV file, then click Next.
    • Choose the folder where you want to import the data and click Next.
    • Check the box under “The following actions will be performed” and then hit Finish.
    • Wait for Outlook to complete the import and check if all your data has been moved correctly.

    An Effective Way to Convert NSF Files to PST – Using Goldytools NSF to PST Converter

    The easiest way to convert NSF files to PST is by using the Goldytools NSF to PST Converter Tool. GoldyTools makes this process simple and efficient. This tool helps you convert Domino Notes NSF files into Outlook PST format quickly. It is designed to meet all your conversion needs easily. You can even split large NSF files into smaller PST files to save time and money.

    • Easily converts Domino Server NSF files to Outlook PST format.
    • Offers filters to select specific data for conversion.
    • Can split large NSF files into various smaller PST files.
    • Shows a clear preview of NSF items before saving them.
    • Allows saving NSF files in other formats like HTML, TXT, and RTF.
    • Works with all Lotus Notes versions like 10.0.1, 9.0.1, 9.0, 8.5, 8.0.2, 7.0, 6.5, and 6.0.
    • Keeps the original folder structure even after converting to PST.
    • Free trial lets you convert up to 10 items per folder from NSF to PST.

    Conclusion

    If you want, you can use any of the two methods given above. But, manual methods are not considered as efficient as professional converters. Thus, if you go with Goldytools NSF to PST converter, you will get a free trial version with some limited features to try before you buy. This tool can give you a smooth and fast conversion for free.

    How to Convert MBOX to PST Manually?

    MBOX is a popular file format that comes after Microsoft Outlook’s PST format. It is used by around 20 email programs like Thunderbird, Apple Mail, Powermail, SeaMonkey, and others. But many users prefer Outlook as it is easy to use and offers more features.

    But what if your emails are saved in MBOX format? Do not worry, as you can convert MBOX to PST file format to use them in Outlook. This conversion process can be tricky and requires careful steps to avoid data loss. If you are a beginner, this blog will help you understand and perform the MBOX to PST conversion easily.

    Advantages of Converting MBOX to PST File Format

    Before you start, it is important to understand the benefits. Knowing why you should convert MBOX to PST will help you better understand the process. Here are some key advantages of switching from MBOX to PST format.

    • MBOX files only store emails, but PST files can store emails, contacts, calendars, tasks, notes, etc., which makes them more useful.
    • PST files work smoothly with Microsoft Outlook and keep everything organized, but MBOX files simply save emails and attachments.
    • PST files offer better security compared to MBOX. You can even add a password to protect your data in PST files.

    How to Convert MBOX to PST Format?

    Have a look at the methods given below to convert MBOX to PST format.

    Method 1

    Using The Inbuilt Gmail Loader Tool

    Gmail Loader is an in-built tool that helps move emails from Thunderbird to Gmail. You can follow the steps given below to do it:

    • First of all, add your MBOX file to Thunderbird and then transfer those emails to Gmail.
    • Then, set up your Outlook with the same Gmail account.

    Now follow the steps below for a detailed process:

    • Firstly, open Thunderbird and make sure that all folders are visible
    • After that, download Gmail Loader
    • Then, open the setup file to run Gmail Loader
    • Now, click on Configure Email File and then click the Findbutton
    • Look for the MBOX files you want to transfer, which are saved in Thunderbird’s storage
    • Click the Open button
    • Select the MBOX file under File Type in Gmail Loader
    • Choose either Mail I Sent or Mail I Received, which is essential
    • Then, enter your Gmail address
    • Finally, hit the Send to Gmail button to start the transfer

    Method2

    Using Goldytools MBOX to PST Converter

    Using the Goldytools MBOX to PST converter, you can now convert multiple MBOX files to different formats like PST, EML, MSG, HTML, PDF, MHT, and DOC without losing any data. This tool safely transfers MBOX data from more than 20 email apps, including Apple Mail, Thunderbird, Zoho Mail, Eudora, WebMail, etc. It keeps your data safe and accurate during the process.

    • Converts MBOX files into PST, EML, and MSG formats
    • Shows a preview of email details before exporting to PST
    • Moves all emails from chosen MBOX files and folders
    • Easily changes MBX, MBS, and MBOX files into Outlook PST format
    • Converts orphan MBOX files to PST or other formats
    • Automatically detects mailboxes from commonly used email apps
    • Works in folder mode so that you can add a whole folder with many MBOX files at once

    Conclusion

    Manual methods can work well, but they are best for people who are comfortable with technical steps and fully understand the process. If you are a beginner, it is safer to use a reliable MBOX to PST Converter like the one given above. It makes the conversion process of MBOX files to PST format much easier and ensures that all of your data is completely safe

    Fix Outlook AutoArchive Not Working or Failing – Quick Guide

    Outlook’s AutoArchive feature helps save space by automatically moving older emails and items to an archive folder. But sometimes, AutoArchive stops working. This can slow down Outlook and even cause problems with your data. Thus, it is important to fix this issue quickly. In this blog, you will look at the possible reasons why AutoArchive is not working and how you can fix it. If the problem is due to a damaged PST file, you can use a PST Repair Tool. Keep reading to know more.

    Reasons Why AutoArchive is Not Working in MS Outlook

    Before you get into the solutions, it is important to know why AutoArchive might not be working. Check out some of the common reasons for this issue right below.

    • AutoArchive might be turned off or not set up properly.
    • Your Outlook profile may not be set up correctly.
    • Problems with the Outlook data file (PST/OST) can stop AutoArchive from working.
    • A poor or unstable internet connection can sometimes cause issues.
    • Using an old or incomplete version of Outlook may lead to errors.
    • Some add-ins may not work well with Outlook and cause problems.

    Importance of AutoArchiving in Microsoft Outlook

    AutoArchiving helps keep your mailbox size under control, makes Outlook run faster, and keeps your emails safe. If it is not working, Outlook might become slow and there is a higher chance of losing important data.

    Method To Fix Outlook AutoArchive Not Working

    In this section, you can see some steps to fix Outlook AutoArchive when it is not working. Pick the method that best fits your issue.

    Method 1: Enable AutoArchive in Outlook Settings

    You need to turn on the AutoArchive feature by yourself in Microsoft Outlook. It is a good idea to keep it on so that old emails are archived regularly and storage stays under control.
    Here is how to turn on AutoArchive if it is not working in Outlook:

    • First of all, open Microsoft Outlook and click on File.
    • From the left panel, go to Options and then click on Advanced.
    • Then, click on AutoArchiveSettings and check the box that says Run AutoArchive every X days.
    • After that, click Browse to choose where you want to save the archive PST file.
    • Finally, hit Applyto save the changes.

    Method 2: GoldyTools Outlook PST Repair

    Goldytools Outlook PST Repair is a powerful and easy-to-use tool that helps fix damaged PST files, no matter how big they are. It can recover all your important mailbox items like emails, contacts, calendar events, etc. This tool works with all major Outlook versions, including 2019, 2016, 2013, 2010, and older. With this tool, you do not have to worry about corrupt PST files anymore.

    • Quickly fix any damaged PST file, no matter how big or badly corrupted it is and recover deleted Outlook items easily.
    • Get back important mailbox data like emails, tasks, calendars, notes, attachments, etc.
    • See a clear preview of all recovered items before saving them.
    • Easily split large PST files or even smaller ones if needed.

    If Outlook AutoArchive is not working, it can cause trouble with saving old emails. You can try fixing it by updating Outlook, repairing data files, or changing AutoArchive settings. For an easier fix, the above given tool helps safely recover broken PST files and avoid losing any data.

    How to Fix Outlook AutoComplete Not Working Issue in 2025?

    Outlook is popular for its easy-to-use features and is a top choice for both personal and work emails. One helpful tool is AutoComplete, which suggests email addresses in the “To” field based on past emails. But when this feature stops working, it can be frustrating and slow things down. In this blog, you will know why AutoComplete might not work in Outlook and get simple steps to fix the problem right below.

    What Refers to the “Outlook AutoComplete Not Working” Issue?

    The “AutoComplete Not Working” issue in Outlook occurs when it does not suggest email addresses you have used before when writing a message. Normally, when you start typing in the ‘To,’ ‘Bcc,’ or ‘Cc’ fields, Outlook shows a list of familiar contacts. If this feature stops working, you have to find or type full email addresses yourself, which takes more time and effort.

    AutoComplete Not Working in Outlook: Why?

    • AutoComplete is turned off in settings
    • The cache memory is full
    • The AutoComplete cache is damaged
    • The user profile has errors
    • Outlook is not updated to the latest version
    • The RoamCache folder is corrupted
    • The OST file is too big or broken
    • The mailbox is too large
    • Some third-party add-ins are causing issues
    • Outlook files are damaged or missing

    Steps to Fix the “Outlook AutoFill / AutoComplete Not Working” Issue
    Method 1: Enabling the AutoComplete Option in Outlook

    Sometimes, users do not realize that Outlook’s AutoComplete feature is turned off because of default settings or accidental changes. When it is off, Outlook will not show suggested email addresses when you type. To fix this, check if the feature is turned on by following these simple steps:

    • Open Microsoft Outlook and click on the File menu.
    • Now, click on Options and then go to the Mail tab.
    • Scroll down to the Send Messages section.
    • Make sure that the box for ‘Use Auto-Complete List to suggest names when typing in the To, Bcc, and Cc lines’ is checked.
    • After that, tap on Empty Auto-Complete List and then click Yes to confirm.
    • Lastly, click OK to save the changes.
    • Now, try sending a new email to check if AutoComplete is working again.

    Methods 2: Using Goldytools OST to PST Converter

    The Goldytools OST to PST Converter is a helpful tool that lets you turn unreadable OST files into Outlook PST files. It safely extracts all mailbox items and converts them without losing any data. You can also save the files in other formats like MSG and EML.

    • Lets you convert the first 20 emails from each folder for free
    • Allows you to convert many OST files to PST at once
    • Converts all email items like emails, calendars, contacts, tasks, journals and notes
    • Supports OST files from IMAP, Office 365, Exchange, Hotmail, and Outlook.com
    • Works without needing an Exchange profile or server connection
    • Repairs and converts damaged OST files to formats like PST, MSG, EML, HTML, MHT and PDF
    • Allows you to split or compress large PST files easily
    • Allows searching OST data by field names like subject or date
    • Supports all Outlook versions from 2000 to 2019
    • Converts OST files from Hosted Exchange and Online Exchange
    • Converts large and password-protected OST files to PST format

    Conclusion

    Outlook’s AutoComplete helps you send emails faster, but sometimes it stops working due to things like cache problems or outdated software. If the issue is with a damaged OST file, a tool like OST to PST Converter like given above can be a perfect solution.

    Best Ways to Convert OST to MHT

    If you are looking easiest way to convert OST file to MHT format in a web browser ,this blog covered it. you discoverer reliable and efficient method to convert OST to MHT, and all important details relative this process.
    Microsoft Outlook is one of most use application for secure communication .It allow user too store emails and mailbox data in local system. Outlook use two primary file format for data storage :OST and PST.
    For open server side encrypted OST file ,Exchange profile and server connectivity require. if you want to read OST file email and other mailbox item without using Outlook ,Then convert OST file to MHT format.

    What are reason for Convert OST file to MHT format?

    There are several reasons to convert OST emails to MHT format:

    • MHT format stores emails in their original format with links and attachments.
    • MHT file open and view in common web browser such as Microsoft Edge, Internet Explorer ,etc
    • MHT file combine email and their attachments into a single file

    How to manual convert OST to MHT format

    Yes manual conversion of OST file items to MHT format possible .However OST file connected to an active Outlook profile then Manual method work
    Yes by Using manually method we convert OST file to MHT format .However this method require OST file connect to Outlook profile.

    • launch Microsoft Outlook on your system.
    • Select email you want to convert .
    • Click on File tab and choose Save As option.
    • In Save as Type option select .mht format.
    • Choose destination folder where you want to save file
    • Repeat this process for each OST email one by one

    Drawback of manual Method

    There are several limitation to use of manual method

    • Repeat process for each email ,it time consuming process
    • Risk of data loss or file corruption
    • Original format and email attributes missing
    • Its works only Outlook profile connected to Exchange Server

    Using Professional Tool for convert OST email to MHT format.

    Manual process comes with many limitation ,data loss ,formatting issue .We recommended to use professional solution Goldytools OST to PST converted .Powerful and user -friendly tool convert OST to MHT format .It support efficient exporting email along with attachment.

    Quick and Easy Method to convert OST to MHT Format

    • Install and launch recommended OST to MHT Convert tool .
    • Browse and select OST file you want convert to MHT format
    • Preview complete OST mailbox data display on screen
    • Choose MHT as output format and apply filter
    • Provide MHT file save location.
    • Press “Convert ” button for Conversion Process.
    • Once conversion complete ,all OST email save in MHT format.

    Top Features of Goldytools OST to PST Converter tool
    Independent Tool : Tool does not require Microsoft Outlook Connectivity with Exchange server
    User- Friendly Interface : Tool provide User – Friendly GUI and make it easy to operate without require technical expertise.
    Secure and Reliable Solution : Tool ensure a safe and error- free conversion of OST file to MHT format, preserve data integrity .

    No File Size Limitation : Software convert OST email message to MHT format without any file size limitations.
    Preserves Email Structure : During entire conversion process ,tool maintains original folder hierarchy .
    Conclusion

    In this post ,we covered both manual and professional automated solution .Due to limitation and risk of data lose we recommend user use professional tool. You use free demo version to explore its features and understand conversion process before purchase

    Manual Methods to Convert OST files to EML Format

    In this article, we explore manual method to convert OST to EML. Many user face problem when switch one email client to other another client. Especially Outlook store data in OST file format ,while many other client store data EML format.

    Before explore method to export OST to EML , First understand difference between these format.
    Difference OST to EML
    OST to EML
    Why convert OST to PST EML Format.

    Many reason need to migrate from OST file to EML format, which given below

    • System failure or system crash, inaccessibility of Outlook profile by Virus attacks. In such case backup of OST file need to convert OST file to EML.
    • Accidental delete OST file from Exchange Server Then take backup OST from Exchange server impossible. If user want to get deleted email then convert of OST backup OST file to EML then user get Delete email easily way.

    Manual Method Convert OST file to EML Format.

    There are three step export OST file to EML file format

    Step1: import OST file email into Gmail account .it’s simple drag and drop data file into Gmail mailbox .Create a copy select OST email in Your Gmail account.
    Step2: Now Configure Gmail account with Mozilla thunderbird email client. Once Gmail account success sync then all data become accessible within thunderbird.
    Step3:Now you export email in EML format from Thunderbird by follow simple step which given below:

    • Run Thunderbird application
    • Navigate folder contain email transfer from Gmail.
    • Select all email .press Ctrl + A on Your keyboard
    • Right- Click on select emails and choose “Save As ” option.
    • Next Browse to location where you want to store export files. Thunderbird automatically save each email in “.Eml ” format at choose location

    OST to EML conversion process successfully complete .If you wan convert only specific emails instead of all mailbox ,follow below steps

    • Select email in Thunderbird, transfer Gmail .Select specific email you want convert .Select all Ctrl+All.
    • Right click on select emails,choose “Save Selected Messages” and select “EML option”.
    • Browser to desire location where you wan save exported files .OST to EML conversion process successfully complete.

    These manual method for convert OST to EML format. However performing these process on multiple OST file ,it time consuming process.

    Alternatively ,you use Professional solution Goldytools OST to PST converter which convert OST to Multiple format such as PST ,EML,MSG,DOC,PDF,RTF,HTML,MHT format. Manual method is very complex .This perform conversion within second and ensure both security and integrity in process.

    Conclusion

    WE explore both manual and automate solution for OST to EML conversion . Manual method is free it ‘s very complex and time-consuming .we recommend you use Goldytools OST to PST converter to which OST convert OST file to multiple format and fester more reliable tools.

    How to mount and Dismount Database in Microsoft Exchange Server

    In this blog we understand simple and effective technique for mounting and dismounting Exchange database .This process performed by Exchange administrators during routine maintenance or restore data on Exchange Server version 2007,2010,2013,2016 and 2019.
    It important to follow plan approach when mounting or dismount EDB files. without a proper strategy ,you face many issue in Exchange mailboxes and distrust server functionality .We strongly recommend read this blog to end ,step-by-step method to mount or dismount EDB file and resolve mounting issue

    Understand right time to mount or dismounting Exchange Database

    There are many scenario where user need to mount or dismount Exchange database files. Explaining each time in detail its time- consuming ,we simple information in table below

    mount or dismount Exchange

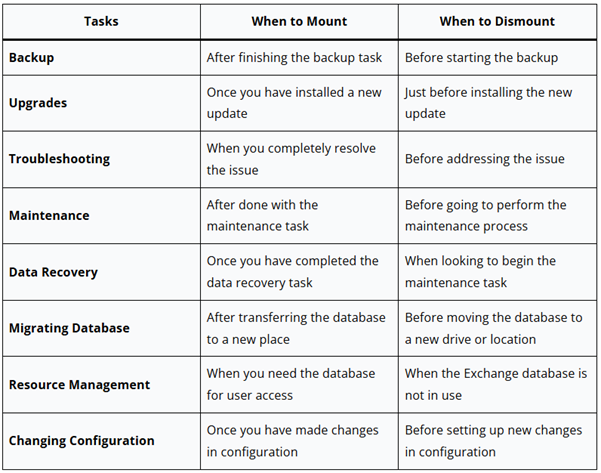
    Now we explore when it necessary to mount and dismount Exchange Database file. Move on Step -by-step procedure for mounting and dismounting EDB files.

    Easy step to mount Exchange Server Database

    User choose between two method o mount Exchange EDB file :use Exchange Admin Center or PowerShell commands. In this blog we explore each method step by step simple and smooth mounting process

      1 Microsoft Exchange Admin Center:
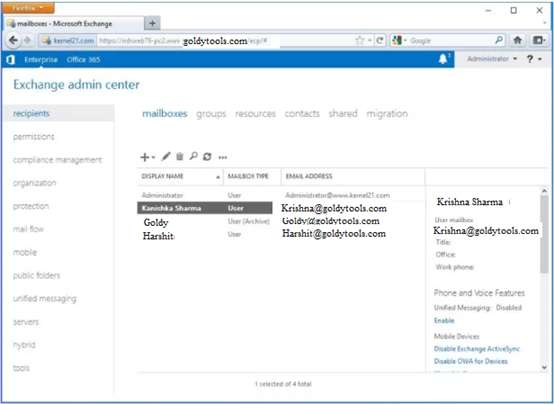
    • Open your web browser and navigate Exchange Admin Center(EAC)
    • Next Sign using your administrator account credentials
    • From left panel ,select Server then clicks on Database options
    • Select database from mount list.
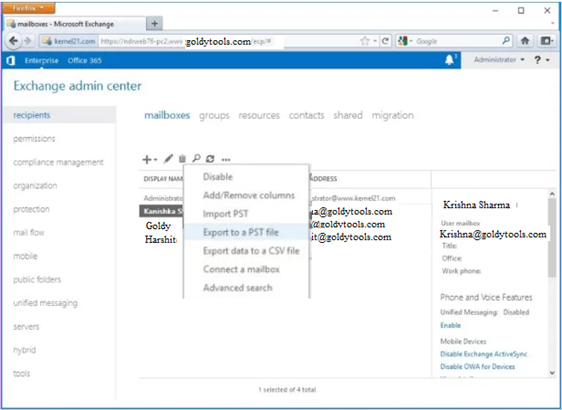
    • after select database , click more button and choose Mount from Available options.
    • A confirmation message appear – click Yes to process mounting with Exchange database .
    • Finally database successfully mount and user access Exchange data without any issue.

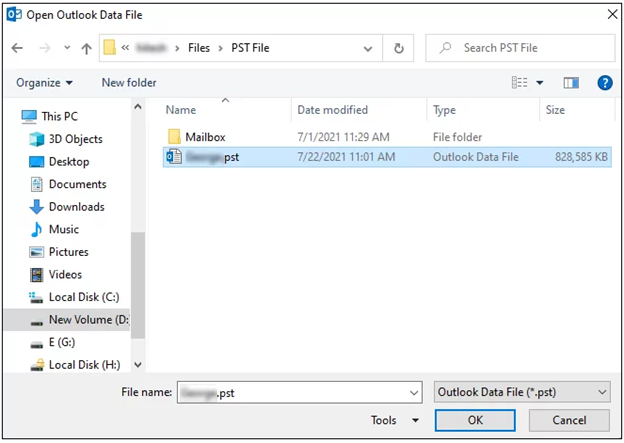
    By using Exchange Admin Centre ,user mount Exchange server files .Please note that this method user mount only one file at a time

    Easy step to mount Exchange Server Database by Microsoft PowerShell Commands:

    Following step guide user how to dismount Exchange database files using Exchange Power shell commands

    • Run Exchange Management Shell on Server
    • verify database status by following command

    mount  Exchange

    • Dismount Exchange database using command provide below .Replace “database Nmae ” with original name of database.

    Run following command to confirm whether database successfully dismounted
    Mounting and dismounting database using method which describe above if this command not execute properly .Then user face risk of data lose . User resolve common mounting relative which given below

    2.Common solution for Resolve Exchange Database Mounting Issue

    User may face certain issue while mount Exchange database files using method which describe above. To resolve these issue and common problem along with their solution in Section .these technique successfully mounting your database files

    MapiExceptionDatabaseError: Unable to Mount Database

    Cause: this error generate when database associate log file missing ,corrupted
    Solution:

    • Verify Log files: Ensure that all necessary log file present by checking log file associate with database
    • Check for Database Corruption: Use eseutil /mh command to examine exchange database corruption
    • If “eseutil /mh” command show that database is in Dirty shutdown state ,then you need to run following commons to repair database

    “eseutil /p “path_to_database_file””
    Note:Replace “path_to_database_file” original path of your exchange database file

    2Exchange Database missing

    This error generate when Exchange server database file missing. Incorrect file path or missing database file and database properly not registered in Exchange configuration

    Solution:

    Ensure that database and log file locate in designate path. Verify that file Directory correctly configure within Exchange Server Setting.

    If database file not registered ,you need to register it and resolve mounting issue

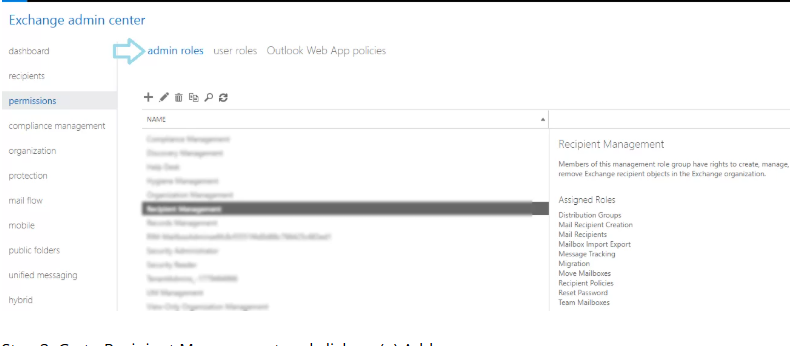
    3.Insufficient Permissions

    This error occur during mounting process if require permission are not properly assigned to Exchange server

    Solution:

    Assign roles that permission user necessary permission to manage database. Example you add user Exchange Organization Administrators group .use following command assign user to Organization Management group:

    Organization Management
    4.Database File Failure Detected

    This error indicate that database entered a failed state – due to multiple unsuccessful mount attempts

    Solution:

    • Use Eseutil command to repair database in solution for first error discuss
    • Check Event Viewer logs for specific error message to help identify database failure

    5.Active Directory Error Messages

    Why this error Occur::++ If any health issue with Active Directory then you failed to mount Exchange database file .First check health of Active Directory replication and following solution giving below

    Solution:

    • First verify that server properly connected to domain and domain controllers accessible.
    • Check health Active Directory replication by following command

    domain controllers
    Professional tool is reliable and recommended alternative tool.

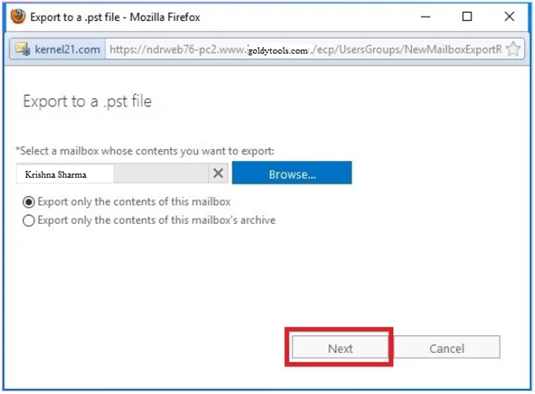
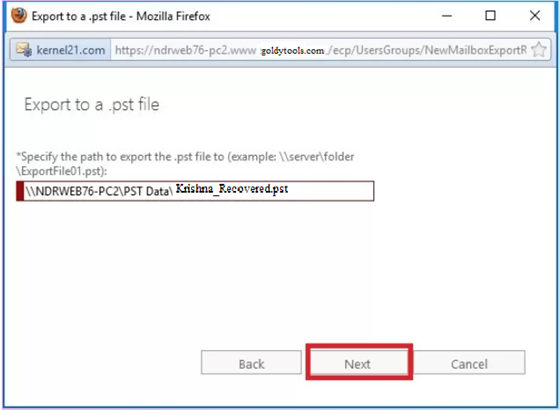
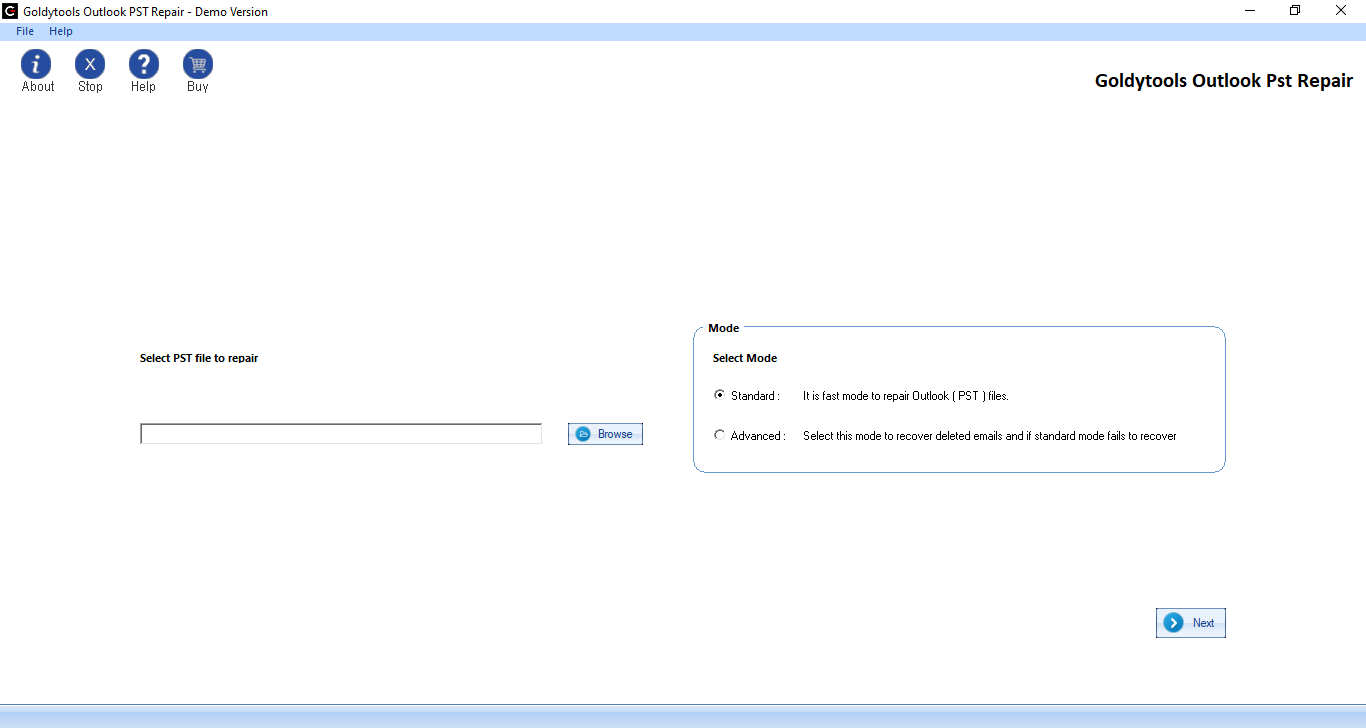
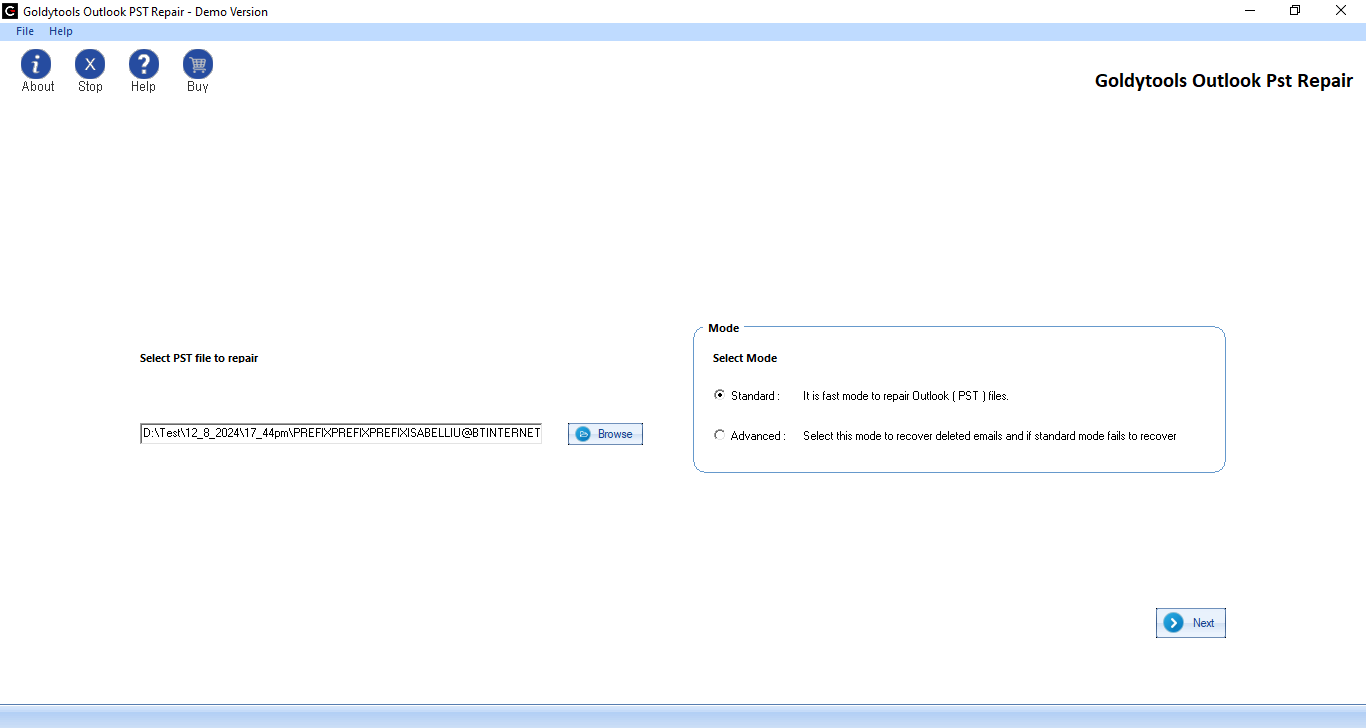
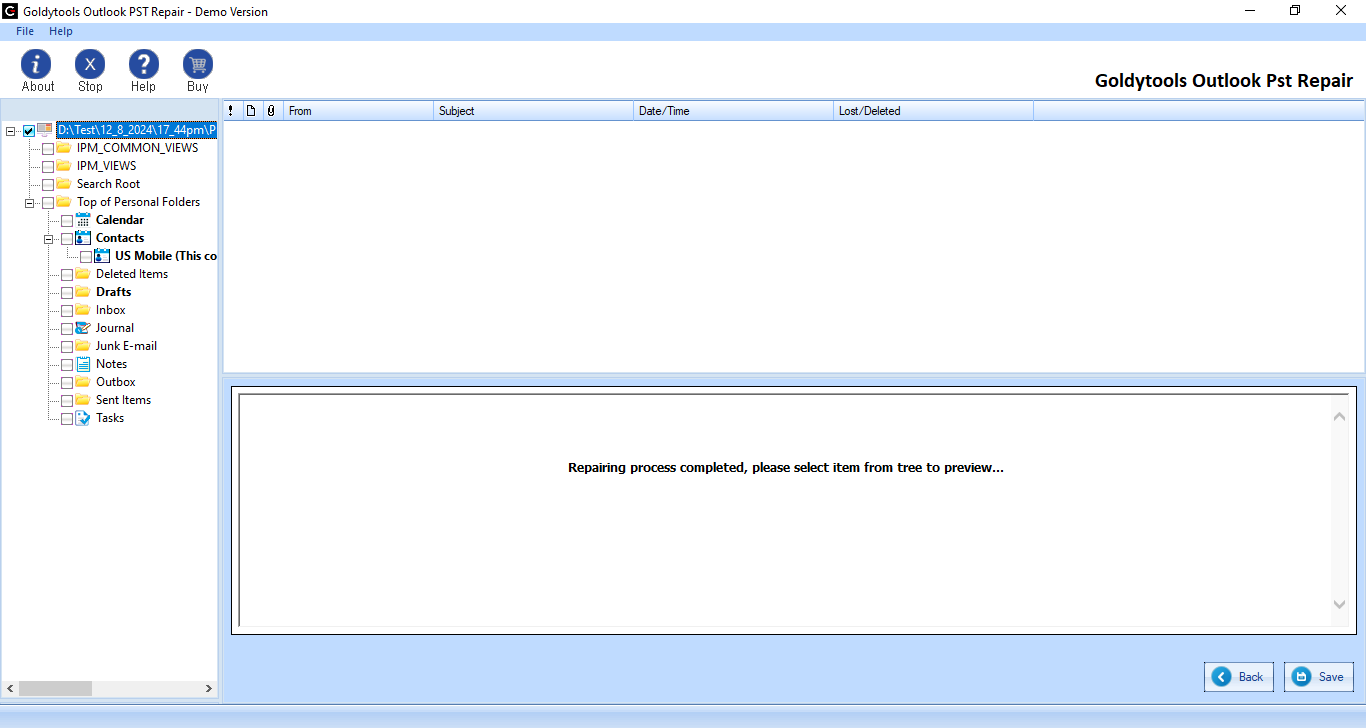
    Mounting Exchange database complex and risk corrupt EDB file So we maintaining reliable backup plan is necessary . Goldytools EDB to PST Converter tool provide a reliable solution for backup and restoring Exchange EDB file. If data base mount or dismount this tool recovery data form EDB file and save it safe location .It quick and effective recovery of data from Corrupted Exchange database file.
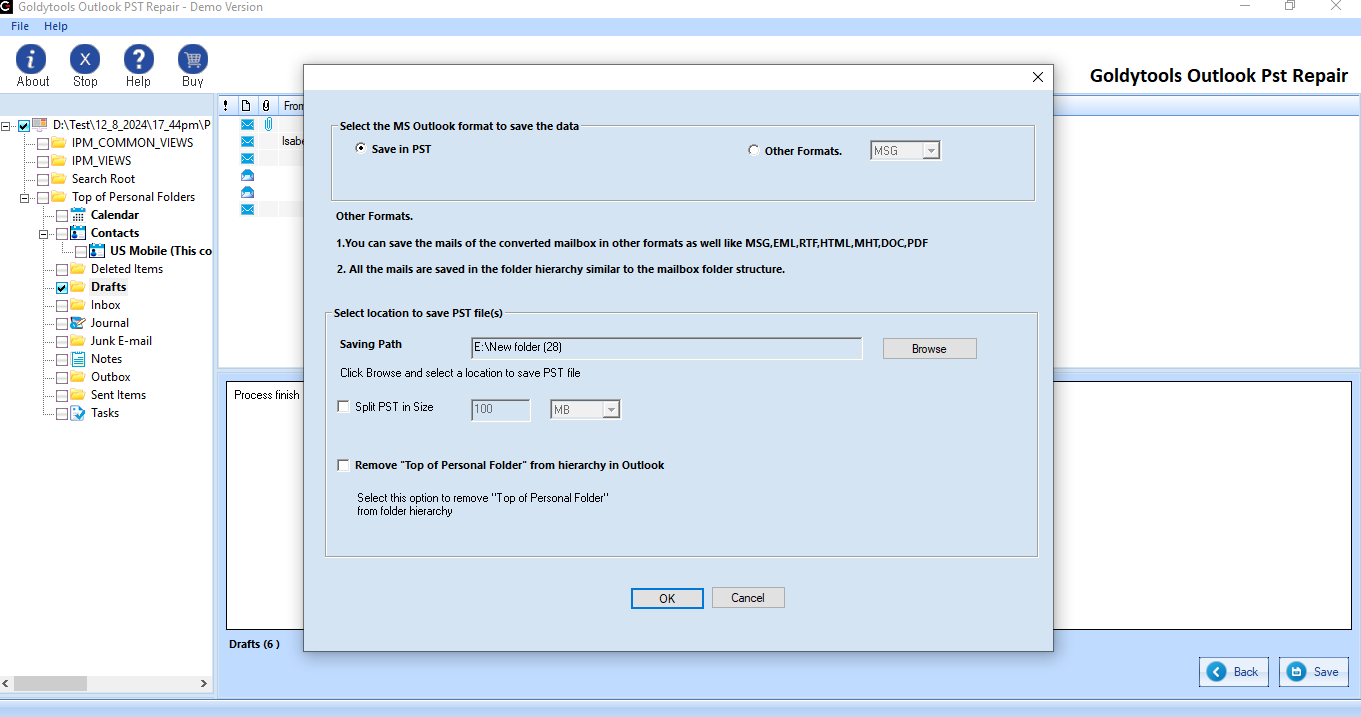
    Software export data into PST Format .Software provide advanced filter option, allow to user save specific mailbox items for export.
    If you need for mount or dismount Exchange database for any reason .it is very complex task to maintain it first take backup for file. In case if EDb file corrupted or inaccessible ,Goldytools EDB to PST Converter tool provide reliable solution to recover EDB data and save in PST Format.

    Conclusion

    If you need for mount or dismount Exchange database for any reason .it is very complex task to maintain it first take backup for file. In case if EDB file corrupted or inaccessible ,Goldytools EDB to PST Converter tool provide reliable solution to recover EDB data and save in PST Format .
    This Blog highlight common issue relative mount or dismount Exchange database file and provide practical solution to resolve it. Choose reliable and User friendly solution to Recovered corrupted EDB file. Company provide trail version which process 50 items per folder and explore its feature.

    Maintain Folder Structure in OST file Conversion

    When convert OST file to PST or other formats, user present with numbers of solution .Maintain original structure of folder during conversation it most important task .there are many method that only perform conversion efficiently but also retain folder hierarchy.
    we explore effective solution to preserve folder hierarchy during OST file conversion .Our goal provide you effective and reliable solution for convert OST file without disrupt folder structure.

    Why convert OST file?

    there are many situation where convert OST file become necessary .Given below some common reason why user Covert OST file

    Data Recovery and Backup

    Convert OST file to PST file effective way to backup important data such as emails, contacts, notes, calendars etc. Storing this backup in PST format smooth and reliable solution in case Exchange server become unavailable

    Accessibility and Portability:

    Ensure data accessibility and portability when convert OST file to PST is necessary .PST file easily share and open in Outlook and user access all mailbox data.

    Archive Data

    Convert OST mailbox to PST format is an ideal solution for archive email data.PST file easy to store ,manage and access without require connection with Exchange server.

    Smart Data Management

    PST file more flexible and control data management compare to OST file .With PST or Other Format like EML or MBOX user can organize and easily handle their data

    Migration

    Data migration and transfer are easier with PST and other format compare to OST .As a result user want to convert IOST file to PST format.

    Best Method to Maintain folder structure during OST file Conversion

    There are several method available for Convert OST file .Choose method which preserve Original folder hierarchy during conversion process .In this we explore most effective solution detail

    Technique 1:Use Outlook Import/Export Feature

    Simplest method for convert OST file is by Using Import/Export feature Of Outlook .This method require Original Exchange account link with OST file

    • Run Microsoft Outlook on Your system
    • Navigate File>Open & Export >Import/Export.
    • In Import an Export Wizard ,Select Export to file and click Next
    • Choose PST file and Click Next.
    • Select folder from OST file that you want export then click Next
    • Click Browse button and choose designation path where you want save new PST file
    • Choose Do not export duplicate items and click Finish

    Technique 2: Use Professional Tool

    OST file conversion that maintains original folder hierarchy ,using professional tool like Goldytools OST to PST converter .tool Designed to convert OST file without data lose. Tool handle OST file size and convert it PST or Other format such as EML,MSG,PDF,RTF,DOC ,HTML. Software recovered corrupted file and inaccessible OST file while maintaining data integrity and folder structure

    Conclusion

    In this Blog we discuss two method for convert OST file. we strongly recommended to Professorial Goldytools OST to PST converter for safe and accurate conversion.It preserve original folder hierarchy and email components .To know more about tool like feature and performance user use trial version which provide free of cost and save 25 items per folder.

    Top 6 situations where Convert OST to PST is Necessary

    Before describe key reason for convert OST file to PST format, first under about OST and PST file.

    Undestand Difference between OST and PST files

    Microsoft Outlook use email client that provide range features to require communication need for business and organization. Outlook powerful information manager. OST and PST file both are Outlook data file format which use to store mailbox data items such as emails, contact calendar ,task etc. both use for similar purpose But they fundamentally different . OST file work offline and automatically sync with exchange server when connect with exchange server .
    IF you use Outlook application , it create PST file to store mailbox data.PST file mainly used for PO3,IMAP, and web-based email accounts,
    OST file generated when your Outlook profile connected to Microsoft Exchange Server and Cached Exchange Mode enabled. OST file contains copy mailbox data local computer but it allow you to work in offline mode

    Why need for Convert OST to PST?

    Now a days OST to PST conversion tool Highly demand Due to OST file Corruption .Conversion play important role for mailbox recovery and data migration .below six condition where import OST file into PST.

    • Exchange Server crash
    • Microsoft Exchange Server crash due to many reason such as virus attack, software corruption, unexpect shutdown, or power failure. hen Exchange Server crash ,then connection failed between Outlook and server .Server recovery process take long time .In meantime an inaccessible OST file store on local system .If user want immediate access to mailbox data then use convert OST file to PST format is practical solution.

    • Change Job or Organization
    • If your Outlook profile previously connect Exchange server in Your Organization .if you have OST file which contain all mailbox data. After move other Organization OST become inaccessible .It works work same Outlook profile . Other system it not work .If you regain access your emails ,contact ,contact and other mailbox item from OST file then effective solution to Convert OST to PST format.PST file import into Outlook account then get all data easily.

    • Data Migration
    • OST to PST conversion become essential when an organization relocate other location.OST file not use other system it open only original configuration. if you want access OST file data then use OST to PST conversion after conversion PST file import into Outlook on any system.

    • Exchange Server Under Maintenance
    • Regular maintain of Exchange server is important for smooth operation. During maintenance , Exchange Server temporarily unavailable , which disrupt access mailbox data for user .In this condition user urgent access to mailbox data during server downtime .best solution Convert OST to PST format

    • Recovering Deleted data from OST file
    • Accidentally delete important mailbox data from OST file? download fresh OST file from Exchange Server then user get deleted items. But when data permanently deleted from Exchange server In such case downloading fresh OST file then fail to recover to deleted data.
      If user want to access deleted data then user use third party software which recovered deleted data.

    • Mailbox Corruption
    • OST file corrupted due to many reason such as virus infection ,hard disk failure, insufficient storage space or Exchange server crash .In such situation .Microsoft provide a built in repair utility . ScanOST.exe tool resolve only minor corruption issue. if OST file highly corrupted then ScanOST.exe tool failed to recovered to OST file . in such condition user use Professional Goldytools OST to PST Converter Which recovered highly corrupted OST file and Save PST file Format

      How to Export OST to PST file

      There are two method Convert OST file to PST format: manual and third party solution.
      Manual method free and useful in simple scenario .it provide serval limitation- such risk of data loss ,limited sized size handling, minor corrupted file recovered.
      Third party Goldytools OST to PST converter provide secure and efficient solution. These designed with advanced features which recovered highly corrupted OST file and recovered inaccessible OST file

      Conclusion

      This article provide overview about OST and PST file, their difference and functionality within Microsoft Outlook .Define top 6 most common reason why convert OST to PST become necessary .article define importance of third party OST to PST convert too. for reliable and secure conversion.

    Method for Fix OST file Synchronization Error

    OST file serve as backbone of Outlook .store and synchronize mailbox data with Exchange server. If Outlook offline then OST file allow user to access their data and work offline. OST file syncs automatically ,ensure that all your offline work update when once outlook connect with exchange server .In this Blog ,we explore manual method to OST file synchronization error .
    However it observed that when you open outlook and attempt to sync with exchange server mailbox then it fail to sync .it result many OST synchronization error messages show. Issue appear in Sync Issue log within Delete item folder .Such synchronization problem occur when one or more corrupted email message find in OST file .these issue not fix in sync process .In this blog we explain how to fix these issue.

    Common reasons for Exchange OST file Synchronization Error

    Synchronization error occur when connect an OST file to an Exchange mailbox .These error arise for different reason depending on Outlook version include 2003, 2007, 2010, 2013, 2016, and 2019.

    • Network connectivity issue primary cause of synchronization problems.
    • Downtime of Exchange server prevent Outlook success synchronization with exchange mailbox
    • Common factor include unexpected system shutdown ,large OST file, and malware or virus infection

    Effective Solution to resolve OST file Sync Error

    OST file in Outlook synchronizes with Exchange Server mailbox when stable connection with server available. Synchronization speed depending factor as data volume and Outlook version. This article explains various step to resolve synchronization issue ,including verifying user profile and check cached Exchange mode .Follow effective help us resolve error

    Check OST file Synchronization

    Ensure OST file sync correctly with Exchange server ,following these steps

    • Right -click folder which you want to check and select
    • Properties Navigate Synchronization tab If sync tab not visible ,it means Outlook profile not configure with offline folders
    • Select “Statistics ” option for folder and verifying following attributes

      Server folder contains: [Number of items in Server]

      Offline folder contains: [Number of items in OST file]

      Last synchronized on: [Date and time ]

    If No issue with OST synchronization ,items count in both server folder and offline folder same. If item values different ,it indicate a synchronization conflict between server and offline folder .then you follow these step verify Outlook profile settings

    In Outlook 2010,2007,2003

    • Navigate “File ” menu and select “Account setting ” then click “Account form ” again from dropdown list.
    • In “Data Files ” tab ,select your “Mailbox – [account name]” and select Change .
    • Navigate “Email tab ” select “Mailbox – [account name],” and click “Change.”
    • Ensure “Use Cached Exchange Mode ” option is selected ,then click “OK”
    • In “Account Settings” window, click “Close” to exit

    How OST file Synchronization Works with Exchange Server

    Now you use two methods for Synchronize offline Offline folders – Manual and Automatic .both resolve OST file synchronization issue effectively

    Manual Synchronization Method

    This method synchronize offline folder in Outlook version 2010,2013,2016and 2019

    • Navigate “Folder List” pane and select folder for synchronize
    • Navigate “Tools” menu select “Send/Receive ” then choose “Microsoft Exchange Server.” .select specific folder for synchronize
    • In Tools menu select “Send/Receive All” to synchronize all folder

    Once synchronization process begin ,a status message appear on Computer screen .If your mailbox contains many items and offline folder not synchronized for long time then synchronize process take long time it may take 30-40 minute

    Automatic Synchronization Method

    with method OST file automatically sync with exchange server each time Outlook connection establish.

    • Navigate “Tools” and select “Options”
    • In Mail Setup tab, Check box Send immediately when connected.”
    • In Send/Receive section, select “Send/Receive Groups.
    • Check option “Perform an automatic send/receive when exiting.”
    • Click close

    Use Professional to Resolve OST File Synchronization Error

    If you unable to resolve OST file synchronization issue , you use Microsoft ‘s built -in repair tool “ScanOST.exe” .These tool designed for repair issue related to OST and PST files. If these fail to resolve issue ,you can use Goldytools OST to PST converter tool .If you have Oversized OST file and corrupted OST file then these recovery oversized and corrupted OST file

    What Happen When tour OST file become too large

    An OST file stores offline copy of essential outlook data ,including email, contact, and attachment .Day by day message add in OST file and OST file size increase .If OST file not manage properly then OST file cross size limit and it effect outlook performance or even Application crash .In this blog we explore what happen When OST file become tool large and provide method to resolve these issue

    Top Reason why your OST file Become too large in Outlook

    There are several reason for OST file increase in size.

    • Sending receiving numbers of email daily basis
    • Storing email with heavy attachment (such as image ,video ,or document)
    • Regularly not delete or archive old email and along with not empty Deleted Item folder
    • If Outlook configure a large amount of email for offline

    All these factor contribute to increase OST file size

    What happen when your OST file become too large

    Oversize OST file generate various problem

    • Outlook unbale to open or load oversize OST file
    • Once OST file cross it size limit then no new add data with OST file
    • An oversized OST file disrupt many Outlook functioning
    • Large OST file easily corrupted

    What is maximum size limit for OST file?

    OST file size depend on version of Microsoft Outlook

    • Outlook 2007 Support OST file Up to 20 GB
    • Outlook 2010 and later Support OST file Up to 50 GB

    Once file size reach its size limit ,immediate manage and reduce file size

    How to Manually fix OST file too large issue in Outlook

    There are several manual method available to resolve issue in oversize OST file. applying these method for reduce risk of file corruption

    • Regularly remove outdated email from OST file
    • Download important attachment on your device and delete them from outlook.
    • Permanently delete item from “Deleted items folder” to free up space in OST file
    • Rename exist OST file and allow outlook regenerate a new OST file

    Disable or Remove Unwanted add-ins in Outlook

    When OST file Become too large ,it is important reduce size OST file to improve Outlook performance here is many method for reduce size of OST file

    • Once Outlook open ,follow these steps
    • click on file tab in top menu
    • Select option from sidebar
    • choose add-in from left hand menu
    • Next select COM add-ins from dropdown list and click Go
    • Uncheck all add-ins that not use and click OK

    Use Outlook Built -in too to Compact large OST files

    Reduce size of OST file by removing all unnecessary data. follow these step

    • First ,Navigate home tab in Outlook and open Deleted items folder
    • Right click on folder and select Empty folder for permanently delete it.
    • Next follow these step for compact
    • Click on Data file tabs ,then choose OST file and click settings
    • Next navigate Advanced tab and click Outlook Data file Settings
    • Finally click compact Now reduce OST file size

    How to turn off shared folder Sync in Outlook

    Shared folders in Outlook increase size of OST file size ,which effect Outlook performance Disable synchronization for shared folders by following these simple step:

    • Open Outlook and click on file tab
    • Next navigate Account Setting then select Account setting from dropdown menu
    • Under Data file tab ,select OST file file associate with account
    • Click setting then navigate advance tab
    • Next select Outlook Data File Settings and uncheck option Download Shared Folders.
    • Finally click OK ,then close and restart outlook application to apply changes

    Disadvantages of Using Manual Method

    Manual method resolve minor issue with Outlook OST file they have many limitation .Below give many draw back of Manual method

    • Manual method involve multiple steps and which take long time for complete it
    • If OST file highly corrupted ,manual method fail resolve it.
    • Risk of accidental data loss when use manual method

    Top recommended tool to repair and Manage OST file too Large

    Goldytools OST to PST Recovery is an effective solution for recovering corrupted OST file .It allow you spilt OST file into multiple smaller size of PST file which you size define in tool without data lose or technical complexity .Company provide demo version that include all feature and you save 25 items per folder .if you satisfied with demo version ,you purchase full software

    Conclusion

    Above we share multiple method to reduce size OST file .you are use either manual method and professional method for get data from corrupted OST file .we recommend using professional tool

    How to Fix Error Detected in Outlook OST file

    Microsoft Outlook use email client in Business world .it stores data in two primary file formats: OST and PST .OST file use in Microsoft Exchange Server to allow user to work offline .if any change made offline automatically synchronized with server once internet connection available.
    However when error detected in Outlook OST file .These issue arise due to various reason .Some common causes

    • File corrupted by software or hardware issue.
    • Virus or malware effect OST file.
    • Forced terminate of Microsoft Outlook.
    • Oversized OST file.
    • Failure Mailbox synchronization with Exchange server.
    • Improper System shutdown

    Manual Methods to Repair Error in Outlook OST File

    Resolve error detected in Outlook OST file ,Many effective method available ,Some common use list below

    Method 1:

    Create new OST file

    • Open Control Panel ,then navigate to User Accounts
    • Next ,click on Mail option
    • In Mail Setup dialog box ,click on Show Profile
    • Select desired profile name ,then click on Properties
    • Click on “Email Accounts” then go to Account setting section
    • Now click on “Data files” tab and select appropriate account
    • Next click on “Open file location ” to access OST file directory
    • Close all open dialog such as Account Setting and Mail Setup
    • Open File Explorer window ,delete corrupted OST file
    • When you reopen MS Outlook ,new OST file automatically create

    Method2:

    Create a New outlook Profile

    • Delete exiting Outlook profile associate with OST file.
    • Create new Outlook profile
    • Set new create profile as default profile in Outlook

    Method3:

    Repair OST file Using scanpst.exe

    • run ” scanpst.exe ” by administrator Credentials
    • Click browse button and open corrupted OST file
    • click start button for start process
    • If error detected then click on repair button to fix it
    • After repair process complete ,a confirmation message appear

    Using automatic tool to Fix OST file Error

    A simple and reliable method to fix error in OST file by use professional software Goldytools OST to PST converter. this tool designed for repair corrupted OST file and fix unnecessary error in OST file .Some important feature given below

    • Recovery corrupted OST file and export data other file format as PST,PDF,RTF,DOC,HTML,MHT,MSG,EML
    • Recover Outlook items as email, task, contact, etc.
    • Use date filter option to recovery on specific date which you need in OST file
    • choose two different recovery mode for OST file corruption
    • High speed scanning mode Support Outlook
    • encrypted OST file and accurate data recovery
    • Support all version of Microsoft Outlook
    • Support all windows version10, 8, 7, Vista, 2003, XP, and 2000.

    Step to Fix Error in Outlook OST File

    • Launch Goldytools OST to PST Software
    • Click open button then select Browse button and add OST file
    • Choose recovery mode -Standard ,Advanced mode and click OK button
    • Scanning process begin automatically
    • Once scan process completed click OK button ++Preview recovered item by click them
    • Now choose item you want to save and export them in Your desired format(MSG,EML,RTF,DOC ,HTML,MHT,PDF

    Conclusion

    The manual process to fix error in Outlook OST file complex and require technical expert .For quicker and more easy solution ,use reliable professional tool Goldytool OST to PST converted highly recommend .it repair corrupted and inaccessible OST file and save multiple format.

    EDB to PST Conversion – Migrate Exchange Data to Outlook

    If you looking urgent solution for Convert EDB file to PST format First you understand EDB (Exchange Database ) and PST(Personal Storage Table) files different to each other and open it respective application – Microsoft Exchange server and Microsoft Outlook .In this article we describe difference between EDB and PST file. guide you by two method to convert EDB to PST format.Microsoft Exchange functioning for Server-side platform while Microsoft Outlook operates as desktop email client.
    Microsoft Exchange Server platform designed for digital message and collaboration ,adopted by large organization .it is secure communication among multiple users within Organization by email , voicemail, text message .User access these services from desktop ,mobile device or web browsers.

    EDB (Exchange Database)

    An EDB file stores mailbox data such as email ,attachment ,calendars ,tasks ,notes ,notes and folders .It single client server architecture and serves as primary data for Microsoft Exchange Server
    PST (Personal Storage Table)
    PST file is Outlook data file used to store mailbox items include emails ,contact ,notes ,task and attachment .There are two types of PST file
    ANSI PST file- Used in order version of Outlook (2002 and earlier) with 2GZ size limit and limited chartered support
    Unicode PST – Used in Outlook 2003 and later version support large file size( upto to 50 GB or more) and full support Unicode character support
    Work with EDB file more complex and dependency on Exchange server enviroment.Outlook PST file are more flexible and user friendly .PST file easily backup ,transfer between system and access in any version of Outlook .Some time need to convert EDB file to PST format.

    EDB to PST Conversion

    Convert EDB files to PST format make it easier to archive data without unmount Exchange database or interrupt Organization .It allow to access data form old EDB file .There are common scenario necessary for EDB to PST conversion .Given below common scenario

    Scenario #1: Access Mailbox Data When Exchange Server Downtime
    Imagine Exchange Server unexpected crash and undergo maintenance .Repair process take long time if you urgent access critical mailbox data . In such case Convert EDB file to PST format then you access mailbox data using in MS Outlook – wait out wait for Exchange server to restore.

    Scenario #2: Data Portability and Platform Sharing
    In some situation when you need share mailbox data with user who not on Exchange Server or using different email client . Convert EDB to PST format is solution.PST file compatible with Outlook and easily shared to other system.

    Scenario #3: Archive Data of Former Employees
    When Exchange Server user leave organization and he want to get their mailbox data for future use .To store data in accessible format by Convert user mailbox from EDB to PST.

    Mailbox Merge Program (ExMerge Utility)

    Microsoft provide Mailbox Merge Tool known as ExMerge utility ,free solution for manage Exchange mailbox data .By using this tool administrator extract mailbox content from an Exchange server Either merge it other Exchange server or Export it to PST files format.

    Important Note:

    Ex Merge utility not available for Exchange server 2007 and later version, if you need it then you download from trusted source online

    How to use Ex Merge Utility for Export Exchnage Mailbox?

    After down load ExMerge utility ,install on your system and run ExMerge tool ,then login it by Exchange administrative privilage .following simple step for export mailbox

    Step1: Microsoft Exchange Mailbox Merge Wizard open and choose operation which you want

    • Extract and Import (One Step Procedure)
    • Extract or Import (Two Step Procedure)

    Extract or Import

    Select “Extract or Import (Two-Step Procedure)” option to perform both export and import operations

    Step2: you select “Extract or Import (Two-Step Procedure)” in previous step, now you choose option from two option

    • Extract data from an Exchange Server Mailbox
    • Import data into an Exchange Server Mailbox
    • Extract data from an Exchange Server Mailbox

    • Select “Extract data from an Exchange Server mailbox then click next to continue for extraction process

    Step 3: Data Selection Criteria window now appear .This window contain several tabs

    • Click Import Procedure tab .select option “Archive data to target store” and click OK.
    • Click on Message Details tab .Enter require inforamtion then click OK.
    • Finally click apply to save changes.

    Step 4: Now you see list of mailboxes user available on Exchange server .Select desired mailbox from list then click Next to process
    Step 5: By click Browse then choose location where you want to save new PST file
    Step 6: Now Migration process start and complete within a few minute.click finish to close Mailbox Merge (ExMerge) utility.
    Limitations of ExMerge Utility

    • Before use ExMerge utility ,you aware of its limitations. there are some certain drawbacks which given below
    • It not used on front -end Exchange server,it not contain mailbox store
    • ExMerge utility fail to process with mailboxes larger than 2GB.
    • ExMerge utility is lengthy and time-consuming process

    Goldytools EDB to PST Converter

    ExMerge utility fails to work properly , we recommended to using a professional Goldytools EDB to PST Converter tools for more efficient and reliable for Edb to PST converter. Goldytools EDB to PST Converter is powerful and user friendly tool .it scan EDB file component and allow user preview mailbox content before conversion.you easily save mailbox data into PST . It recovered inaccessible or corrupted EDB file . Before purchasing full version users download free demo to explore its feature and functionality .Demo version export 25 email items for each mailbox folder within selected EDB file

    Conclusion

    These article explore most common scenario where EDB to PST conversion must become necessary. we explained about ExMerge utility ,a free tool provide by Microsoft .But ExMerge Utility have some limitation So we introduce a professional too Goldytools EDB to PST Converter which advance and user -friendly

    How to Manually Convert OST to PST Files in Outlook

    IF you face challenge convert OST to PST format ,this blog provide you reliable and effective solution to help complete your conversion easily .It also provide every step convert corrupted or damaged OST file which inaccessible in Microsoft Outlook. Highly corrupted ,complete set of offline mail box data successfully recovered and converted into PST format

    Top Reason for convert OST file to PST format

    Common question arise in user mind Why it necessary to convert OST to PST ?There are several reason for conversion . Below some important factor for converting OST to PST format.

    Due to System crash or Failure

    MS Exchange Server face unexcepted issue as crash, system failure ,virus attacks and other error. Due to such issue user not able to connect to exchange server .in this condition outlook profile display many error .Convert OST file to PST format user get their data and resolve such issue.

    Accidental Deletion:

    Convert OST to PST provide recovery of mailbox data which accidentally deleted from Exchange Server

    Migration of Mailbox Data

    Convert OST to PST process of migrate data from one system to another system. This is beneficial when an organization plan to relocate other location then user transfer their data in new environment

    Unable to Access the Exchange Server

    Convert OST to PST is necessary during plan Exchange Server downtime or maintenance .In such condition user not access Exchange server and user not access their mailbox data . If user want to access their mail data then Convert OST to PST format.

    How can Easily Convert OST to PST files

    Several third party OST to PST convert tool available in market .we recommend that user first try manual method

    Manual method for Convert OST to PST
    Open Microsoft Outlook 2013 on your computer.
    click on file tab

    click on file tab and choose open and Export option

    click on file tab
    Select Open & Export tab and click Import/Export
    Select Open & Export
    After click on import /export option , a dialog box appear. Select on “Export to a file ” and click “Next” to process
    click "Next"
    Now select “Outlook data file (.pst) “and click Next to continue process
    Outlook data file
    Select folder which you want to export choose necessary file and click Next
    click Next
    Now select “Allow duplicates to be created” to export file and then click Finish to complete process
    click Finish
    After complete process ,dialog box appear prompt you to set optional password .Click OK and Outlook profile save in PST format at specified location
    optional password
    Conclusion

    Manual method used to accomplish this task.it not guarantee data security and risk data .Solution not successful approach when OST file corrupted.
    In such situation user can use third party tool like Goldytools OST to PST converter. Software recovered corrupted and inaccessible OST file .

    Free Method to repair corrupted EDB files Using Eseutil and Isinteg Utility

    Microsoft Exchange Server widely used email Server in Big Organizations .It stored data EDB file format which contain user mailbox items such as email ,calendar ,notes ,task ,message, etc .EDB file corrupted several reason such as virus attacks, jet engine error ,internal system issue etc
    there are two method for repair corrupt EDB files

    1. In Manual method use utilities like Eseutil and Isinteg
    2. Second Method use third-party tool

    Before using Eseutil and Isintg utilities ,you complete following steps

    • Log in Exchange Server administrator account
    • Create backup of current EDB database and store it in safe location .This backup important for you if original data base corrupted during repair process using Eseutil or Isinteg.
    • Delete or Relocate unnecessary files and folder to free space .after that make sure you have 20-30% of total storage available.
    • In case original dive lacks of sufficient free space then use appropriate command which move repairer data file to another drive with sufficient space
    • If you want to check available free space on disk then you search Application Event ID 1221.

    Use Eseutil & Isinteg for Repair Corrupted EDB file

    Use following instruction to repair corrupt EDB file use Eseutil and Isinteg utilities

    • Go Star Menu and choose run to continue
    • Enter cmd in Run dialog box and click OK
    • Navigate to C:\Program Files\Exchange Server\Bin
    • Now type Eseutil.exe in command Prompt and press Enter
    • Eseutil.exe support two recovery mode :/r for soft recovery and /p for hard recovery .
    • Use Esectil /p when data base highly corrupted or inaccessible
    • after repair corrupted EDB database using Eseutil/p command ,use Eseutil /d for defragment Exchange database
    • Run Isinteg.exe to check integrity of repair EDB database . USE following command ISinteg -s -fix teats alltests.Select recovery EDB file from Exchange server
    • Run Esetuil.exe until no error any error in Exchange server
    • Run Eseutil/G command to check integrity of EDB Database
    • Use Exchange server administrator too for remount EDB database

    This manual method for Repair corrupted EDB file is complex and not sure it recovered inaccessible database .to perform this process require strong technical expert. Any incorrect command then you lose database. Eseutil and Isinteg utilities not repair any database which corrupted by Jet engine errors or software-related corruption .To avoid risk of data lose then user use third part tool which recovery corrupted data base and recovery inaccessible data base

    Goldytools EDB to PST Converter

    Goldytools EDB to PST Converter provide many features designed for effortless and efficient data recovery. it recovery deleted , corrupted or dismounted EDB filed without any loss of data.

    1. IT recovery EDB filed without any change in original folder hierarchy and email structure.
    2. User add multiple EDB files in a single operation
    3. Tool provide split feature that allow user to divide large PST file into multiple small size files
    4. Goldytools EBD to PST Converter provide advanced filter and search option with user friendly GUI
    5. A free demo version is provide by company to evaluate software feature and functionality .Demo version allow conversion and save 25 items per folder
    6. It is support with all exchnage server Version include Exchnage 2010,2013,2016 and 2019

    Conclusion

    EDB file corrupted is common issue face by many Exchange Server organization. while Exchange server provide built -in utilities as Eseutil and Isinteg for recovery. these utilities have some limitations and drawbacks.In this blog we explore both method ,we recommended efficient and user -friendly solution -Goldytools EDB to PST Converter

    How To Fix Subfolder under Inbox PST file

    PST files contain email folder ,contact, personal information and other email data.PST file serve as backup files which use for export data from Microsoft Outlook. Outlook become important tool in Many people daily lives .So user face any issue Outlook then user feel frustrated .Common issue is when user find when PST file not display subfolder

    Common Reason why Outlook PST file Subfolder Missing

    • When PST file corrupted .Outlook fail to Show certain subfolder ,user unable to access important emails
    • Certain change Outlook View setting it generate some issue
    • Accidentally delete Outlook subfolder

    Condition describe above result in PST file not displaying sub folder in Inbox.

    How to fix PST file not displayed subfolder in Inbox

    • Repair PST file by Scanpst.exe
    • By change version Microsoft Outllook
    • Resetting View Setting in Outlook
    • Using Professinal Outlook PST Repair tool

    Scanpst.exe use to fix missing sub-folder in Outlook PST File

    Inbox Repair Tool(Scanpst.exe) is inbuilt utility in Microsoft Outlook which repair corrupt or damaged PST file. It is used recovered missing Outlook data ,include folder or email .Before use Scanpst.exe ,first close Outlook running application.

    • Run Scanpst.exe on your PC
    • Click Browse button to select PST file for repair
    • Add select PST file
    • After load PST file then click Start button for scan
    • Select option for create backup of scanning file before start repair.it create replica of Original file
    • Finally click repair button for Repair PST file
    • click OK to close Inbox Repair tool

    Following above step ,you can fix issue “PST file not show subfolder in Inbox “this method save and resolve error”

    Reset View Option in Outlook

    If above techniques fail to fix “PST file not show subfolder under inbox “. Then we use other method this issue generate by wrong setting of Outlook view setting not display subfolder correctly .Resolve issue by Outlook view option .Process reset view for proper Folder display.

    Now we check Inbox subfolder if same error again repeat ,it indicate that PST file highly corrupted and Inbox Repair tool is unable to repair it. If PST file highly corrupted then we use third party professional tool

    Trusted Solution for Corrupted PST file

    Now we Goldytools Outlook PST repair tool which recovery corrupted PST file and save it multiple format such as PST, DOC, RTF, EML, MSG, HTML, MHT Format

    How Recover corrupted PST file?

    Install and run Goldytools Outlook PST repair Software

    Goldytools Outlook PST repair

    Choose PST file for recovery it

    PST file for recovery

    Choose recovery mode Standard or Deep

    recovery mode Standard

    Scanning and Recovery process start

    Scanning and Recovery process

    Save recovery PST file in selected File Format

    Save recovery PST file in selected File Format
    Conclusion

    If PST file show error “PST file doesn’t show subfolders under Inbox”. For fix this issue we Manual Method and third party solution ,First we use manually method if file highly corrupted then Manual fail to repair this issue . At last WE use Professional software Goldytools Outlook PST repair tool for highly corrupted PST file

    How to Transfer an Outlook OST Data File from One Location to Another

    If user want to copy Outlook OST data file from one syetm to another another system like other file.it can not open ,access, and import OST file directly in Outlook . User want access data of OST then User convert OST file into PST format.
    OST file add to Outlook and if outlook in Offline mode then you access OST data .if you want to OST file move to new system. OST file data important data for every one which use outlook .But if you want access directly it other system not possible .there indirect method to achieve it . in this post we explore these method in this post.
    If you admin of Exchange server then you configure account in Outlook in new system ,You can directly down load data from Exchange server .Bt you want transfer OST file to another System then you first convert OST file to PST format file.

    How to find location of OST file

    If you configure With Exchange server ,IMAP ,or Office 365 account you can find location OST by Outlook Account setting then get OST file path.

    1. Open MS Outlook and select File Option
    2. In Info section ,select Account Setting option .then select Account Settings
    3. In account setting window .select account associate with OST file . then click Data file tab and select open File Location
    4. This open folder where your OST file are store

    Copy OST file to USB derive from default location and transfer to other computer
    If Outlook application not functioning properly ,you can access OST file by Control Panel.
    After transfer OST file to another system you was not open it manually in Outlook .Outlook support only PST file .if you access mailbox data ,First you convert OST file to PST file.
    If you want to use the same account with available content of mailbox then export it as PST file and then transfer this PST file into Outlook application.

    Export mailbox data to PST file

    • Open file in Outlook
    • In Open & Exportation ,select Import/Export
    • Select Export to file option ,then click Next button
    • Select Outlook .pst file and Click Next
    • Select folder which you want to transfer account .Then click Next
    • Choose exclude duplicate items. then select destination for export PST by browse button .Press Finish button for completes process

    After export PST file ,you can import it using same process

    Import PST file to Outlook

    • Go to File Menu Microsoft Outlook
    • Click on Open & Export then select Import/Export Option
    • Select Import from other application .then click next button
    • Use browse button to add PST file and click OK button
    • Press Finish button to Complete import process

    Conclusion

    User need to convert OST file data to PST file when user want use same account to other Computer .First create account in Outlook on other computer then automatically create mailbaosx folder .then you import PST file from old System
    If Outlook file not working .then you use Professional Goldytools OST to PST converter Tool to convert which convert all OST file to PST file.

    Convert Encrypted OST files

    OST is Important component of Microsoft Outlook that permits user to work offline.it store mailbox data local system and automatically synchronizes with Exchnage Server Once connected to it. If OST file become inaccessible or encrypted ,then user loss their important data. there are reliable method available to repair or convert damaged or encrypted OST file into PST Format.
    Before exploring solution for convert encrytpted and password – protected OST file.First understand OST files become inaccessible or encrypted

    What is OST file and how it become inaccessible or encrypted?

    OST file is a local copy of mailbox data store on system when outlook is connected Exchange mode. it enable user to to access ,view, and modify their mailbox data as email, contact and calendar when it offline . if any change done it OST file offline mode. when OST file connect to Exchange server change automatically synchronized with sever.

    Common reason why OST file become inaccessible and encrypted

    • Issue with exchange server ,like hardware or software error
    • Unexpected delete of user profile and mailbox data
    • reason Hardware of software problems
    • Encryption of OST file by user or by organization security policies
    • Effective Method for Repair and Convert Inaccessible OST files.
    • Repair and Convert Inaccessible OST file is not easy task .it require a certain level of expert and technical knowledge .There are many reliable method available that repair and convert OST file to PST file format

    Method 1:Repair OST file by Scanpst.exe or Inbox Repair Tool

    • Scanpst.exe built in Microsoft Outlook to repair mirror issue in OST file.
    • First closed Microsoft Outlook and then Control Panel
    • Click on Programs and Features then select Ms Office from program.
    • Choose “Change” then select Repair Option
    • Follow instruction to complete OST file repair process

    Method 2: Exchange Server mailbox Using Mailbox Export Request

    If user have Exchange Server administrative privileges and Exchange Management Shell then they use Mailbox Export Request feature to transfer data from an OST file to PST file . Follow Below step one by on

    • Open Exchange Management Shell and run following command:
    • Exchange Management

    • Replace “User ” with actual username and \\Server\Share\user.pst with full network path name and file anme
    • Press enter for mailbox export request
    • Wait for Process finish it take time depending on mail box size.

    Manual Method Draw Back

    • It take time for Large OST file or Highly corrupted OST .It takes several hour completed repair process
    • Manual method not recovery data from encrypted or Corrupted OST file. Inbox Repair tool repair minor issue
    • In Many method have risk of data loss and it change database structure.

    Best way Convert Encrypted OST file without data loss

    User use professional OST to PST converter tool which available on line. Goldytools OST to PST converter most reliable and effective solution with user friendly interface which recovered Encrypted file and Corrupted and Save in many file format as EML,MSG, PST ,PDF,HTML,DOC,RTF

    Conclusion

    OST file become inaccessible or encrypted .it effect workflow and on Outlook performance .in this post we discuss both method manual method and Professional Goldytools OST to PST Converter .In Manual Method have data lose risk and some limitation .So we recommended user use professional tool which recovered encrypted file or password -protected OST file.

    Why and How to Convert PST Files to MSG Format?

    How and Why to Converting PST file to MSG

    Email become universal tool for communication with client. Microsoft outlook store mailbox data in PST format .It contain entire mailbox ,including emails ,contact ,task ,calendar and etc.MSG file represent a single item – such as email, contact, or task -preserve all associate property.MSG file are smaller ,easy to manage and many user want to convert PST files into MSG file for improve management .
    if you looking for Convert PST file to MSG format? This blog guide you effective method for Converter PST to MSG format. We explore why need for Convert PST to MSG format

    Reason for convert PST file to MSG format

    there is not specific reason for Convert PST file to MSG format .Several advantage for converting PST to MSG .Below some common reason why user choose to Convert

    1. MSG file easy to manage because small size. Whereas PST files are large and complex and not easy to transfer
    2. By Convert PST to MSG format ,user can extract specific emails and manage important message
    3. This conversion allow user to create backup of select emails by saving them in MSG Format
    4. IF PST file corrupted and unable to access it. Convert PST to MSG format recovery it and preserve contents of file.

    Effective Method to Export PST Data to MSG File

    Now we cover why convert PST to MSG file is beneficial .In this blog we describe to method : manual method and professional tool

    Manual Method for converting PST to MSG format

    Microsoft Outlook allow user to save PST email in MSG Format. Follow these step for Manual Method

    1. Lauch Microsoft Outlook on your system
    2. Navigate File>Open & Export and select Open Outlook Data file to access PST file
    3. Open & Export

    4. Choose PST file that contains email to export to MSG Format.
    5. Now Select email you want to convert to MSG format.
    6. Once select emails ,simply drag and drop it onto desktop or any folder to save
    7. Email save in MSG format ,which open without Outlook.

    Follow these step user convert a few email from PST file to MSG format .For larger conversion ,process time consuming and difficult . For efficient and reliable solution for Conversion PST to MSG file we recommended for Goldytools OST to PST Converter Tool.

    Easy to Use tool for Converting PST to MSG file.

    When you convert large volume of emails from PST to MSG Format using reliable tool like Goldytools Outlook PST Repair tool (PST to MSG Converter ) This software handles any Size of PST file or email count without limitation .It recovered corrupted and Inaccessible PST fileIt also maintains meta property during process and data integrity.

    Understand OST file Corruption Reason and Solution

    Microsoft Outlook most popular and widely used email client .OST file allow user to work with their mailbox data when it Offline. Outlook configure with Outlook 365 and store their mailbox data in OST file .These files sometime corrupted due to many reasons .
    In this Blog we explore most common reason for OST file corruption and share solution to fix these issue

    Overview of OST Files?

    OST fie are contain copy of user mailbox data which store on Exchange Server. OST fie are contain copy of user mailbox data which store on Exchange Server.OST file enable user to access their mailbox data while offline, local store data continue available of mailbox content. Once Outlook connect with Exchange server then OST file automatically synchronizes with server mailbox .This functionality appears convenient

    Common reason for OST file Corruption

    Some time OST file interrupted during synchronization process due to poor or unstable internet connection -it become corrupted .Once OST file corrupted then it effect on Outlook performance .
    there are many common reasons for OST file corruption .which categorized into hardware and software -relative reason

    Hardware – Relative causes of OST file Corruption

    These issue arise from improper configuration ,failure in computer hardware component as Hard drives ,RAM ,power supply

    1. Network Disruptions
    2. Storage device Failure
    3. Bad Sectors on Disk
    4. Sudden Power cut

    OST File Corrupt due to Software failure

    Problem reason by logical inconsistencies classify as software relative issue .these error occur when software bug ,virus or malware infection ,application crash or install software from untrusted source.

    1. Limitations within Outlook Application
    2. Unexpected Close Outlook
    3. Storage limit in Outlook

    Top six solution to fix OST file Problem

    Method 1: Launch Outlook in Safe Mode

    Main purpose of starting Outlook in Safe Mode is to disable which cause error during startup. Now Outlook lauch safely without any corrupted add -ins or files. Open Outlook in Safe Mode ,use command :outlook.exe /safe.

    Method 2: Update Folder Contents

    This method involves change folder property to resolve issue inaccessible OST file.it applicable only Outloook2010

    1. First Right -click folder and select property .
    2. A Dialog box appear .Click on Clear Offline items then click OK
    3. Next On Outlook 20210 ribbon ,click Send /Receive
    4. Finally ,click Update folder to apply and save setting.

    Method 3: Turns Off Firewall settings

    user can temporarily disable antivirus application and fireball setting and they scan all incoming and outgoing emails. these windows functioning block Microsoft outlook .To resolve these issue , it recommended to disable security setting and restart Outlook.

    Method 4: Reduce OST file Size

    A large OST file generate various issue ,Such outlook performance and File corruption .after delete items they remain in Deleted folder .
    Delete item from “Deleted Items” folder individually its time consuming process .By compressing OST file ,you reduce extra space take by deleted items.

    Method 5: Utilize Scanost.exe Tool

    Microsoft provide ScanOST.exe tool scan all mailbox items in OST file stored in Exchnage server by using ScanOST.exe resolve minor corruption issue . OST Integrity checker available only in Outlook 2007 ,outloo2010 and later version .But In newer version of Outlook ,if you use ScanOST.exe to fix error in OST file

    Method 6: Professional Software

    If Manual method not resolve issue then use professional tool. Goldytools OST to PST converter is repair corrupted OST file and save in different format Such as PST,EMLMSG,DOC,PDF,RTF,HTML,MHT
    Tool provide fastest scanning speed and compatible all version of Outlook .You use free demo version

    Conclusion

    I have describe all solution relative OST file corruption file. When yoiu face OST file corruption then you use these method .Goldytools OST to PST Converter highly recommended which recovered corrupted OST file without any lose.

    Free Methods to Extract Emails from OST Files Quickly

    Free Solution for Extracting Emails from OST files

    In blog we demonstrate how to extract email from OST file .Here we discuss about both manual and third party tool .;Microsoft Outlook store data in two format : OST file and PST file.OST file allow offline access to mailbox data ,PST file use for store email ,contact ,calendar ,etc.

    Manual Techniques for Email Extraction from OST file

    Method-1 :Use MS outlook ‘s “Import/Export Option” for Extract Email

    Follow steps below to export data from Outlook using the Import/Export Option

    1. Open MS Outlook on Your system
    2. Click on File and select Open & Export tab
    3. Next ,Select Import/Export option
    4. In Import/Expot Wizard ,Select “Export to a file ” and press Next
    5. Select data for export as PST file and Click Next
    6. Finally Select destination for export file and click Finish.

    Note: This process require connection to Exchange server

    Method-2 Extract Email from OST file with Archive Feature

    Use follow step to save email on your system

    1. Open MS Outlook
    2. Navigate File and select Option from menu
    3. In Options Window ,Select Advanced tab
    4. Next click on AutoArchive Settings options in AutoArchive section.
    5. Configure archive setting and click OK to apply

    Note: You can not extract contacts from OST files using this technique.

    Method-3:How to Extract email from OST file use Drag & Drop Option

    Use drag – and drop feature in Outlook to save email items ,including contact and other data fom OST file

    1. Open MS Outlook and Select email to save .
    2. Next drag and drop select email to destination and they save as separate .msg file

    Note: Msg file can accessed using outlook or any EML Viewer
    Above process can time- consuming and repetitive ,Require multiple step until full process completed

    Professional Method for Saving OST file Email

    Goldytools OST to PST Converter is recommended ease and reliability solution for extract email from OST file. This tool convert OST file email to multiple format such as PST ,EML, MSG, DOC, PDF, RTF, HTML, MHT.it provide advanced features such as Data range and split PST t option.This software recovered and restore corrupted OST file and inaccessible file

    Conclusion

    This blog cover four method – three manual and one professional method for extract data from OST file. Manual method have some limitation and time consuming .Professional method quick ,reliable and user friendly and Migrate Large volume of data without any limitation.

    How to do Exchange EDB to PST Recovery?

    How to Recover Exchange EDB Files to PST Format

    Exchange EDB to PST Recovery is important process drive by many operational and Administrative need. EDB file store mailbox data including email, calendar ,contact etc . On other hand PST file use by Outlook for store mailbox data from POP3,IMAP, and web -based email account.

    Reasons for Converting EDB Files to PST

    Reason for Exchnage EDB to PST Recovery very from user to user ,but many common scenario include

    1. Large mailbox size reduce Exchange Server performance if user export mailboxes from EDB to PST is one effective solution for reduce EDB size and improve Exchange
      server efficiency.
    2. Since EDB files are susceptible corruption and Export data from EDB to PST file a reliable option.
    3. if user retain data from EDB file, export it to PST is professional solution
    4. What are method use for Exchange EDB to PST recovery

    5. Two method for recovery Exchange EDB file, First manual Method and Second third party tool .Now we discuss about Manual method
    6. Step 1:login to Exchange Admin Center(EAC) using administrator credentials
      Step 2:Navigate “Permissions” tab ,Then select Admin Roles
      Exchange Admin Center

      Step 3 Navigate “Recipient Management” and select (+) Add button.
      Recipient Management
      Step 4:In Role Group Wizard click (+) button under Roles section

      In Role Group

      Step 5:Select “Mailbox Import Export” option and select add and then click “OK ”
      Mailbox Import Export
      Step 6:Under Recipient Management, Select on “Mailbox Import Export”
      Recipient Management
      Step 7: Step Navigate to “Recipients” section , select Mailboxes and choose mailbox you want to export .Click More option and Select “Export to a PST file.Export to a PST
      Step 8 :Click “Browse” mailbox you want to export
      Step 9:Enter path to Share folder
      Enter path
      Step 10:Enter path to Share folder
      Enter path
      Step 11:Finally select mailboxes to receive notification after successful export .Click “Finish” to begin process .Now data of EDB export to PST file
      export to PST file

    Operational Limitations of Manual Methods

    1. Manual recovery of EDB file to PST is complex and data lose risk that require technical know about Exchange server
    2. The manual method is time consuming process .
    3. Manual Method size limitation ,it not support large number of mailboxes.

    Professional EDB to PST Recovery Solution

    Recovery of EDB file then you use third party tool which recovery corrupted EDB file and delete data. Goldytools EDB to PST Converter is specifically design for this purpose. IT provide advanced feature with user -friendly interface.

    1. It provide fast and efficient recovery of Corrupted and healthy EDB file.
    2. No size limitation of EDB file ,It recovery any size of EDB file
    3. Tool maintain data integrity and preserve original folder hierarchy .
    4. Tool provide option to split PST file based on user defined size limit

    How to Configure Deleted Item Retention in Exchange Server?

    Managing Deleted Item Retention in Exchange Server

    Manage deleted items is important for maintain Exchange Server environment .When user delete emails – by pressing Delete ,using Shift+Delete and empty Deleted items folder – data move to Deletion folder. Duration these items recoverable depend on Deleted Items Retention setting configure for mailbox or Exchange Database. Exchange Server retains deleted items for 14 days . Retension period can customized to any value between 0 and 24855 day.This blog explore about setting about configure deleted item retention in Exchnage Server using Exchange Admin Center (EAC).If your Exchnage Database file corrupted during configure process .you can use Goldytools EDB to PST Converter Tool to restore mailbox data from corrupted and Inaccessible EDB Files

    What information user Know Before starting

    1. Configuration process take approximate five minute
    2. Permission assigned before you can start procedures .First we check available permissions refer to Messaging Records Management entry under Messaging Policy and Compliance permissions in Exchange Server
    3. Verify that your Exchange server functioning working properly
    4. Next select number of deleted items day :this setting determined time duration deleted items are retained before permanently removed and user can not restore it.Note:default retention period 14 days.you manually adjust this setting between 0 to 24855
    5. Select Option Don’t permanently delete items until the database is backed up.

    Step to Configure Retention Setting for Exchange

    1. Navigate Server then select Database
    2. From List mailbox databases, select require mailbox database and select Edit Icon
    3. In mailbox database property wizard then select one of following option
    • Keep deleted item for :14 days default, Manual select duration between 0 to 24855
    • Please check option Don’t permanently delete items until the database is backed up.
    • Finally Deleted item retention configuration complete

    How user configure Deleted item Retention for mailbox?

    Configure deleted item retention for mailbox, by use Exchange Admin Center and follow step carefully

    1. In Exchange Admin Center ,go to Recipient and then click Mailboxes
    2. From list of mailboxes ,select desired mailbox and choose Edit Icon.
    3. Once mailbox properties page open ,navigate Maibox usage and click More option .then select of following option
    4. Use default retention setting configure in Mailbox database
    5. Next process to configure delete item retention setting for mailbox.

    Conclusion

    This blog explore delete item retention and provide step intruction on configure deleted item retention by Exchange Admin Center in Exchange Server. IF EDB file corrupted or damage then use Goldytools EDB to PST tool .which recovery corrupted EDB file and Demo version provide you converted 25 items per Folder

    Outlook OST File Size Not Reducing After Archiving Error – Fix it

    Not Reduce OST file size after Archiving Error fix

    Growing size of Microsoft Outlook data file common issue due to its use for email communication for across organization. If user delete email items but OST file doesn’t reduce .This result error “Outlook OST size not reducing after archiving .”So there any solution to resolve this issue . Yes there are many strategies to handle it. Most reliable solution conversion OST file to PST format for backup .Use professional tool OST to PST Converter tool is permanently solution for this issue

    Manual Method to fix “OST File Size Not Reducing After Archiving” issue

    we explore manual method to resolve issue of OST file Size not reduce after Archiving

    Method1 :Reduce Outlook’s mailbox manually

    To reduce size of Outlook mailbox user’s use Mailbox cleanup tool .this utility help user view total size mailbox and size of individual folder. Below following step you can reduce and manage size of your mailbox size.

    1. select on file Tab
    2. Next select tool and then choose Mailbox cleanup
    3. After this .choose any of following action
    4. To view size entire mailbox ,select on View-mailbox-size

    If you want to find older emails, do following

    Method 2:Reduce size OST data file

    OST file linked with Microsoft Exchange Server account. OST file not delete automatically ,even when item removed from server .Shrinking files a practical solution to improve Outlook performance and reduce size
    If you want compact OST file following these step

    1. Delete unnecessary emails
    2. Then open Folder list view
    3. Bottom of navigate pane Click Folder List icon. you can press CTRL+6 for it.
    4. Next, Right – click on Deleted items folder in Navigate Pane
    5. Then Click on Empty folder then select File > Account Settings.
    6. Once completed click on Data files tab and select file you want to compact
    7. Next select on setting then navigate Advanced tab and choose Outlook Data File Settings.
    8. Click Ok
    9. Outlook not need to open during process of compact Offline OST file Process .
    10. if you need delete any both offline and online folder ,follow these step
    11. Select setting then navigate Advanced tab and choose Outlook Data File Settings.
    12. Select item which you want delete
    13. Next click Delete

    This Manual Method resolve issue of Outlook OST file size not reducing after archive .It require technical expert and this process time consuming and complex with risk of data lose if all step not perform carefully

    Professional Method

    For resolve issue of Outlook OST file size not reduce after archiving ,you need use Goldytools OST to PST Converter tool this with user friendly inter face and not need technical expert.

    Conclusion

    In this blog we explore both manual and professional method for solve issue .Manual Method need technical expert and time consume where as professional tool provide easy and secure solution .so we recommend you to use professional too.

    Repair Outlook PST files using PST Outlook Repair Tool

    Repair Outlook PST Files with the PST Outlook Repair Tool

    If you look for repair Outlook PST file but you are not more knowledge about it don not worry in this blog we discuss about it .Goldy provide you Goldytools Outlook PST repair too which recovery to corrupted PST file and Inaccessible PST file. it automatically detect and scan corrupted PST file, repair and restore all data with preserve original property

    Key Feature Of Goldytools Outlook PST Repair tool

    If you want to get high quality result form PST Outlook repair then you choose reliable and more feature tool .Tool which retrieve lost or deleted mailbox data and provide flexibility to export recovered data in PST,DOC,PDF,MSG,EML,HTML,MHT,RTF format.

    • Easily and quickly repair corrupted Outlook PST file
    • Restore corrupted PST data in multiple format including PST EML,MSG,HTML,RTF DOC,PDF,MHT
    • Repair PST file of any size without limitation
    • Recovery parentally deleted or lost Outlook items
    • Provide option split large PST file as per specific requirements
    • Preserves folder hierarchy and doesn’t change original property
    • Recover all email details include body content, CC, BCC, subject, date and time
    • Tool support all version Outlook and Windows Operating System
    • Provide life time free technical support

    Efficient solution to Repair PST file of any Size

    With Goldytools Outlook PST repair tool you repair PST file .It quickly sans and allow user to recover PST file without any size restriction .Tool provide option to split Outlook PST file as need

    Preview PST Files Before Recovery

    User convenience of previewing items before repair PST file. By Using Our tool User view source mailbox folder which file add ,you full visibility into content .User can preview folder item including message body ,items property ,recipient details and attachment.

    Recovery of permanently deleted Outlook items

    Advanced scanning capability of Goldytools Outlook PST repair tool enables deep scanning and recovery of permanently deleted items . User preview recovered content – including email ,attachment etc ,before restore .this feature support of deleted attachment.

    Save Email items in Multiple file Format

    After repairing PST user save recovered items in PST ,MSG,EML,RTF,DOC,HTML,PDF,MHT format .tool recovered corrupted and inaccessible file and save it multiple format

    Preserve original metadata of recovered item

    Outlook PST repair tool designed for recover and restore all type Outlook data items .Tool retain all property of email including CC, BCC, Contact, attachment ,Task- so user retrieve their their data original form .Tool also preserve original folder hierarchy to maintain mailbox structure